25 Formal Hairstyles for Long Hair for Special Days
Struggling to choose the right look for a special event? These formal hairstyles for long hair make it simple to find something that actually suits you. Whether your hair feels too flat, too thick, or just hard to manage, the right style can change everything.
This guide is all about helping you pick styles that work in real life, not just in photos. From sleek ponytails to soft buns and flowing waves, each idea is designed to be practical, wearable, and easy to follow. I’ve noticed that the best styles always come down to balance something neat combined with something soft.
You’ll find options for different hair types, face shapes, and occasions, along with simple tips that make styling easier. If you’ve ever felt unsure about what to do with long hair for formal events, this will give you clear direction and ideas worth trying.
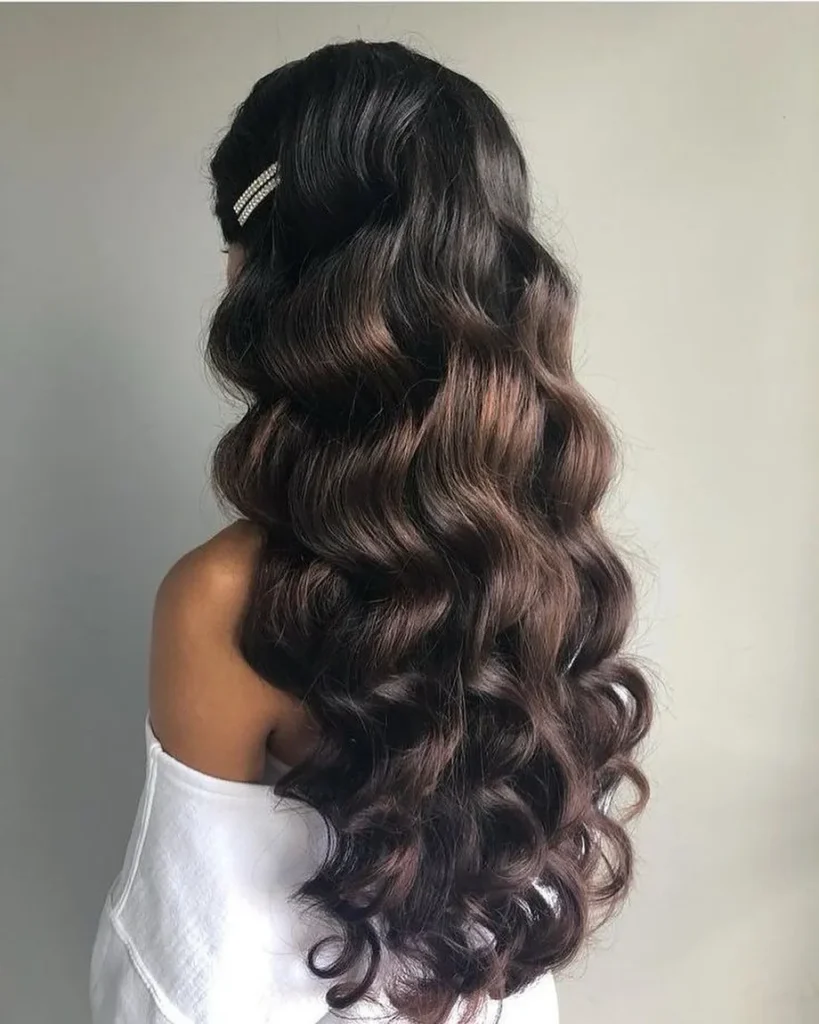
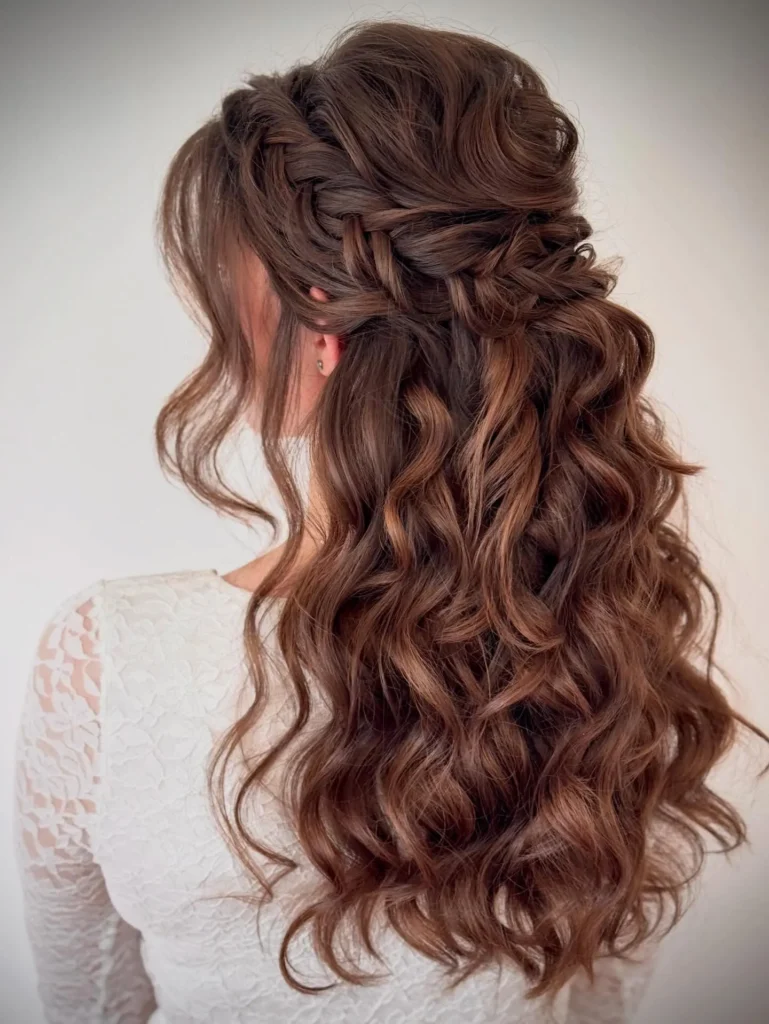
1. Twisted crown cascading glossy waves

Source: sierra_lynn_styles
Don’t twist the crown too tightly, that’s where most people go wrong with this one. The top section should feel secure but loose enough that it blends into the waves below. When that balance is right, the whole style looks put-together without any stiffness.
Curl with medium sections so the waves don’t turn too tight or too flat. After curling, brush through lightly with a wide paddle brush to soften everything. Lift the crown just slightly before pinning so it doesn’t press flat against the head.
Avoid pulling the twist too hard or the top starts looking stiff. Leave a few thin strands loose near the sides to keep the face framing relaxed. That little looseness is what stops the whole style from looking overdone.
2. Romantic loose bun delicate tendrils
Source: hair_by_nataliemarie
A bun that looks like it came together in ten minutes is sometimes the most charming one in the room. Sections gather loosely at the back while a few strands fall near the face without being placed too carefully. The shape stays airy but still holds through the day.
Build some texture into the hair before you start, smooth hair won’t give the bun any fullness. Pin in small layers instead of wrapping everything into one tight knot. Keep the base sitting a little lower so it doesn’t look too formal or stiff.
Skip curling the tendrils too tightly or they start looking overdone next to the loose bun. Let them fall in uneven pieces instead of matching curves on each side. That slightly uneven finish is exactly what gives this style its charm.
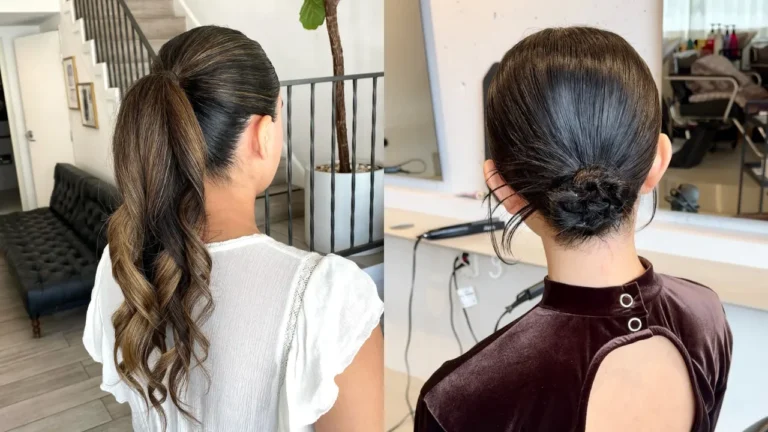
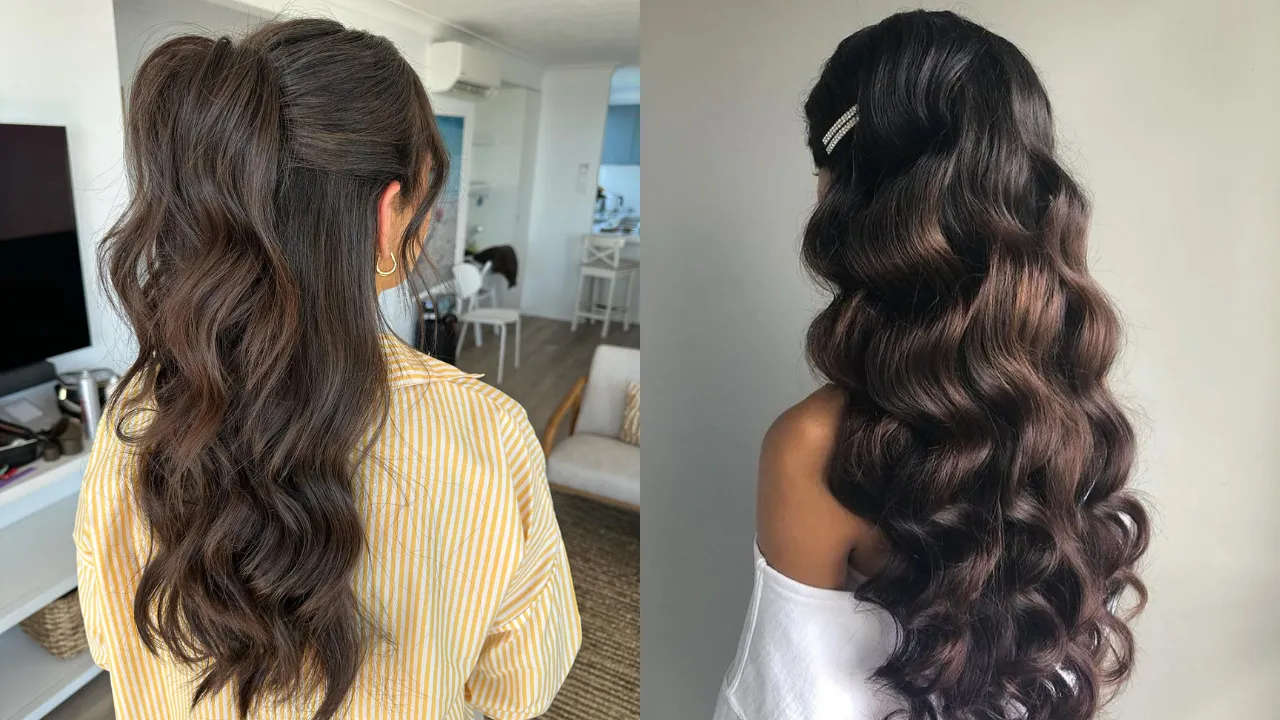
3. Sleek low ponytail voluminous ends
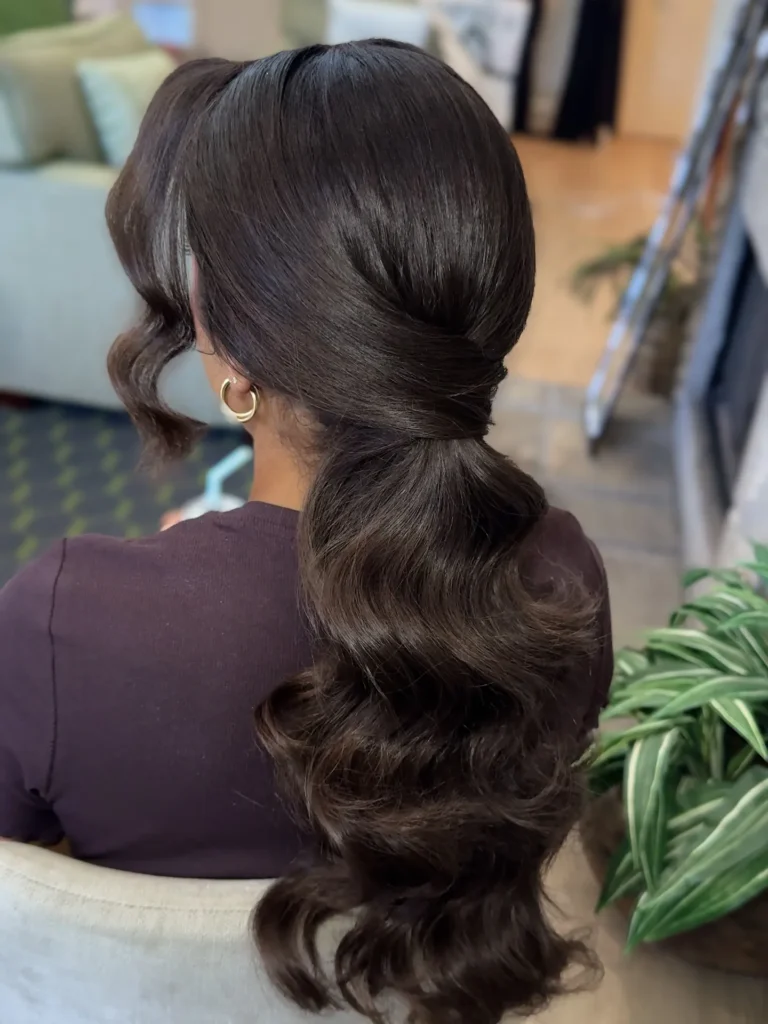
Source: lissetcuevasartistry
Getting the top section smooth is the first and most important step here. The crown stays flat and clean while the ponytail does all the work with volume and shape below. It reads minimal from a distance but has a lot going on once you look closer.
Use a boar bristle brush with firm tension while pulling the hair back to avoid any bumps. Once secured, only add waves through the bottom half of the tail. Keep shine spray focused on the top where light hits naturally rather than applying it all over.
Avoid adding too much product near the roots or the whole style can feel heavy. A light touch at the crown keeps everything sharp. Controlled shine always reads cleaner than coating the full length.
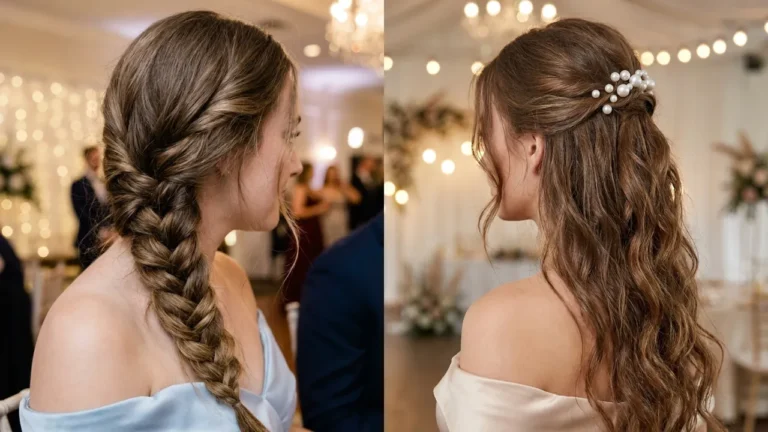
4. Half-up lifted curls statement style
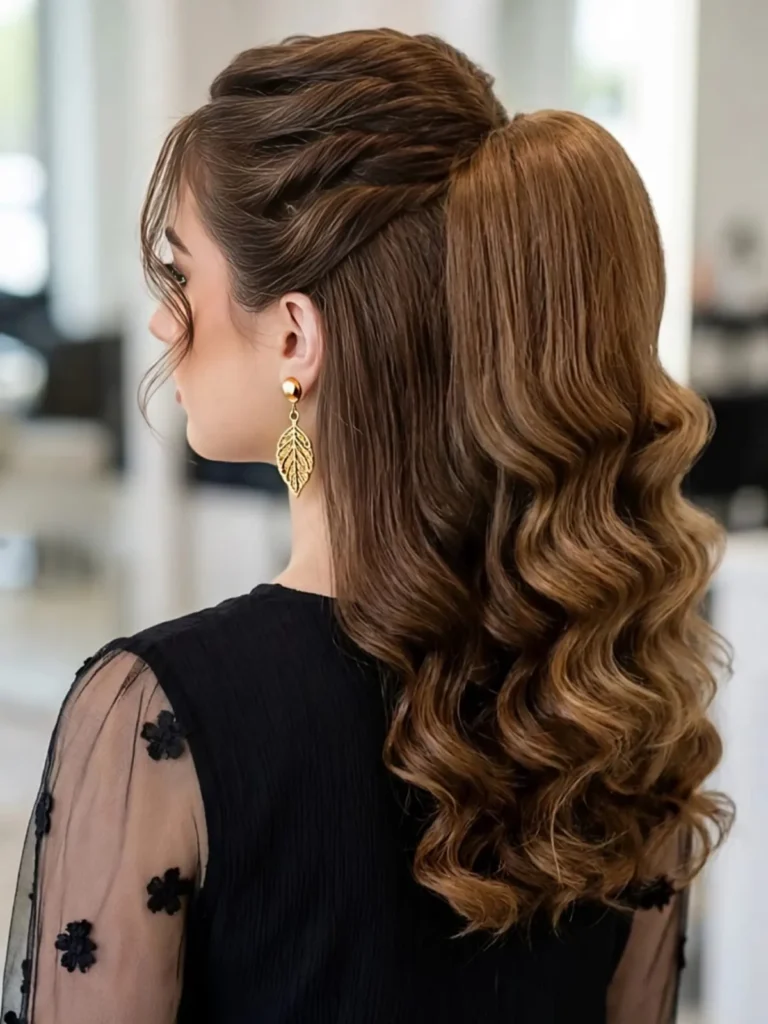
Source: saloon_albanafsaj
Flat hair at the crown kills this style before it even begins. The top section needs height without that lift, the whole shape collapses into one heavy layer. When the crown sits up and the curls hang below with spacing, the contrast is what makes it work.
Backcomb only at the roots, then smooth over the surface lightly so the volume stays underneath. Secure the upper section with a clip or pins that hold without being too rigid. Curl in larger sections below so the waves have room to breathe instead of sitting dense.
Too much tension at the top pulls the lift down fast. Tight curls through the length make everything look packed together. Keep clear space between each curl so every section stays visible.
Read More : 25 Fancy Hairstyles for Long Hair for Any Occasion
5. Polished chignon minimal hairpiece accent
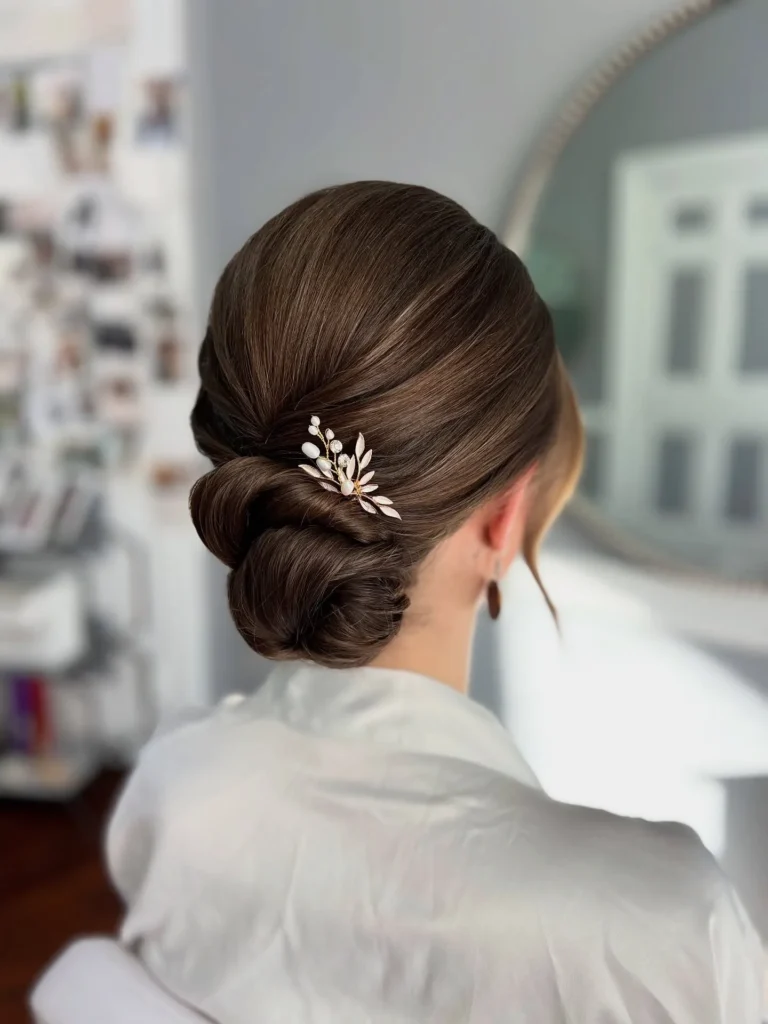
Source: maricruzhairstyles
Smooth the hair completely before you even think about forming the bun. Any bumps or uneven sections underneath will show through the finished shape. The cleaner the base, the sharper the chignon sits at the nape.
Gather the hair at the nape with light, even tension and twist the length before coiling it. Secure from the underside of the bun so no pins are visible from any angle. A small accent piece, a pin, a clip, or a delicate comb, sits cleanly against the smooth surface without pulling focus.
Misting a clean toothbrush with a little hairspray and running it over the hairline smooths down flyaways without touching the bun. Skip heavy products or the surface turns greasy instead of glossy. Keep the accent small, one statement piece is always stronger than several competing ones.
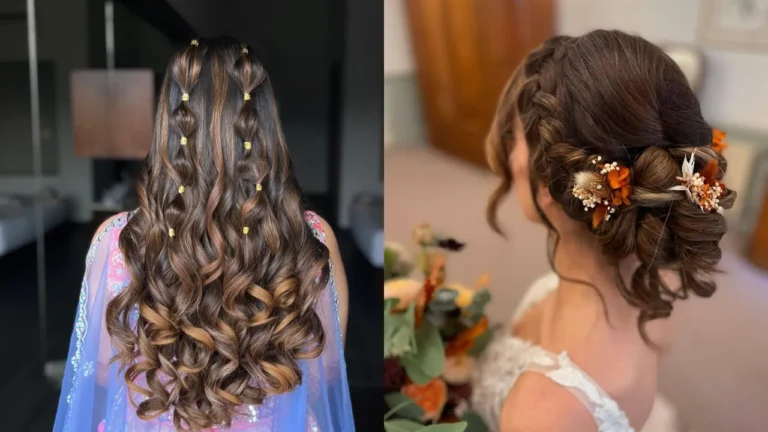
6. Elegant pinned back flowing lengths
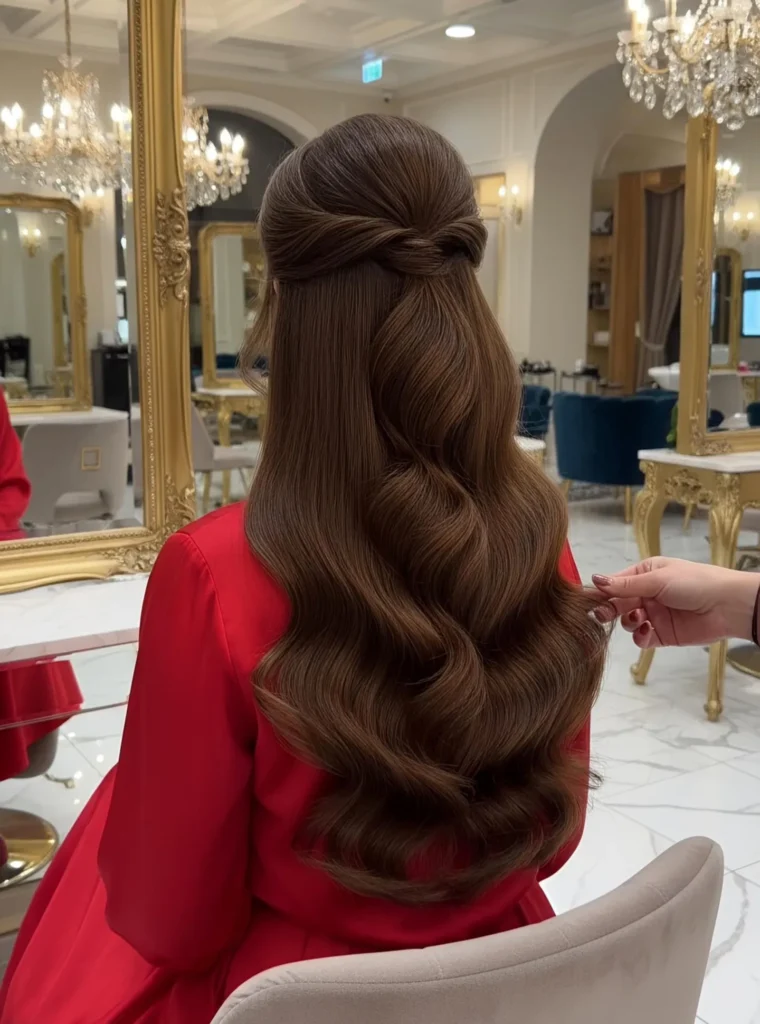
Source: tina.66603
The back section carries all the detail here while the length stays completely free. Small sections from each side get pinned back gently, just enough to guide hair away from the face. The rest flows down without any interference.
Take even sections from both sides and pin with slight overlap so the join blends in. Push the pins close to the scalp so they hide under the top layers. Once pinned, leave the length alone, brushing it too much at this stage removes the natural movement.
Don’t place the pins too high or the shape looks uneven from the front. Over-curling the loose length makes it compete with the pinned section behind. The pinned detail should frame not overpower the rest of the style.
7. Sculpted waves jeweled detail
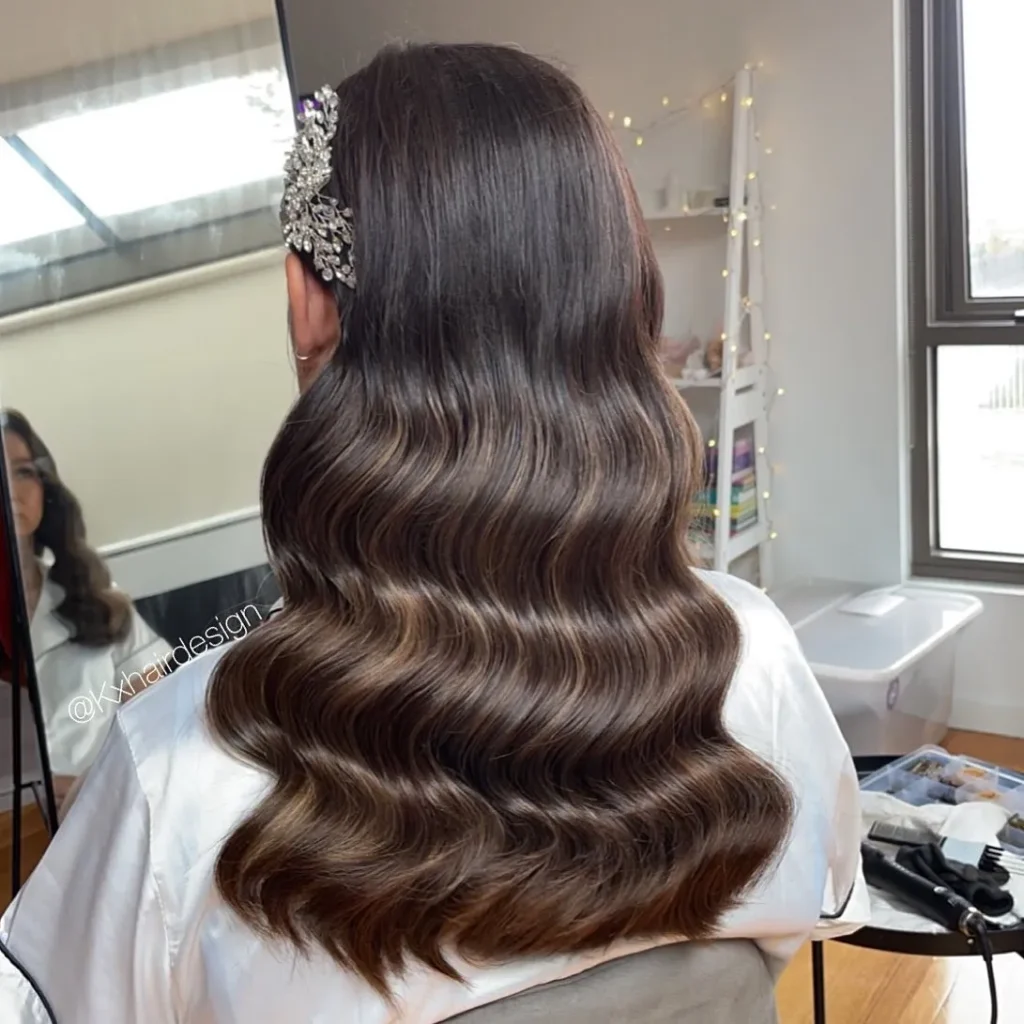
This style has no room for mistakes in the wave pattern every section needs to follow the same direction from start to finish. One wrong curl can break the entire rhythm and it shows immediately once everything is brushed out. Taking it slowly section by section is the only way through.
Set each curl with a clip and let it cool completely before releasing. That cooling stage is what locks the wave shape in before brushing skipping it weakens the hold significantly. A deep side part set before curling guides the whole wave direction naturally.
Switching the curl direction even once in the middle ruins the pattern across the length. Volumizing powder dusted at the roots before curling gives the waves a stronger anchor. Precision here counts more than speed.
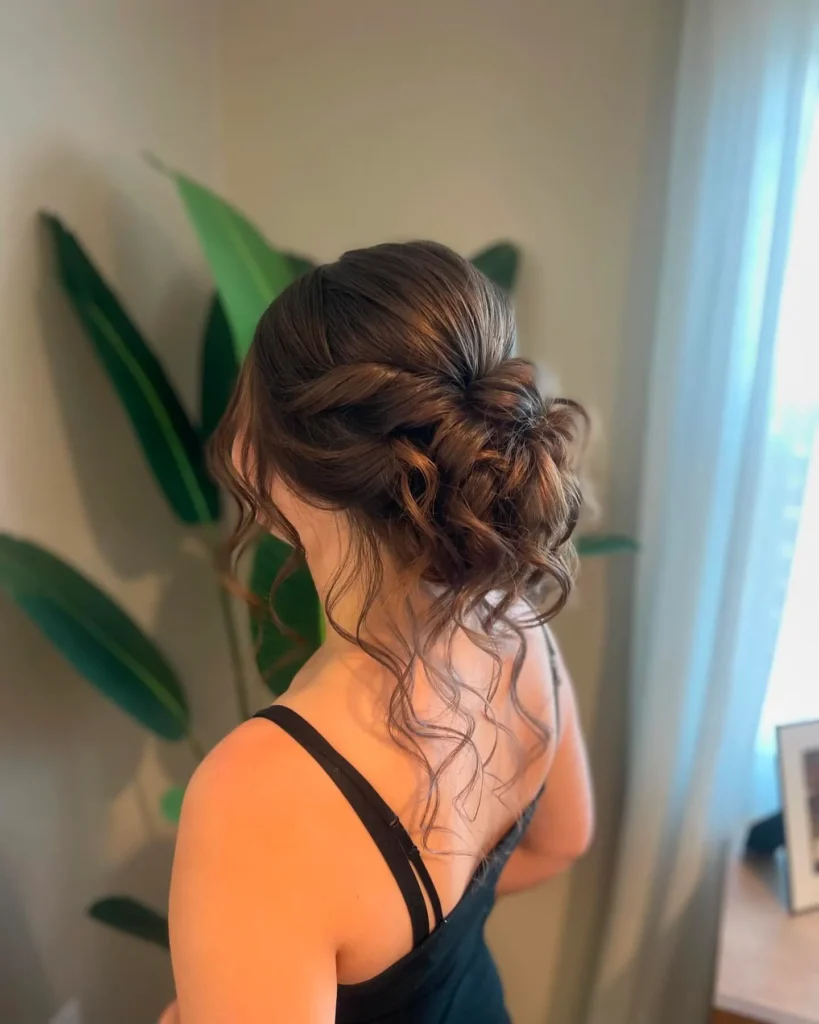
8. Textured bun airy framing
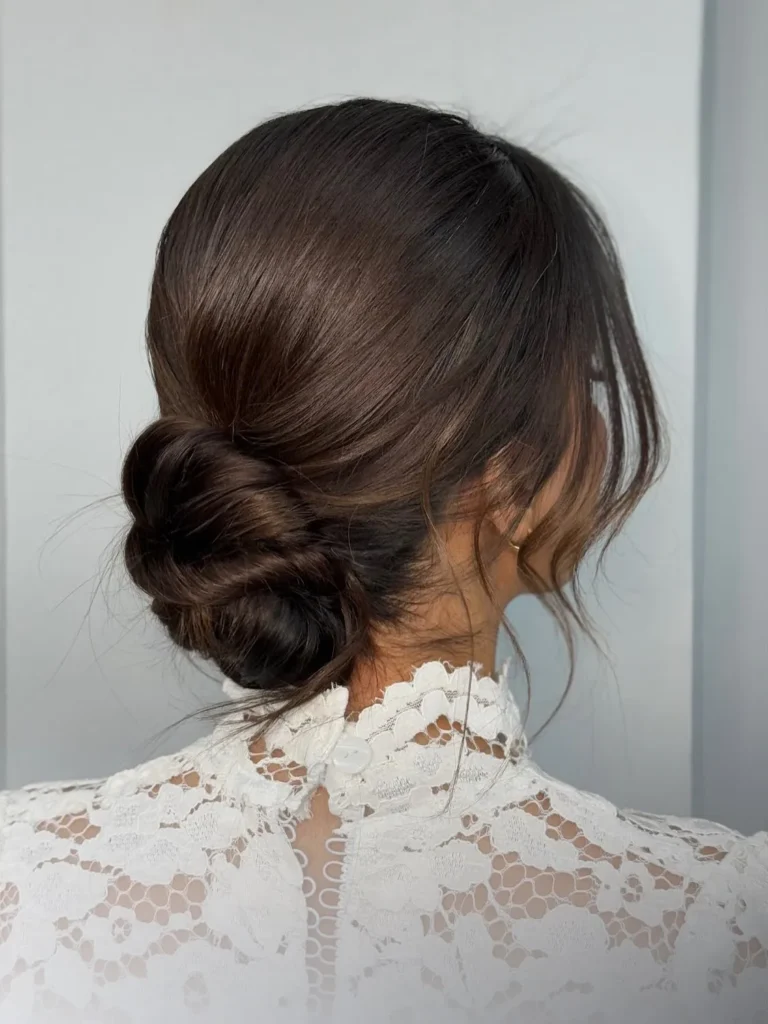
Source: nastaran.hairstylee
Volume is the whole point of this bun, but it has to be built through light layers not packed in all at once. Loose sections frame around the face while the center sits slightly lifted above the nape. The shape should feel open, not stuffed.
Spray dry texture product through the hair before starting so the bun doesn’t slide down after pinning. Gather loosely using your hands rather than a brush to keep the texture alive. Pin in small sections going in different directions so the bun builds depth from the inside out.
Avoid wrapping everything into one tight coil that removes all the dimension. Pulling individual strands apart too far makes the bun look messy rather than full. The goal is a shape that looks full without looking forced.
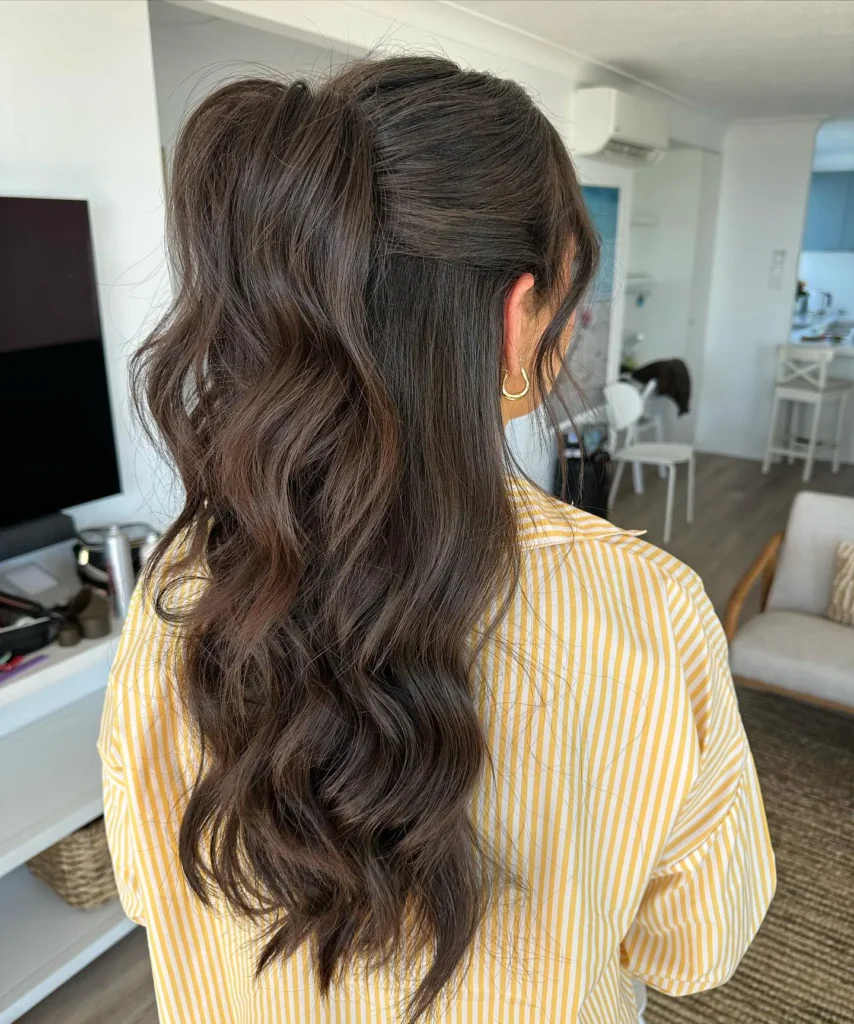
9. Smooth pony rippled tail
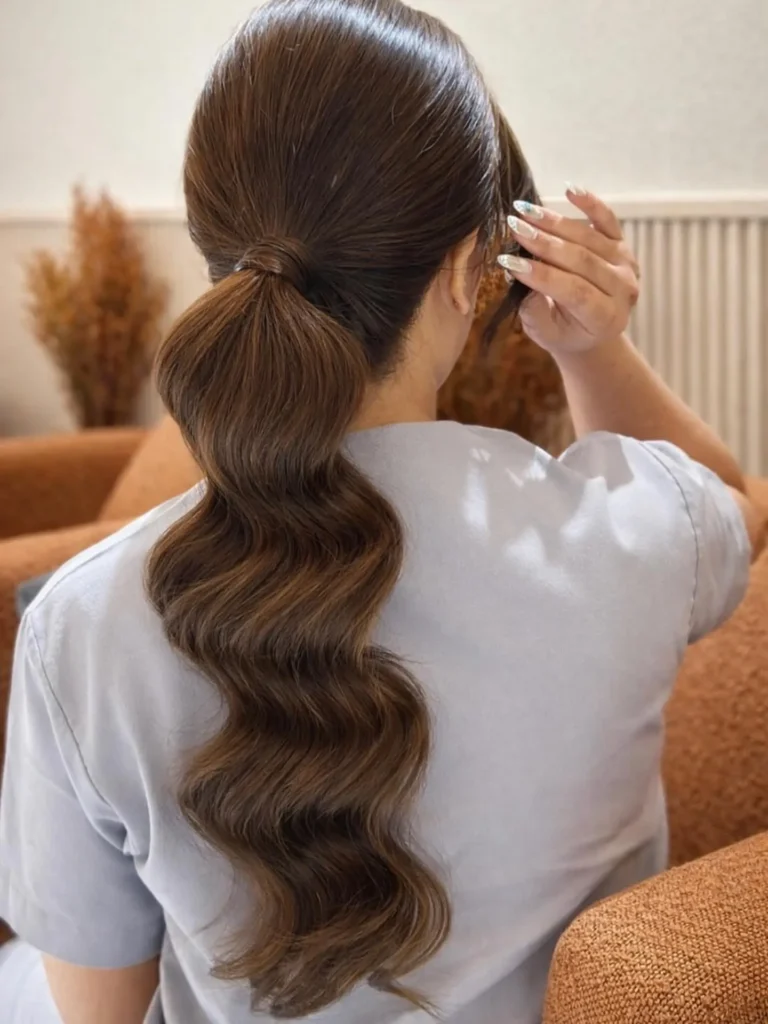
Source: treschic.beautylounge
Two completely different textures on one ponytail that’s the whole idea here. The upper section stays completely smooth and flat while the tail below moves in open, relaxed ripples. Keeping those two zones clearly separate is what makes the contrast work.
Secure the ponytail with strong tension so no bumps or unevenness show through the top. Only begin adding waves from the mid-length downward, leaving everything above untouched. A larger barrel creates wider, softer ripples that suit the formal tone better than tight curls.
Bringing texture too close to the elastic breaks the clean line at the base. Avoid heavy oils through the tail since they weigh the ripples down fast. A light finishing spray on just the top section keeps the surface smooth without overdoing it.
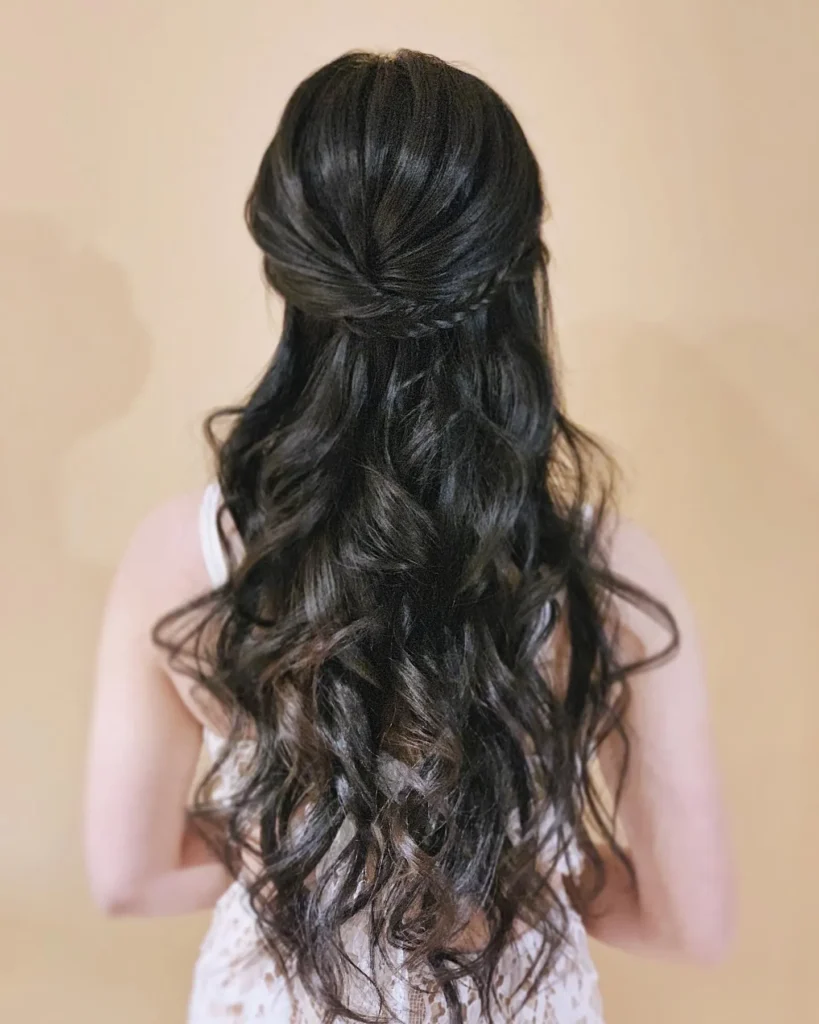
10. Soft twist halfdown flow
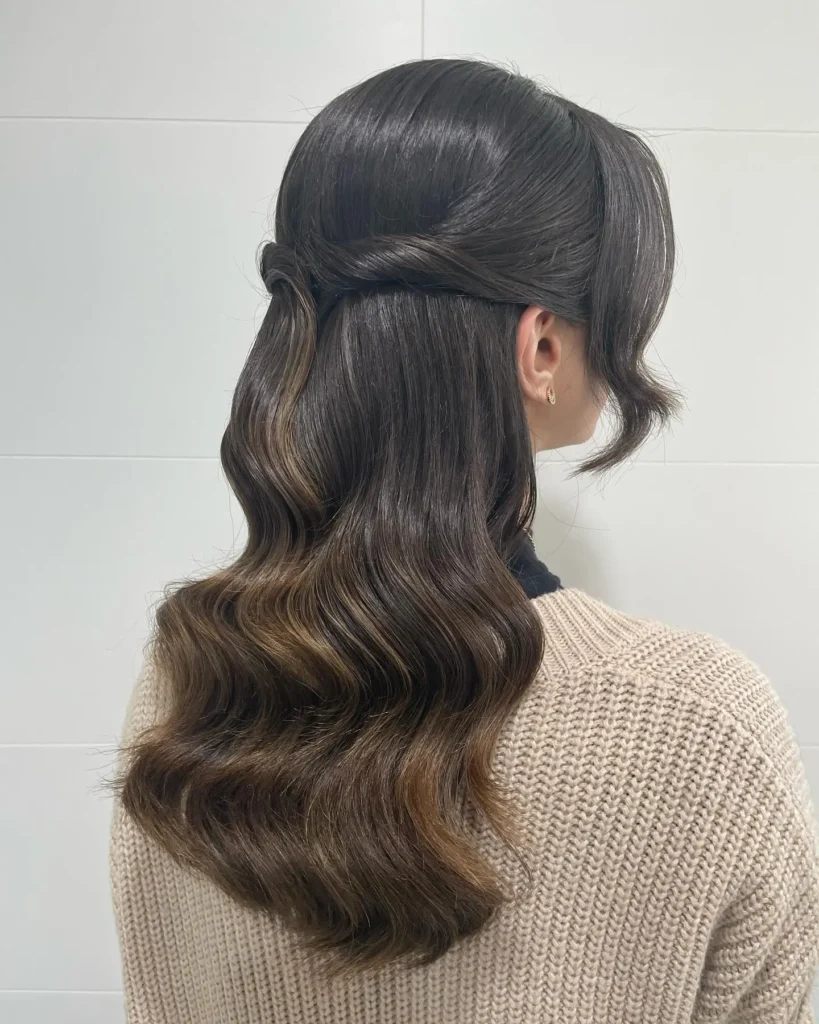
Source: ra.heirstyles
The twist here should blend into the rest of the hair not sit on top of it like a separate piece. Sections from each side fold back gently and meet at the center without a visible gap or break. When done right, you almost can’t tell where the twist ends and the loose length begins.
Use light tension when twisting and keep the pins flat against the head so they disappear within the layers. Let the lower length fall in relaxed waves that follow the same direction as the twist above. That alignment between top and bottom is what keeps the whole thing looking cohesive.
Pulling the twist too tight creates an obvious split that breaks the flow. Heavy product on the ends drags the shape downward over time. Keep the movement consistent and even from the crown all the way to the ends.
Read More : 26 Updos for Long Hair Perfect for Events
11. Mermaid curls clipped shine
Source: hairstyleslate
Long, defined curls running from root to end with a single accent clip shifting everything to one side this one is for people who want their hair to be the statement. The curl pattern needs to stay consistent throughout the entire length for the style to read clearly. One or two uneven sections will disrupt the whole rhythm.
Curl in the same direction for every section without switching. Let each curl cool and set fully before you separate or touch it. Keep the clip area tidy so it doesn’t push any curls out of their natural path.
Brushing too aggressively through the length breaks the curl definition quickly. Placing the clip too low makes it disappear into the mass of curls. Position it mid-way where it visually anchors the style without getting buried.
12. Elevated pony loose bends
Source: hairbylaceygc
Raising the ponytail higher than usual changes the entire feel of a basic pony. The base sits with lift while the tail falls in open, relaxed bends that keep the length from looking stiff. That combination of height at the top and softness below is what separates this from a standard tie-back.
Lift the crown section slightly before securing so the base doesn’t press flat. Use a wider curling tool for the bends so each wave has room and doesn’t feel compressed. Wrapping a thin strand of hair around the elastic and pinning it underneath hides the band completely.
Placing the pony too high throws the proportions off when viewed from the front. Tight bends make the tail look rigid rather than flowing. Keep the waves loose so the length has movement throughout the day.
13. Twisted half up cascading ringlets
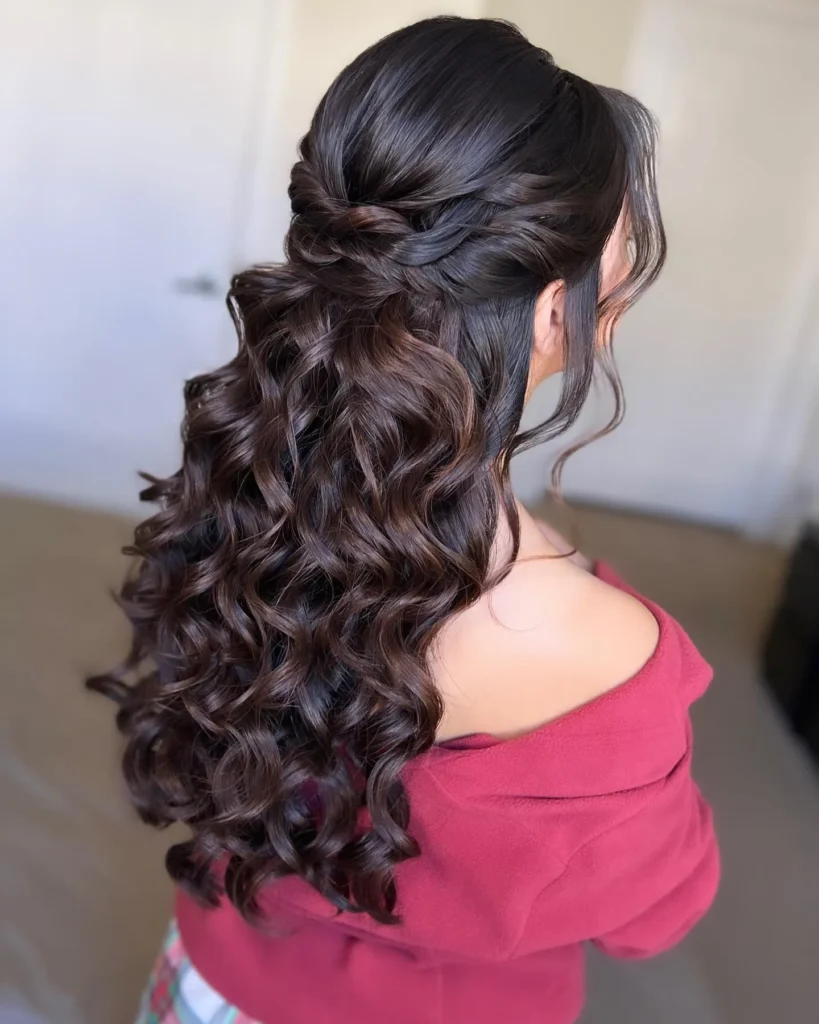
Source: eventsmakeupspace
The crown twist has to sit with a little lift if it sinks flat against the head, it blends in and disappears. Ringlets falling through the lower length are what give this style its energy and depth. That difference in texture between the two sections is the whole point.
Twist loosely from each side before pinning so the sections look relaxed rather than pulled. A smaller barrel forms tighter ringlets that hold longer through hours of wear. Always let the curls cool fully before separating touching them too early causes frizz and shortens hold time.
Brushing through the ringlets too much removes the definition fast. Pulling the crown twist too tight flattens everything at the top. Let the lift stay and the curls stay defined those two things working together are what make this work.
14. Braided pony lifted texture
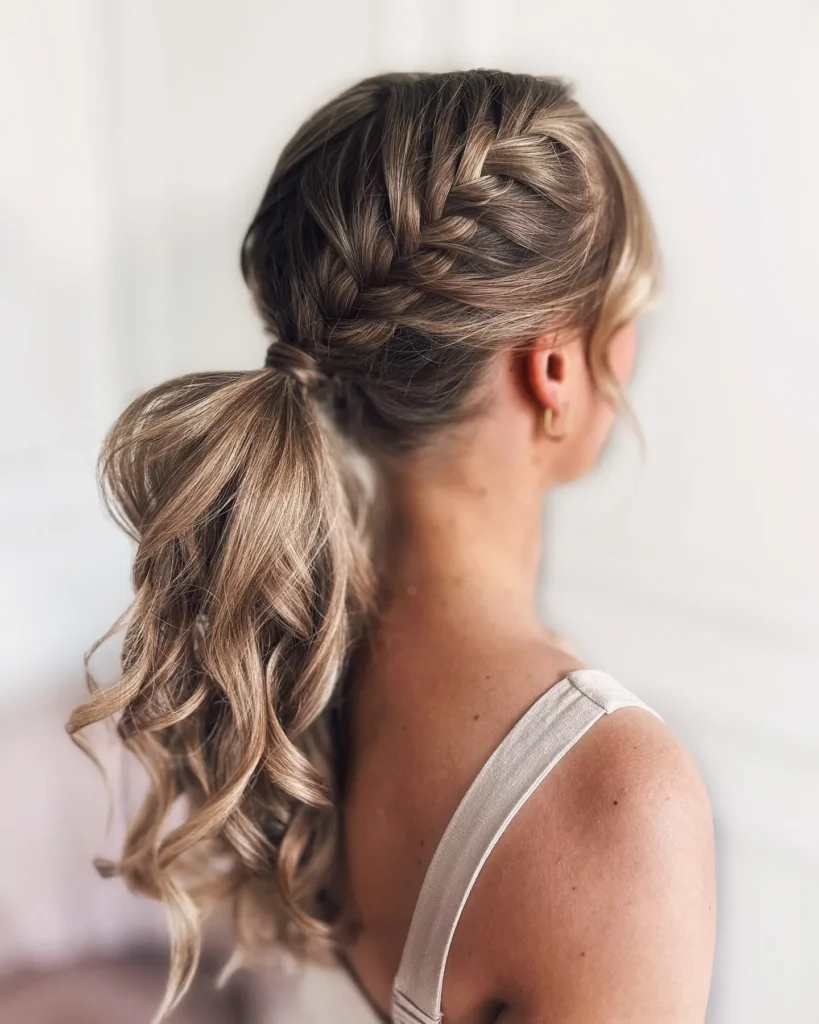
Source: hairdo.byvera
Instead of a plain elastic, the braid becomes the base of the ponytail and that single change makes the whole style look more considered. The tail below builds texture through loose waves that make it look fuller without adding extra hair. The braid and the ponytail work as one connected shape rather than two separate things.
Braid with controlled, even sections so it doesn’t loosen too quickly. Once the ponytail is secured, gently pull at the braid edges to widen it slightly. Add soft waves through the lower tail so it has movement rather than falling flat.
Loosening the braid too much makes it look uneven from the side. A ponytail placed too low reduces the visual impact of the braid at the base. Keep the transition between the two elements clean so both are clearly visible.
15. Side braid voluminous waves
Source: clairehartleystylist
Shifting everything to one side is a simple move that completely changes the feel of a style. The braid runs along one side while the waves fall on the other, creating an asymmetrical shape that reads very deliberate. That one-sided focus gives the style a direction that a centered arrangement doesn’t have.
Braid loosely along one side without pulling it flat against the scalp. Build the waves with volume so the length doesn’t fall limp beside the braid. Let the braid sit slightly forward so it frames the face rather than disappearing behind the ear.
A braid that’s too thin loses its presence against the fullness of the waves. Over-curling the length makes it heavy rather than full. Keep the volume rounded and the braid visible so both sides read clearly.
16. Wrapped crown loose spirals
Source: elegancebykim
The crown section wraps around the head in a controlled path while spirals hang freely through the length below. There’s no forced stiffness here the wrap guides the shape and the spirals do the rest. Together they create a style that feels both intentional and relaxed.
Section the crown hair into small, even pieces before wrapping so the path stays consistent from front to back. Curl the remaining length with a medium barrel and keep all the spirals going in the same direction. Clip each spiral to cool before releasing so the shape holds longer.
Pulling the wrapped section too close to the scalp flattens the shape quickly. Separating the spirals too much makes them look uneven rather than spaced. Keep the spacing between each curl deliberate so every spiral stays clearly defined.
17. High pony embellished strands
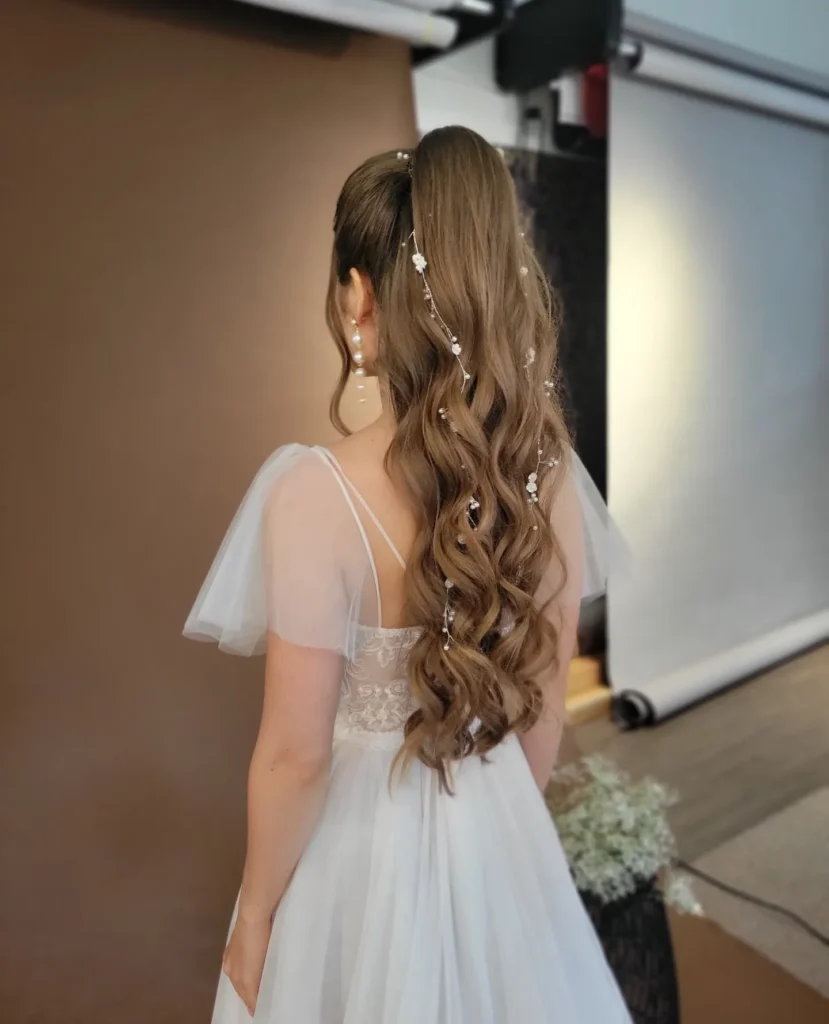
Source: claraleungdesigns
Raising the ponytail shifts the whole shape upward, which changes the look completely from a standard low or mid pony. A few thin strands wrapped around the elastic at the base add a small but noticeable detail. The tail carries waves or bends through the length so it doesn’t fall completely straight.
Secure the base with strong tension first so it holds without slipping. Wrap two or three thin sections around the elastic and pin the ends underneath so the band stays hidden. Bend the tail with a wide tool so the movement is open and loose rather than tight.
Placing the pony too far back on the head removes the lift when viewed from the front. Too many wrapped strands bulk up the base and make it look heavy. Keep the wrapping minimal so the shape stays clean and sharp.
18. Soft gather tousled lengths
Source: josephines_beauty
No strict parting, no tight sections just hair pulled back loosely with a relaxed hand. The length stays slightly textured throughout so it doesn’t press flat against the back. That loose, easy gather is what gives this style its casual-formal balance.
Backcomb lightly near the crown so the top doesn’t collapse down during wear. Use your hands to gather the hair instead of a brush so the texture stays alive. Let the ends fall where they naturally go without pressing them into a pattern.
Smoothing the hair down too much before gathering removes all the softness. Overworking the ends makes them look stiff instead of relaxed. Keep the gather light and the tension easy so the shape holds without looking rigid.
19. Copper waves glossy finish
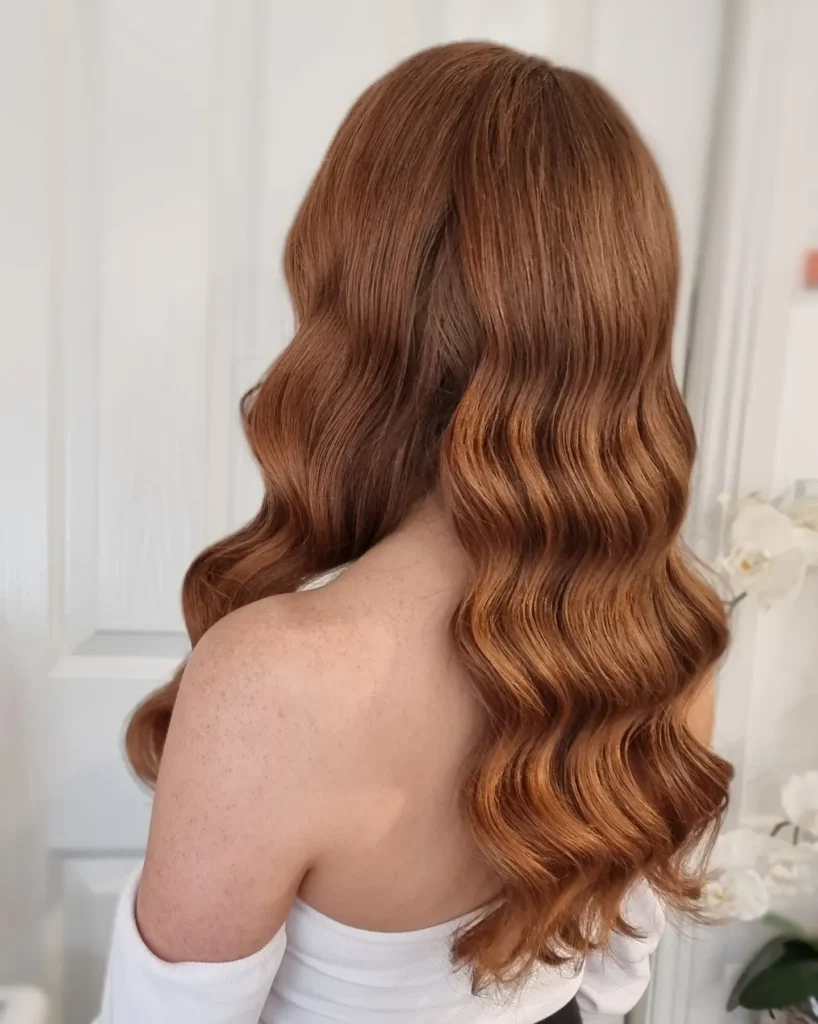
Source: hairbykarren
Rich color through the length combined with a consistent wave pattern is a combination that photographs well in any lighting. The waves keep the hair from looking flat while the glossy surface adds a polished quality. Both elements need to be present for this one to land the way it should.
Form the waves in even sections without switching direction halfway through. Brush through lightly after releasing each curl so the waves blend without losing their shape. A small amount of lightweight hair oil rubbed between the palms before brushing eliminates static and adds the glossy finish without product buildup.
Mixing different curl sizes makes the finish look uneven across the length. Too much product dulls the shine rather than enhancing it. Keep the surface clean so the color and wave pattern stay as the main focus.
20. Sleek bubble pony shine
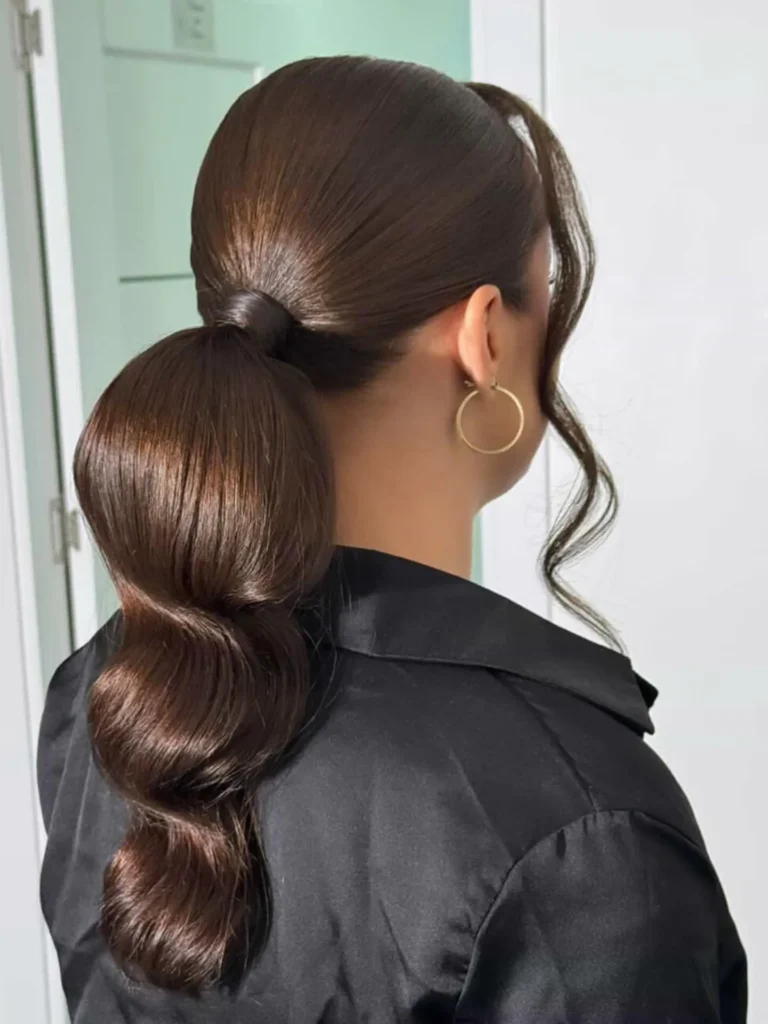
Source: renteacarmenbraids
Clear elastic bands placed down the length of a ponytail create sections that puff out into a bubble shape. The top stays smooth and flat while each segment below adds its own round dimension. The spacing between each band is what gives the style its structure.
Secure the base tightly so it doesn’t shift. Space the bands evenly down the tail by eye, then gently pull each section outward to create the rounded bubble shape. Keep the top area smooth so the contrast between the flat crown and the dimensional tail reads clearly.
Uneven spacing between bands makes the pattern look off from any angle. Pulling sections out too aggressively distorts the bubble shape into something messier. Keep the tension even and the spacing consistent so every segment stays defined.
21. Crown braid loose texture
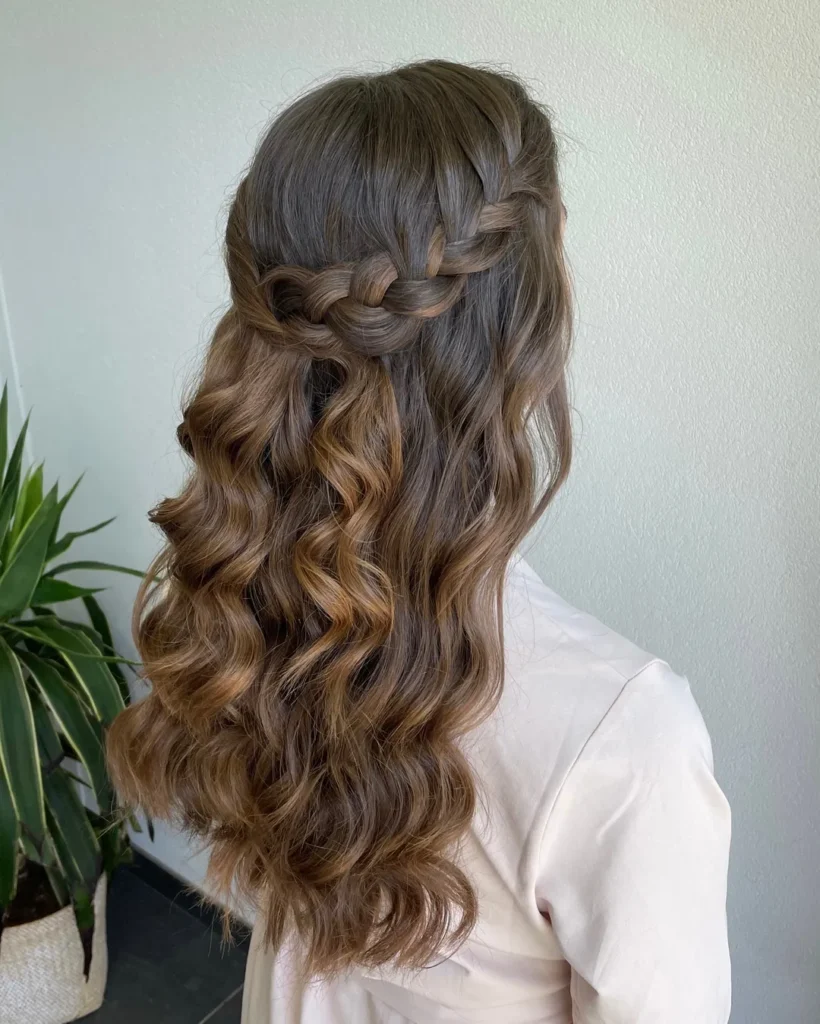
Source: gemmanicholshairandmakeup
A braid across the crown works as a natural headband while the rest of the hair stays free below. The two parts of this style the structured braid above and the loose texture below need to stay separate enough that both are visible. When they blend too much, neither reads clearly.
Braid across the crown using even sections so the width stays consistent from one side to the other. After securing, loosen the braid slightly by gently pulling at the edges to give it more width. Keep the hair below lightly textured rather than over-styled.
Tightening the braid too much makes it look rigid against the head. Heavy volume underneath can visually overpower the crown detail. Keep both sections in proportion so the shape holds together without one dominating the other.
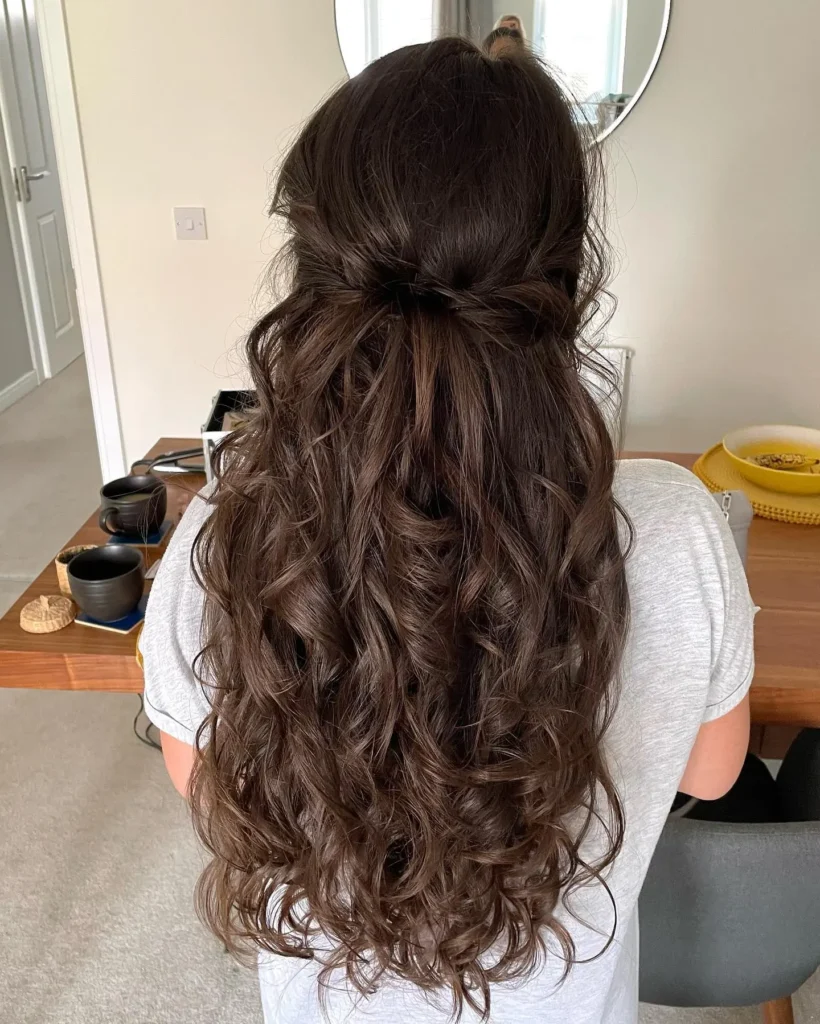
22. Half up curls soft lift
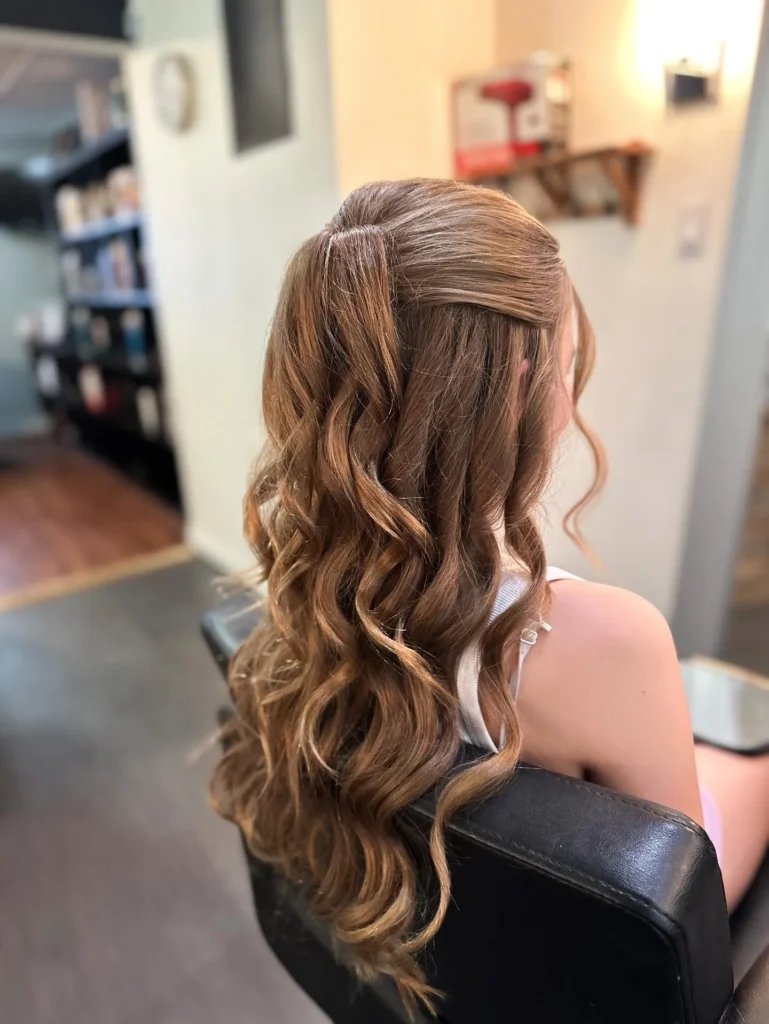
Source: chloeshairrr
Crown lift is the starting point for this style everything else depends on getting that right first. The upper section holds with height while curls through the lower length fall with clear spacing between them. That open spacing is what stops the style from looking heavy or dense.
Build light volume at the roots with backcombing before securing the top section. Smooth over the surface of the crown so it looks clean but doesn’t remove the height underneath. Curl the lower length in larger sections so each wave has space around it.
Pulling the upper section too tight flattens the lift immediately. Smaller curls through the length pack everything together and remove the airy quality. Keep the sections spaced and the curl size generous so the style stays open.
23. Curly updo velvet bow
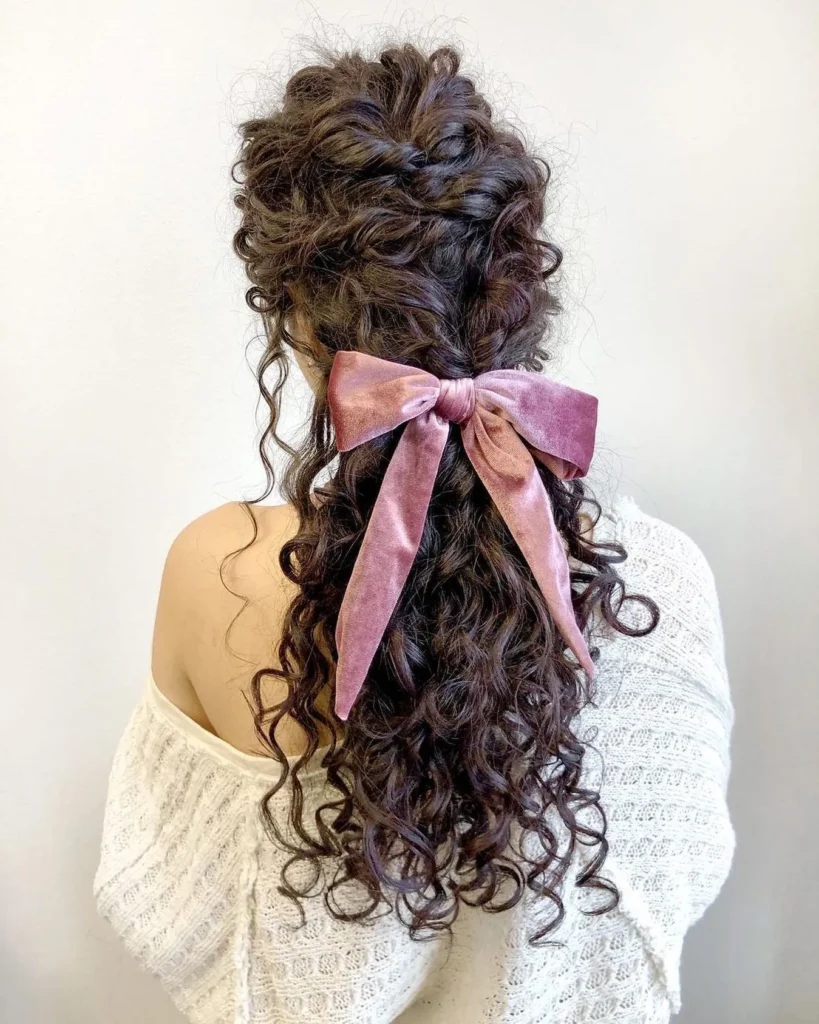
Source: readcurl
Curls pinned upward into a compact shape with a velvet bow placed at the base the two elements contrast each other in the best way. The texture of the curls plays against the smooth fabric of the bow, and that difference in surface is what makes the combination interesting. Neither element needs to be large for this to work.
Pin curls upward in layers rather than all at once so the updo builds depth gradually. Secure the base firmly before attaching the bow so it sits level and doesn’t tilt. Leaving one or two curls slightly loose near the edges softens the overall shape.
Packing curls too tightly removes the texture and makes the updo look flat. A bow placed too low disrupts the visual balance of the whole arrangement. Keep both elements proportional so the style reads cleanly from every angle.
24. Braided bun pearl detail
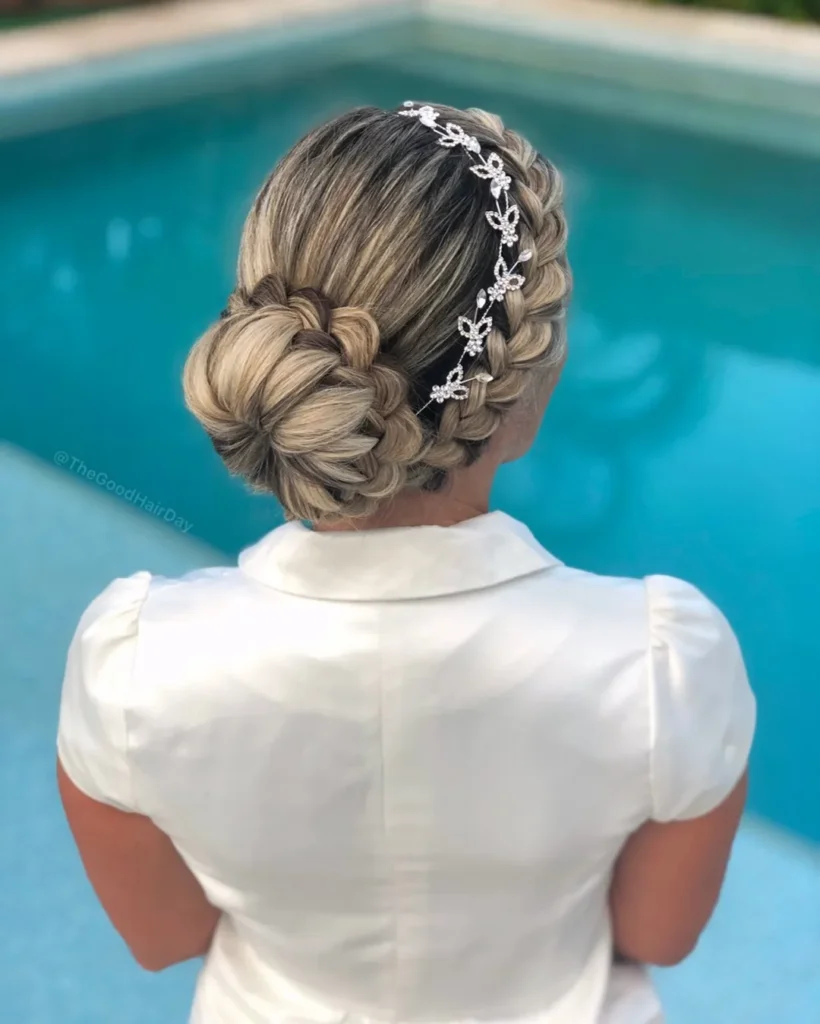
Source: thegoodhairday
The braid doesn’t just add decoration here it becomes the actual structure of the bun. Coiling a clean braid into a bun gives the shape more definition than a plain wrapped bun would have. Pearls placed with spacing along the surface add a delicate detail without making the style look overloaded.
Form the braid neatly before coiling so the bun has a consistent shape. Place pearls with deliberate spacing between each one so they don’t cluster in one section. Secure all the pins from underneath the bun so the surface stays smooth.
Overloading with pearls takes over the design and distracts from the braid shape beneath. A loose braid makes the bun look uneven once it’s coiled. Keep the braid tension even and the pearl placement spaced so the finish stays clean.
25. Fishtail cascade airy ends
A fishtail braid has a finer, more detailed pattern than a regular braid, and that detail shows beautifully through long hair. The braid runs from the crown all the way down, then ends slightly loose so the last few inches feel lighter than the rest. That shift from tight weave to open ends adds a layered quality to the whole shape.
Work with small sections throughout so the pattern stays sharp and defined. After securing, gently pull at the sides of the braid to widen it slightly for more presence. Leave the ends less structured don’t secure them all the way through.
Pulling the braid edges too aggressively breaks the weave pattern. Ending the braid too high removes the cascading quality that makes this style stand out. Keep the length running all the way down so the shape feels complete from crown to tip.
What Ruins a Formal Hairstyle Fast
A good style can fall apart quickly if a few basics are ignored. Most problems come from small mistakes that are easy to fix once you know them.
- Too much product makes hair heavy and dull
- Pulling the crown too tight removes volume
- Mixing too many textures breaks the flow
- Over-curling can make the style look stiff
Keeping things balanced and controlled always gives a better result.
Quick Fixes If Your Hair Starts Falling Apart
You don’t need to redo your whole hairstyle if something shifts. Small fixes can bring everything back in place within minutes.
- Twist loose curls and pin them at the back
- Tighten ponytail base and wrap a strand again
- Use hidden pins to secure loose sections
- Smooth top layer lightly instead of restyling
These quick adjustments save time and keep the style looking fresh.
Best Styles Based on Hair Thickness
Hair thickness changes how styles hold and how they look by the end of the event. Choosing the right type makes everything easier.
For fine hair:
- Sleek ponytails
- Half-up styles
- Soft waves
For thick hair:
- Braided styles
- Textured buns
- Full curls
Working with your hair type always gives better results than forcing a style.
Small Details That Make a Big Difference
The overall style matters, but the finish depends on the small things. These details are often missed but change the final result.
- Even spacing between curls or braids
- Slight lift at the crown
- Clean and straight parting
- Hidden pins instead of visible ones
When these are right, even simple styles look much more refined.
Before You Finalize Your Hairstyle
Taking a little time before the event saves a lot of stress later. A quick check helps you avoid last-minute issues.
- Try the style once before the event
- Check how it looks from the back
- See how long it holds without fixing
- Make small changes if needed
Planning ahead makes the whole process smoother.
Styling Prep Checklist
Getting the base right makes styling easier and helps the style last longer.
- Wash hair one day before styling
- Use heat protectant before curling
- Let curls cool before touching
- Use pins that match your hair color
- Add light texture for better grip
A strong base makes every style hold better.
FAQs
How do I make my hairstyle last longer?
Use light spray before and after styling, and avoid touching your hair too much during the event.
Should I wash my hair before styling?
Wash it one day before so your hair has better grip and holds the style longer.
Which hairstyle works best for long hair?
It depends on your hair type, but ponytails, buns, and half-up styles are the easiest to manage.
Can I do formal hairstyles at home?
Yes, most styles can be done at home with basic tools and a little practice beforehand.
How do I stop my curls from falling flat?
Let curls cool fully before touching and use smaller sections for better hold.
· How do I make my hairstyle last longer?
Use light spray before and after styling, and avoid touching your hair too much during the event.
· Should I wash my hair before styling?
Wash it one day before so your hair has better grip and holds the style longer.
· Which hairstyle works best for long hair?
It depends on your hair type, but ponytails, buns, and half-up styles are the easiest to manage.
· Can I do formal hairstyles at home?
Yes, most styles can be done at home with basic tools and a little practice beforehand.
· How do I stop my curls from falling flat?
Let curls cool fully before touching and use smaller sections for better hold.
Conclusion
The right hairstyle can completely change how you feel at an event. These formal hairstyles for long hair are designed to give you options that are both beautiful and easy to manage, no matter your hair type or skill level.
Take your time, save the styles that stand out to you, and try one before your event so you feel confident wearing it. I’ve seen how even small changes in styling can make a big difference in the final look.
Save this guide on Pinterest, try a style that fits your vibe, and share it with someone who might need ideas too. Sometimes the right hairstyle is all it takes to feel ready.