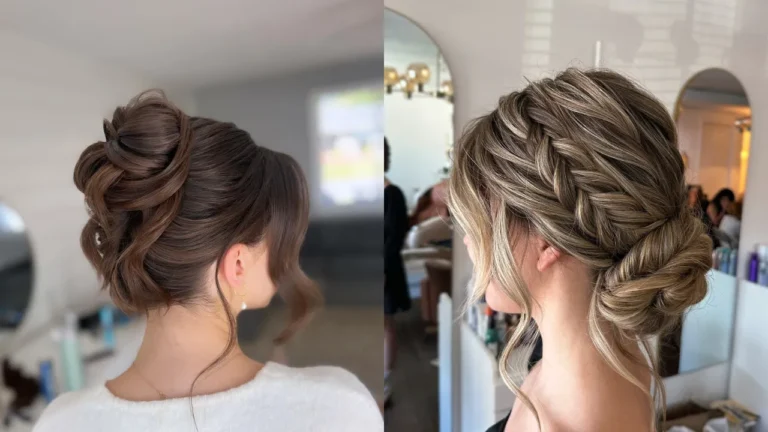
25 Fancy Hairstyles for Long Hair for Any Occasion
Tired of repeating the same hairstyle every day? These fancy hairstyles for long hair bring fresh ideas that instantly upgrade your overall style without needing a haircut or major effort. Even small styling changes can shift how your hair sits and holds.
In my experience, most people struggle with volume, placement, or making styles last longer. That’s exactly what this guide focuses on practical styles that actually work in real situations, from casual days to events. You’ll find braids, buns, ponytails, and half-up looks that feel different but still manageable.
What Makes a Hairstyle Stand Out
Before you explore the ideas, it helps to know why some hairstyles catch attention while others fall flat. In my experience, it usually comes down to placement, volume, and structure rather than complexity.
Small changes like adjusting height, spacing sections, or controlling tension can completely improve the result. Keeping these basics in mind will help every style below look more intentional and refined.
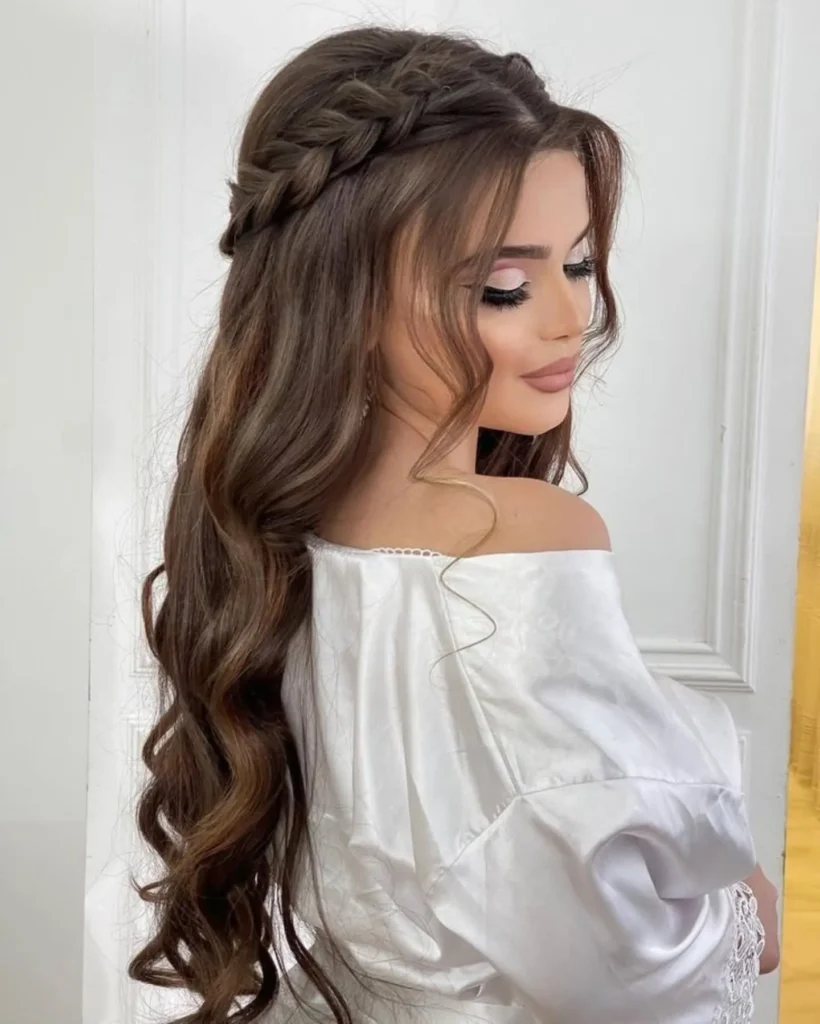
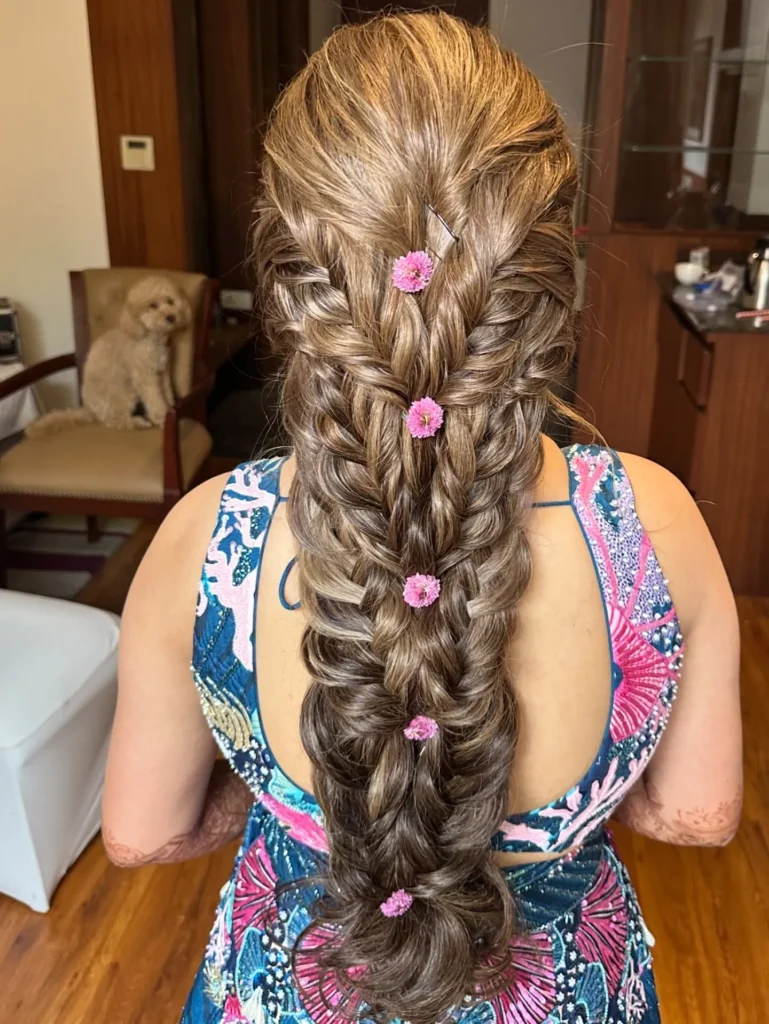
1. Floral Braided Cascade Waves
Source: zhanna_syniavska
This one is for the girl who wants her hair to tell a story from behind. Braids start near the crown and slowly melt into long, flowing waves that create a layered, dreamy effect. Small floral accents are placed between sections to add just a little romance without making things feel overdone.
The key here is to keep the braids loose and relaxed, not tight and stiff. When you braid with a light tension, the waves underneath blend in naturally and the whole thing looks like it just happened effortlessly. A little texture spray through the ends also helps the waves stay lifted and not go flat halfway through the day.
Space your braids out instead of clustering them together. When braids are too close, they start to blend into one heavy section and the beautiful detail gets lost. Give each braid room to breathe and the entire cascade effect will look cleaner, airier, and way more scroll-stopping.
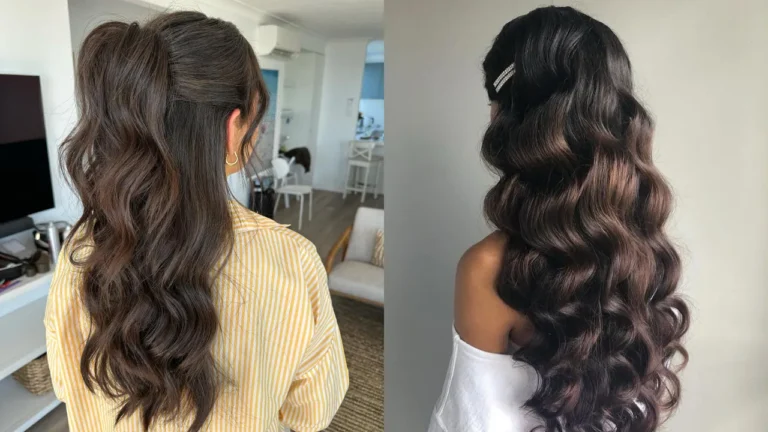
2. Twisted Half-Up Glossy Waves
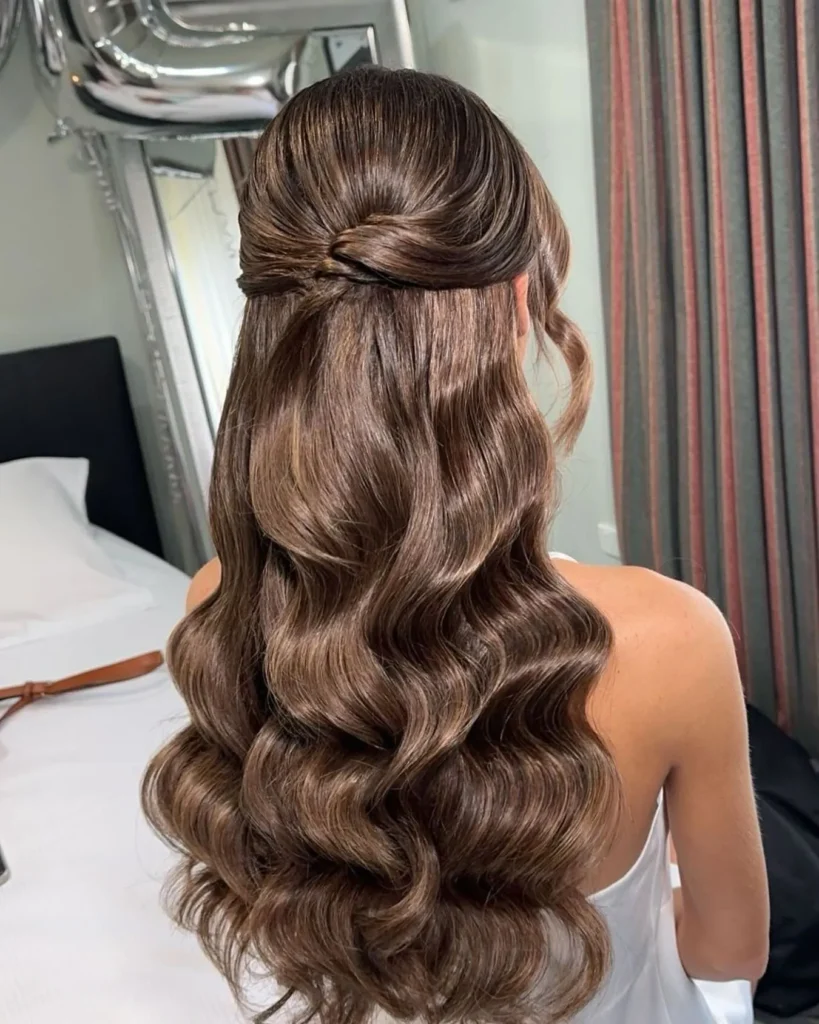
Source: ravihairstylist1
This style is all about balance. The twist at the back gives you structure and polish, while the glossy waves below keep things soft and feminine. It is the kind of look that works for brunch with friends just as well as a fancy dinner out.
Take equal sections from both sides of your head and twist them inward toward the center, securing them at mid-head level. Keep the crown smooth but not flattened, because a little volume up top makes the whole shape look more intentional. Finish the lower lengths with defined waves for a consistent, glossy finish.
Placement matters more than you think with this one. If the twist sits too low, it disappears into the waves and the style loses its purpose. Aim for mid-head placement and add just a bit of lift at the crown to give the shape height. That small adjustment changes the entire look.
3. Textured Braided Low Bun
Source: absolutely.ineke.hairstyling
Not all buns are created equal, and this one proves it. Instead of pulling everything into a tight knot, you build the bun in layers using braids, which gives it texture and volume that a regular bun just cannot match. It looks impressive but the method is easier than it appears.
Start by making a few loose braids, then gently pull each one apart to fluff them up before you form the bun. Wrap the braids gradually and secure in sections rather than all at once. This layered approach builds a bun that holds its shape and keeps visible texture throughout.
The biggest mistake with this style is pulling the base too tight. When the bun is overly compact, it shrinks down and the texture gets lost. Leave a few strands relaxed near the nape to soften the edges, and resist the urge to smooth everything out. The texture is the whole point.
Read More : 23 Bun Hairstyles You’ll Want to Try Right Now
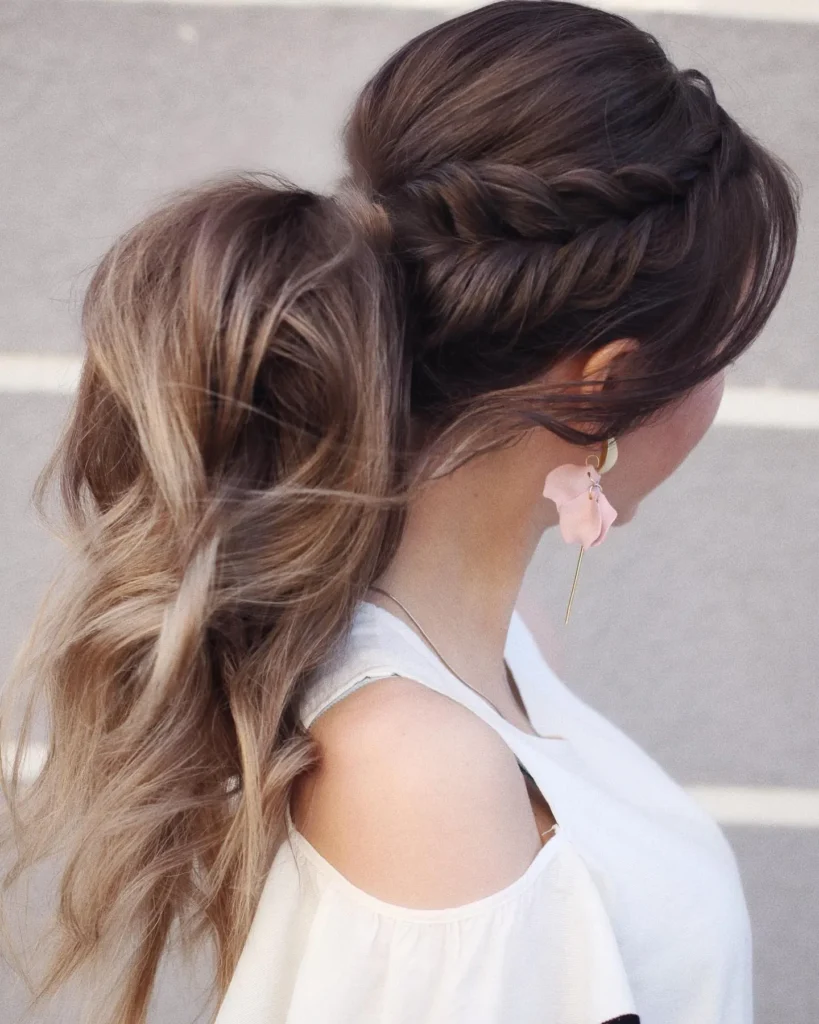
4. Sleek High Pony Glam Finish
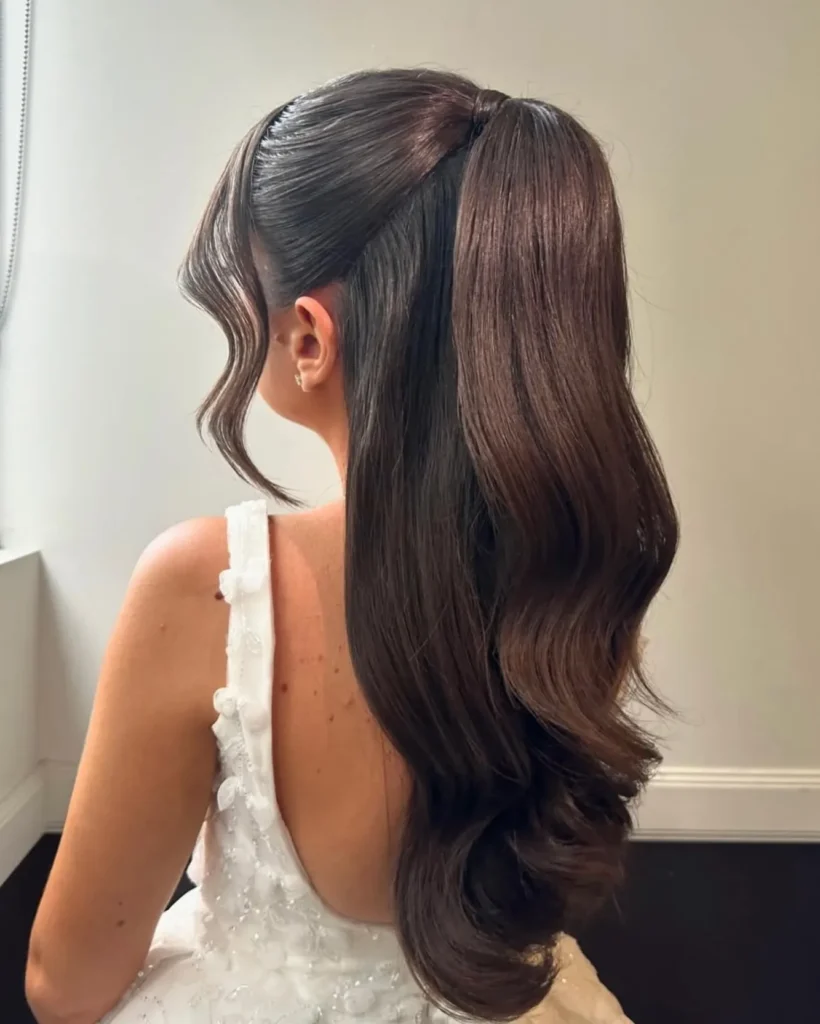
Source: parth_hairartist
A high ponytail sounds simple, but when it is done right, it is one of the most powerful hairstyles you can wear. The key is clean lines, strong placement, and a finish that looks sharp without looking stiff. This style lifts your whole face and gives you an effortlessly polished look.
Brush everything upward with firm control, keeping the sides neat and the crown slightly voluminous so the pony does not sit flat against your head. Wrap a small section of hair around the elastic to hide the tie, then smooth the ponytail length for a sleek, refined finish that holds all day.
Pro tip from stylists: avoid pulling the hairline too tight at the front. It creates tension that looks harsh and can actually cause breakage over time. A little softness at the edges keeps the style looking polished rather than severe, and helps the ponytail move naturally with you.
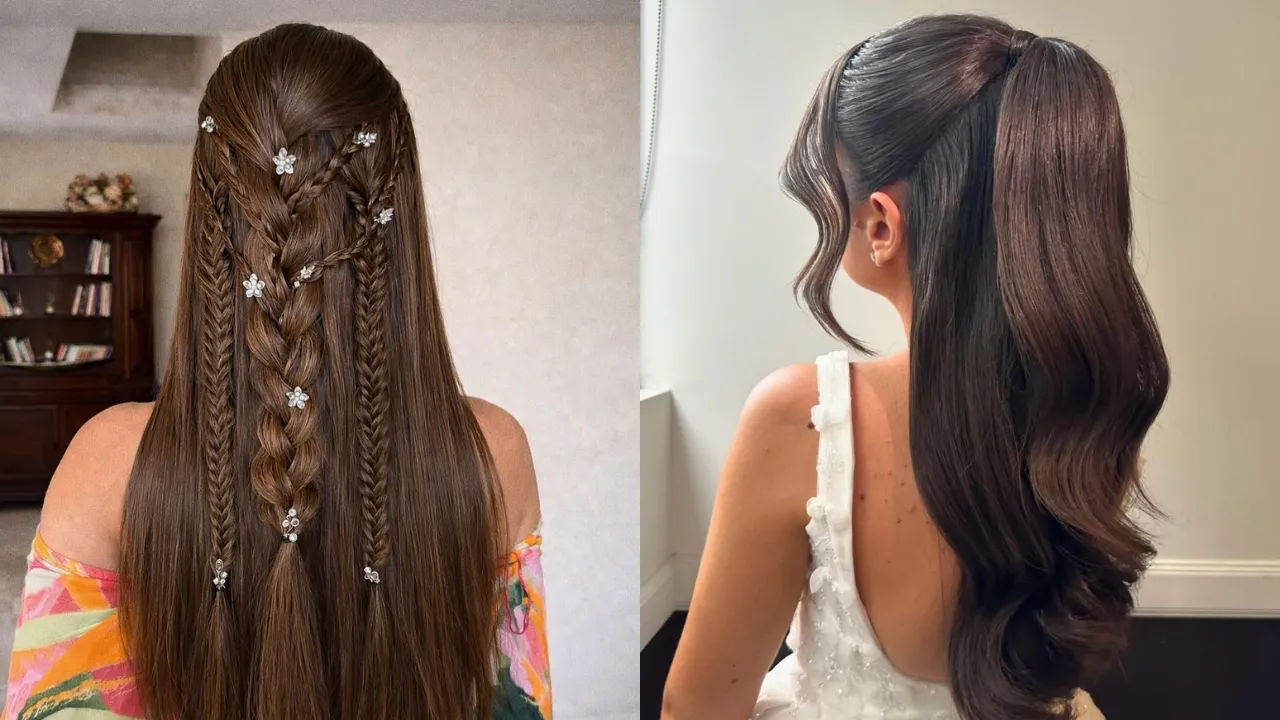
5. Crystal Accent Multi Braid Style
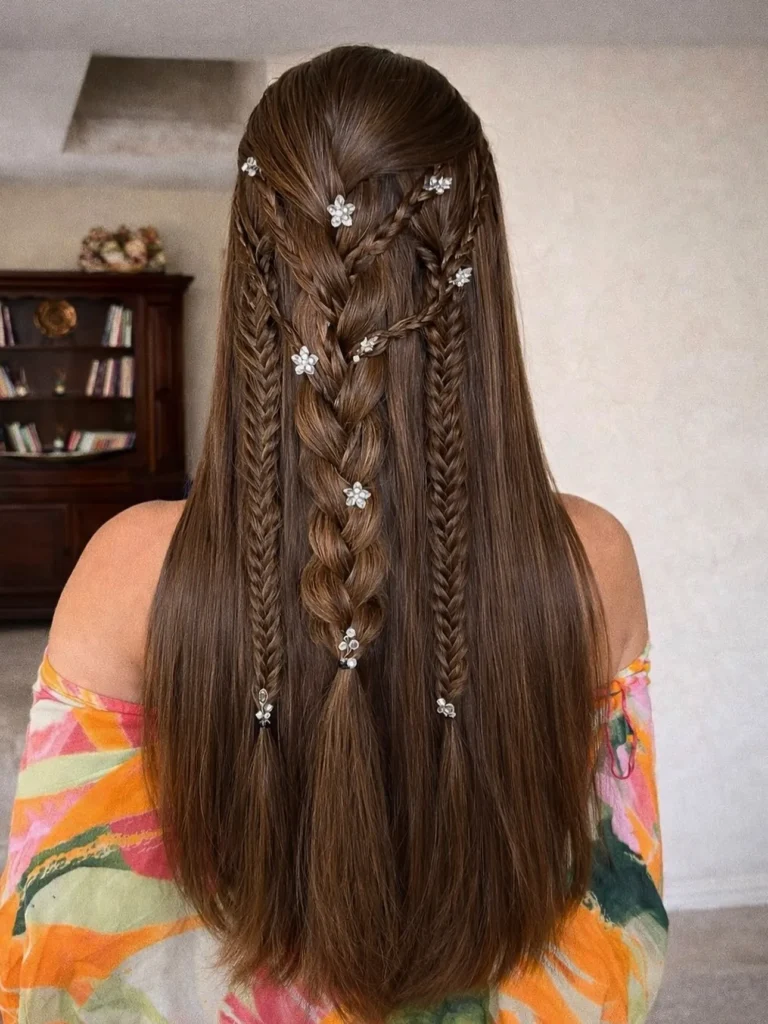
Multiple braids layered together create a look that feels editorial and eye-catching, and the crystal accents make it feel special occasion ready. This style has depth because each section is spaced with intention, not crowded together. It is detailed without being overwhelming.
Section the hair evenly and vary your braid sizes so the pattern has some visual interest. Mix a thicker braid with a thinner one for contrast. Place crystal accents lightly in between sections rather than piling them all in one spot. The goal is for the crystals to highlight the braid work, not compete with it.
Less is more when it comes to the embellishments. Too many crystals clustered in one area pulls attention away from the actual braid structure and makes the whole thing look cluttered. Space them evenly across the style and let the braiding do the heavy lifting. The crystals are the finishing touch, not the main event.
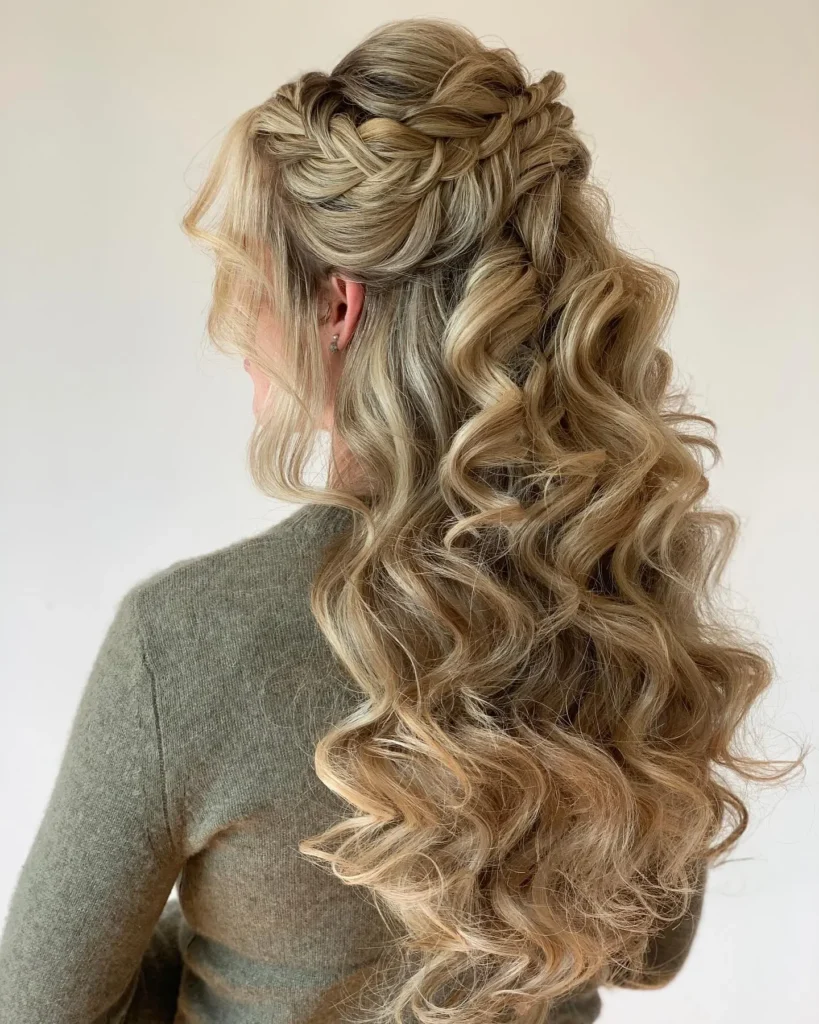
6. Voluminous Curled Ponytail Updo
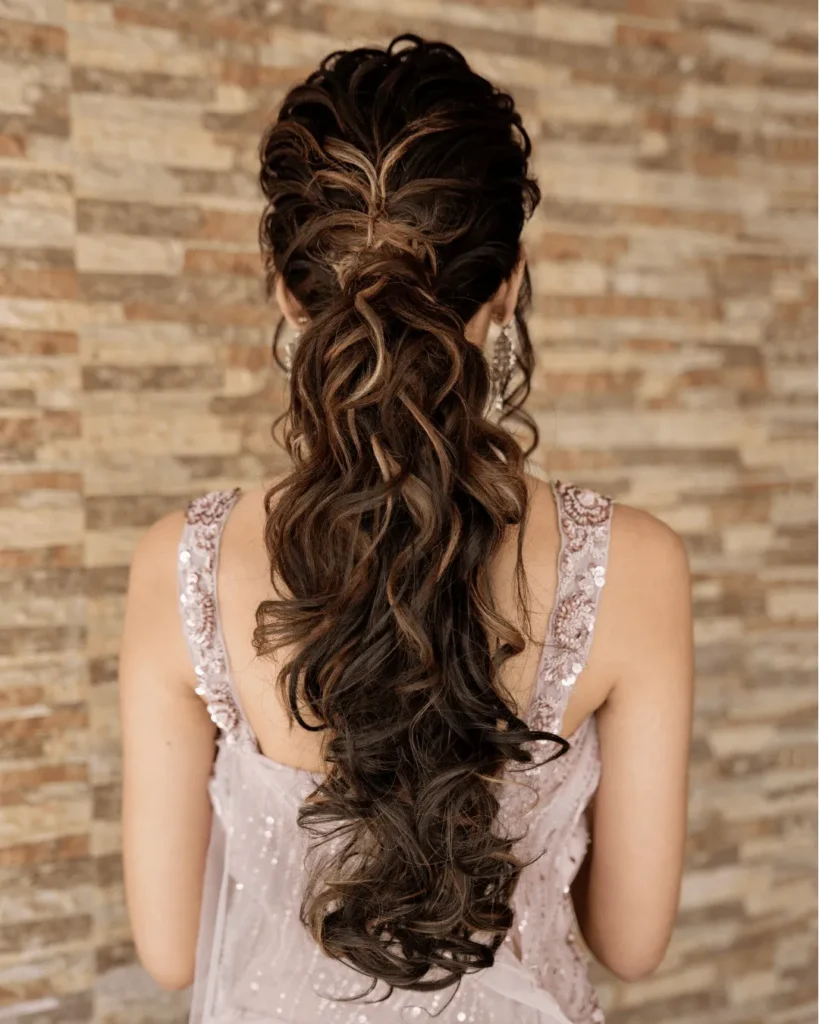
Source: auraabridalstudio
This ponytail is anything but basic. Packed with curls from base to tip, it creates a shape that looks full and dimensional rather than flat and limp. The gathered form keeps everything lifted while the curls add movement that catches the eye from every angle.
Curl the hair in sections before you gather it, then loosen the curls slightly so they blend together instead of looking individually defined. Tie everything at a mid or high level depending on the lift you want, and shape the curl mass into a rounded form as you secure it. This creates that bouncy, full finish.
Never brush through the curls once you have gathered the pony. Brushing breaks down the curl pattern and causes volume to drop almost immediately. Use your fingers to gently separate and shape if needed, and finish with a light-hold spray to keep the bounce intact throughout the day or night.
7. Double Crown Braid Straight Length
Source: db_nail_beauty_studio
Two braids running side by side along the crown create a strong, symmetrical outline that frames the head beautifully. The rest of the hair stays sleek and straight below, giving you that clean contrast between structure up top and smooth simplicity through the length.
Part the hair cleanly down the center first, then form one braid along each side of the crown, keeping the thickness and direction consistent on both sides. Let the remaining length fall straight and smooth it lightly with a finishing serum or a flat iron pass to keep everything polished and in line.
Read More : 26 Updos for Long Hair Perfect for Events
8. Long Thick Braid Rose Tie
Source: kat.d0ll
There is something classic and quietly confident about one thick, full braid running straight down the back. No layers, no extras, just a clean braid that commands attention through its fullness and length. The rose tie at the end adds a feminine touch that keeps it from feeling too plain.
Gather all the hair at the back and braid it evenly from root to tip, keeping your grip steady so the width stays consistent all the way down. Tie it off neatly and then choose your rose tie placement based on the length of your hair. It should sit where it feels like a natural finishing point, not tucked away or crammed at the very end.
One thing to watch is the tension near the start of the braid. Gripping too tightly at the top narrows the braid immediately and you lose all that beautiful thickness. Start with a slightly relaxed hold and maintain it throughout so the braid stays wide and full from crown to tip.
9. Glossy Deep Wave Side Clip
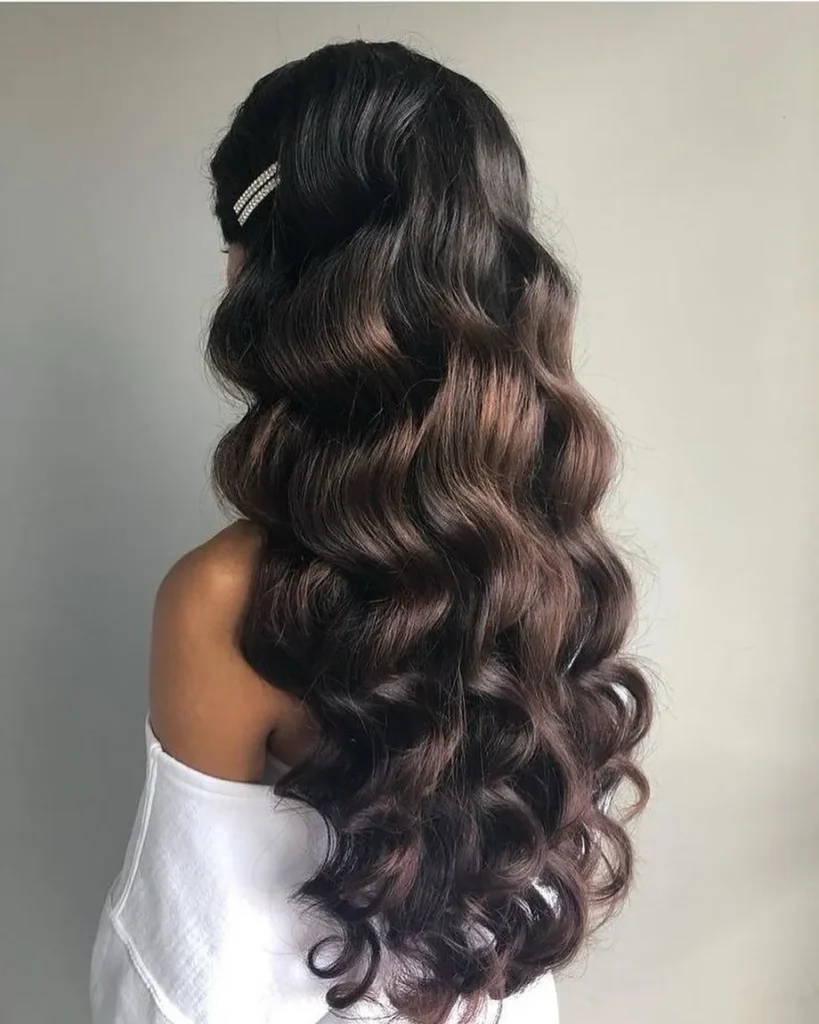
Source: hairstyleslate
Deep waves are inherently glamorous, and sweeping them to one side makes the style feel intentional and directional. The clip anchors everything in place while letting the waves do the visual work. This one photographs beautifully and looks great on both straight and naturally wavy hair textures.
Create your deep waves using even sections and a large barrel iron, then guide all the waves toward one side before securing with a clip that holds the shape without flattening it. Keep the surface smooth as you work so the wave pattern stays continuous and does not break or kink in the middle.
Once the waves are set and clipped, leave them alone. Adjusting them after setting is the fastest way to break the pattern and ruin the flow. A light mist of shine spray before you clip will give that glossy finish that makes deep waves look so luxurious, and it also helps the shape hold longer.
10. Soft Crown Braid Loose Waves
Source: iffat_art_and_craft
A braid along the crown paired with loose waves underneath is one of those styles that looks like it took effort but actually comes together quickly. The braid defines the top of the style while the waves keep the rest feeling relaxed and easy. Together they make a combination that is both polished and approachable.
Start from one side and braid gently across the crown toward the opposite side, keeping the tension light so the roots do not look flat. Pin it in place and then let the remaining length fall into loose waves. The transition between the braid and the waves should look blended, not like two separate things happening at once.
Position matters with the crown braid. If it sits too far back, it loses the framing effect around the face and the style looks more like a headband than a braid. Keeping it slightly forward gives your face that flattering frame while the waves balance things out below.
11. Half Up High Pony Waves
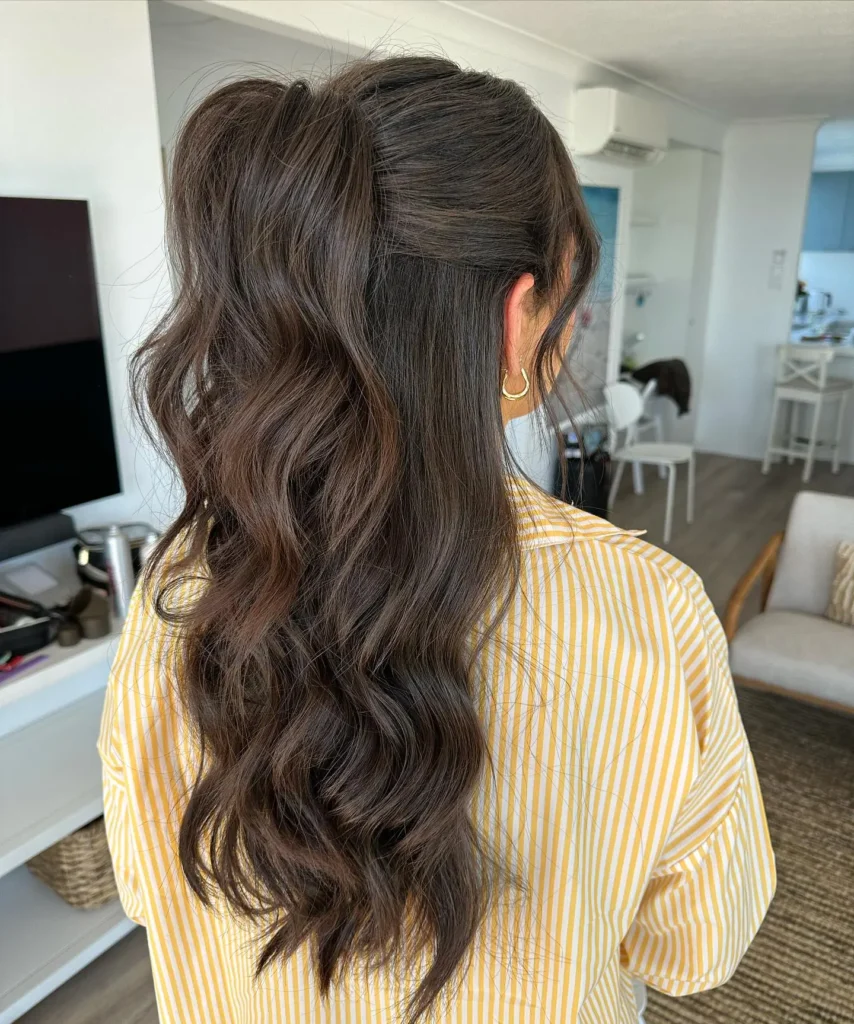
Source: hairbylaceygc
Taking the top half of your hair into a high ponytail while leaving the rest down gives you the best of both worlds. You get lift and shape at the crown, plus free-flowing movement through the length. It is casual enough for daytime but elevated enough for an evening out.
Gather the top section higher than you normally would and secure it firmly so it holds its height without slipping. Before you tie the lower section, curl it lightly so the waves align naturally with the ponytail rather than looking disconnected. When everything blends together, the style reads as one cohesive look.
The height of the pony determines the whole vibe. Too low and it looks like a basic half up that you threw together in two minutes. Keep the pony sitting high enough that there is a noticeable lift above the crown, and that height is what makes the look feel styled and intentional rather than casual and rushed.
12. Butterfly Accent Twisted Waves
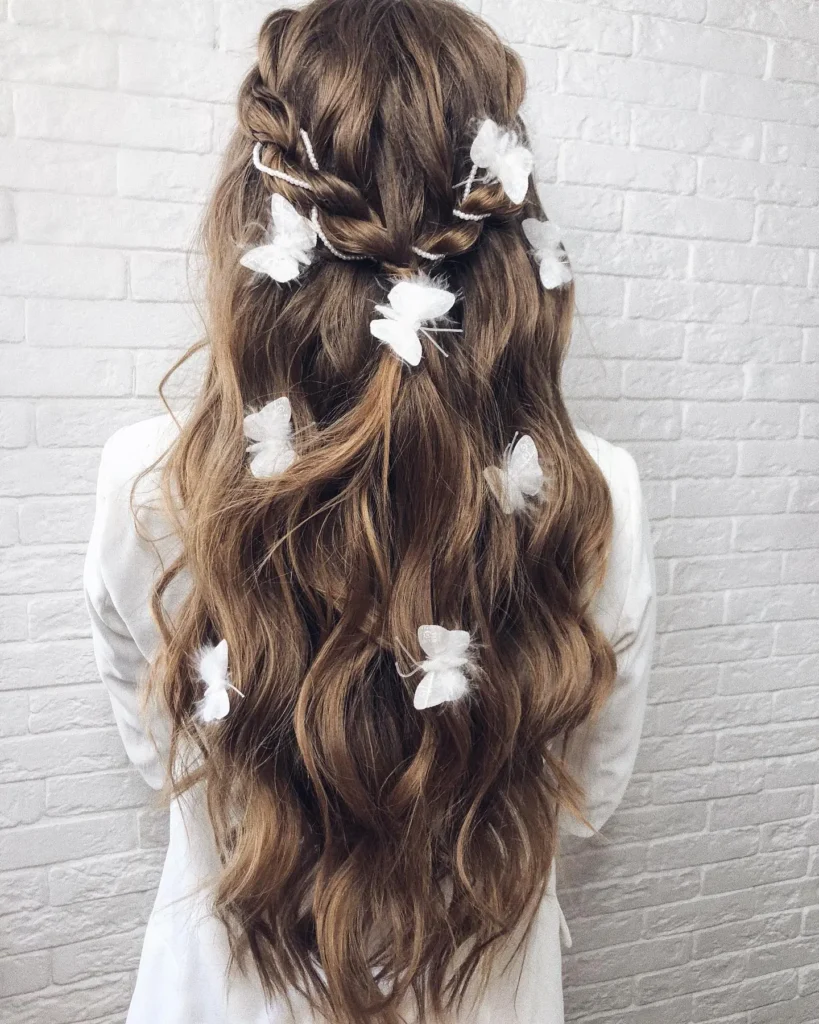
Source: svetlana_koroteeva
Small twists pulled from each side of the face meet at the center and hold the style together, while waves cascade below to keep everything flowing and soft. The butterfly accent placed at the joining point gives the look a focal point that feels whimsical without being over the top.
Take thin sections from both sides and twist them inward toward the back of the head, keeping the tension even so both sides sit symmetrically. Secure them together at the center and place your butterfly accent directly on top. Let the remaining length fall into soft waves that blend smoothly with the twisted sections above.
Keep the twists refined and on the thinner side. When they are too thick, the center gets bulky and the accent gets lost in all that volume. Thin, controlled twists let the butterfly stand out as the clear focal point, and the waves below stay the star of the length.
Read More : 25 Formal Hairstyles for Long Hair for Special Days
13. Braided Crown Golden Curl Flow
Source: clairehartleystylist
A crown braid paired with golden, defined curls below is a combination that feels both structured and romantic at the same time. The braid anchors the top of the head while the curls add energy and movement through the length. It is one of those styles that looks completely different from every angle.
Form the crown braid first, guiding it steadily along the hairline without over-tightening at the roots. Once it is pinned, curl the remaining hair in well-defined sections so the pattern underneath looks consistent and intentional. Curls that are too random can make the style look messy rather than deliberately styled.
Make sure the braid has enough width to hold its presence against all those curls below. A thin braid gets visually swallowed and loses its purpose as the framing element. Keep it full enough that it draws the eye across the crown, and the curls will naturally follow that lead downward.
14. Twisted Braid Low Pony Blend
Source: lena_satory
A low pony gets a serious upgrade when twists and braids are woven together before they are gathered. Instead of a plain, simple pull-back, you get a blended pattern at the base that looks detailed and intentional. The length below falls cleanly and the whole thing sits beautifully at the nape.
Start by twisting sections from each side of the head, then merge them into a braid before securing everything into the low pony at the nape. Keep each section even as you work so the transition from twist to braid looks smooth and natural, not abrupt or tangled. This blending is what makes the style look seamless.
Resist the urge to place the pony higher than the nape. The low placement is what defines this style and gives it that elegant, refined quality. Moving it up breaks the structure and makes the blended base look out of place. Trust the low placement and let it do its thing.
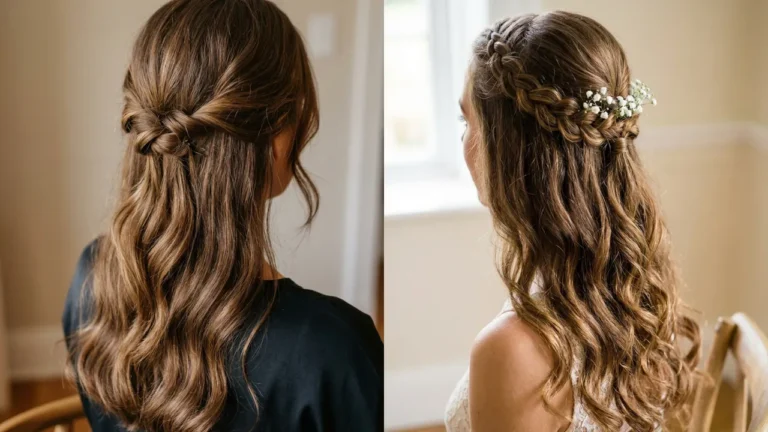
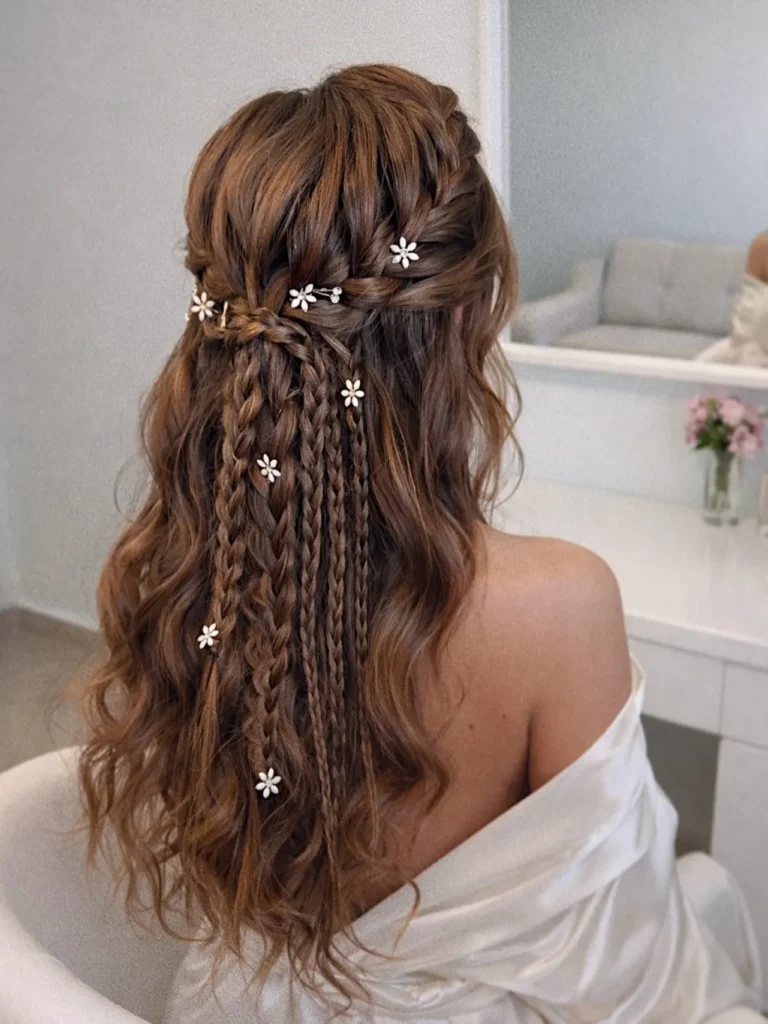
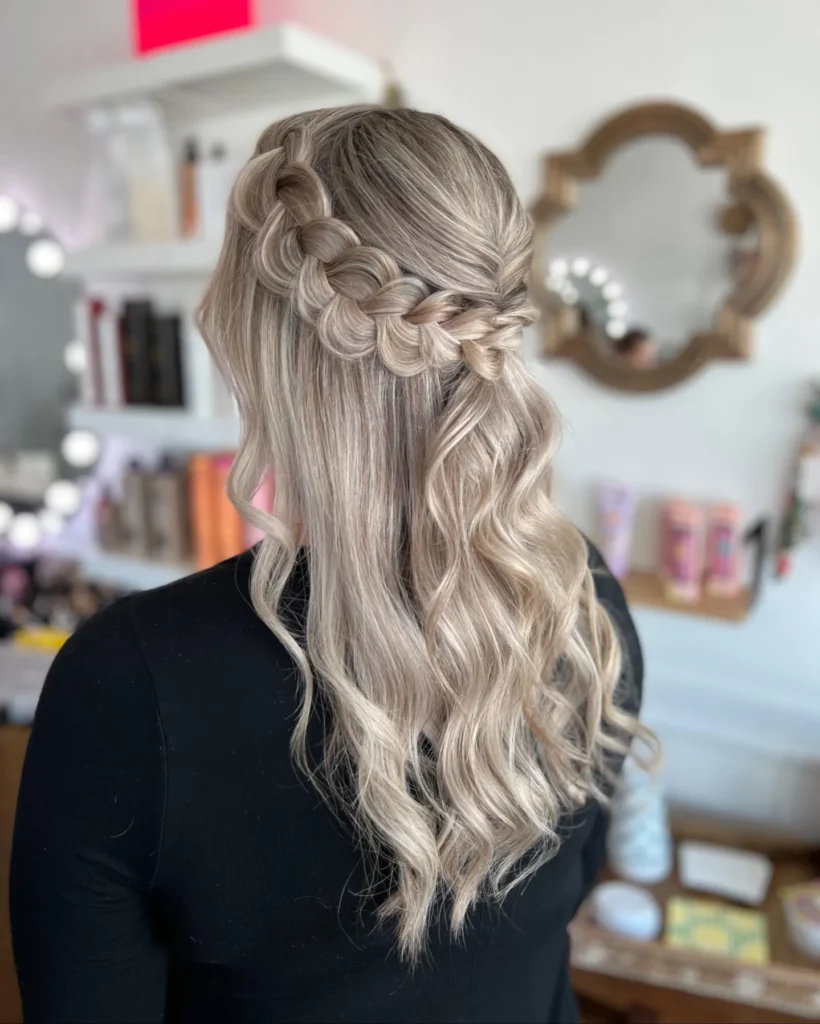
15. Pearl Accent Half Up Waves

Source: prepup_by_priyanka
Pearls placed along a half up style give it an instant feeling of elegance. They draw attention to the center of the head without distracting from the waves flowing below. This style is popular for weddings, graduations, and any occasion where you want to look quietly luxurious.
Lift the top section and secure it at mid-head level, then place individual pearls or a pearl pin along the joining point to highlight the structure. Shape the lower hair into waves that stay consistent from mid-length through to the ends. Consistency in the wave pattern is what makes this look polished rather than haphazard.
Spacing is everything with the pearls. Clustering too many together in one place looks heavy and takes the focus away from the wave texture below. Spread them out evenly along the secured section and let there be breathing room between each one. The more deliberately you space them, the more expensive the whole style looks.
16. Statement Bubble Ponytail Glam
Source: beena_bridalmakeover
The bubble ponytail is having a major moment and once you see why, you will understand the obsession. Instead of hair that just hangs from a tie, each section puffs out into a rounded bubble that creates visual rhythm all the way down the length. It is bold, fun, and surprisingly chic.
Start with a high or mid ponytail secured firmly, then add elastics at even intervals down the length. After each elastic is placed, gently pull the section outward from all sides to inflate each bubble into a full, rounded shape. Keep your spacing consistent because uneven bubbles are what make this style look messy instead of intentional.
The elastic tension is the trick most people get wrong. Pulling the ties too tight compresses the hair and removes the rounded bubble shape entirely. Aim for a snug hold that keeps the section in place without squashing it flat. Once each bubble is shaped, a little finger-fluffing is all you need to perfect the roundness.
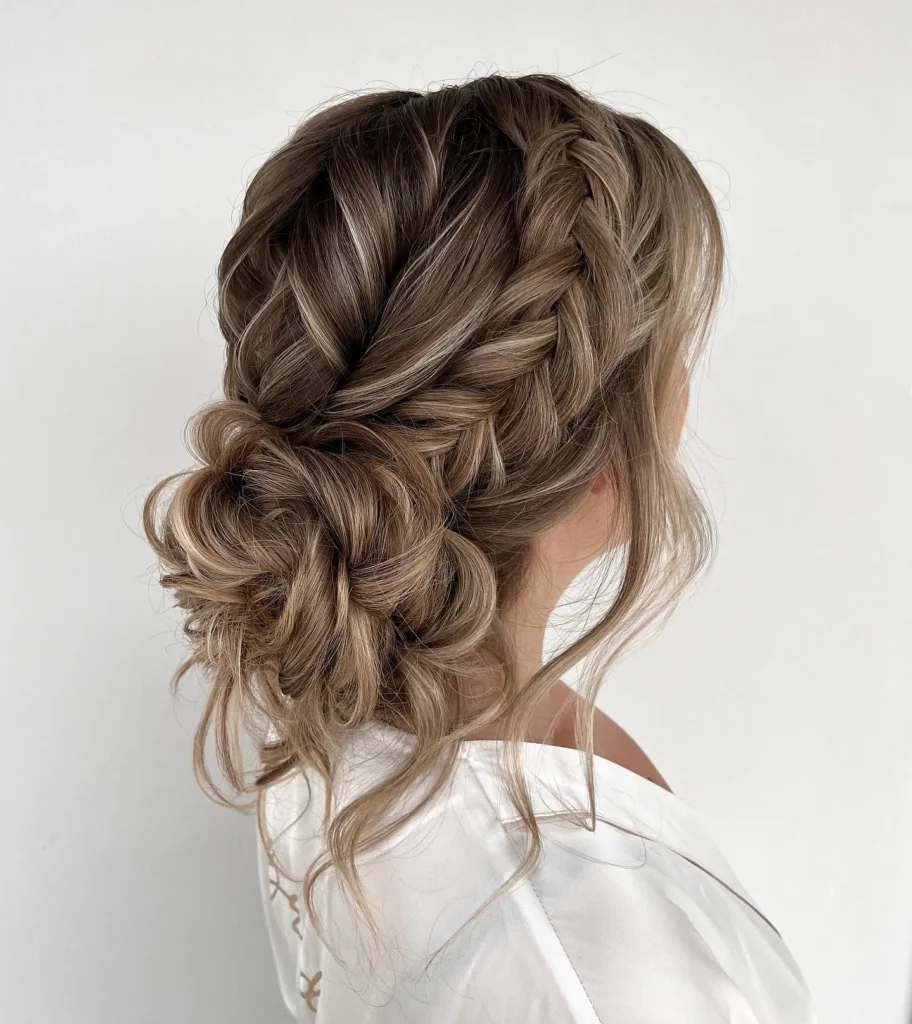
17. Intricate Braided Low Bun Updo
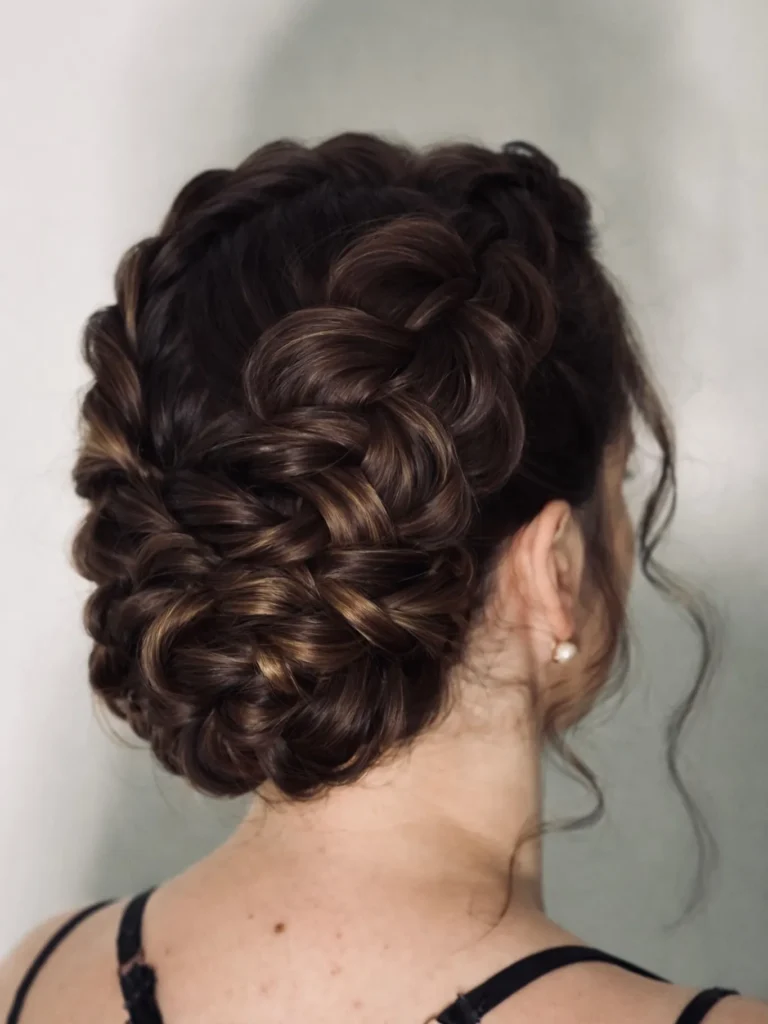
Source: hairzstueck_theresa
Multiple braids gathering into a low bun at the nape creates a style that looks like it came straight from a bridal editorial. The detail is visible from multiple angles because the braids are layered into the bun rather than hidden inside it. It is the kind of updo that makes people ask who did your hair.
Create several smaller braids across the head and guide them all toward the nape, but wrap them into the bun gradually rather than pushing everything together at once. Secure each layer separately as you build so the texture stays visible on the surface. This staged approach is what separates a structured bun from a messy one.
Spreading the braids evenly as they merge into the bun is the key to keeping the shape balanced. Overlapping too many braids in one spot creates a lopsided, heavy-looking base. Even distribution keeps the bun compact without bulging on one side, and allows every individual braid detail to remain visible and clear.
18. Soft Loop Braid Half Style
Source: kaylaanne_flores
Loops woven into a half up style bring a fresh, almost architectural quality to the look without leaning on traditional braid patterns. Each loop adds shape and dimension while keeping everything feeling light and open. It is different enough to stand out but soft enough to wear anywhere.
Take small sections from the top half of your hair and fold them into loops before pinning them at the back. Keep each loop similar in size so the finished design looks balanced across both sides. Let the lower half of the hair fall naturally so the looped section stays visible and does not compete with too much going on below.
19. Floral Detailed Multi Braid Cascade
Source: hairstylist_kritika
This is the style for anyone who loves a high-impact back view. Layers of braids flow downward in a cascading pattern, and small floral details between sections give the design just enough contrast to make the braid work pop. From behind, it looks like something out of a fantasy.
Start with multiple sections at the crown and braid them in varying sizes so the overall pattern has visual interest and does not feel too uniform. Allow each braid to naturally flow into the next layer below it, and maintain clear spacing between sections so every braid stays distinct and readable.
The urge to add more braids is real with this style, but overcrowding is what kills the cascade effect. When braids are packed too tightly together, you lose the depth and the layering disappears into one dense block. Keep the gaps intentional and the spacing clear, and the cascade will do its job of drawing the eye from crown to ends beautifully.
20. Soft Volume Twisted Low Bun
Source: lalasupdos
A low bun does not have to look flat and deflated. When you build it using twists instead of a single gathered knot, you end up with a bun that has natural volume and gentle dimension. It stays professional and neat while still looking like something you actually put thought into.
Twist sections from both sides of the head and guide them toward the nape, then wrap them loosely into a bun while securing in layers. The keyword is loosely. Keeping the twists relaxed as you form the bun allows each section to retain its shape instead of getting compressed into nothing at the base.
Volume in a bun comes from how you build it, not from how much hair you have. Even if your hair is medium thickness, layering the twists and securing gradually will give the bun a fuller appearance. Pulling everything tight in one go does the opposite and makes even thick hair look flat and small.
21. Half Up Bow Twist Lengths
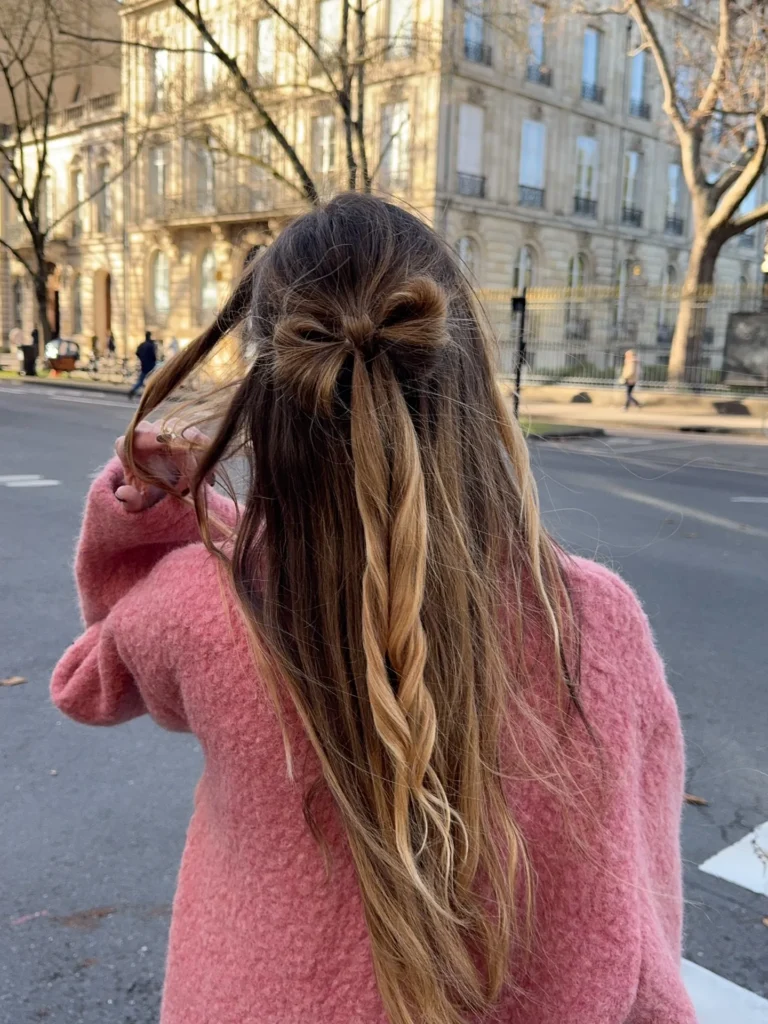
Source: marlene_rougier
A bow made from your own hair is one of those details that feels playful and polished at the same time. The twisted sections form the bow at the back while the remaining length flows freely below, and the contrast between structure and movement is exactly what makes this style so satisfying to look at.
Divide the top section into two equal parts and twist each into a loop to form the bow shape. Secure both sides carefully so they stay even and the bow holds its form throughout the day. Let the rest of the hair fall straight or in light waves below so the bow remains the clear focal point of the style.
Evenness is non-negotiable with the bow. If one loop is bigger or positioned higher than the other, the asymmetry is immediately obvious and the style looks more like a mistake than a choice. Take an extra moment to match both sides before you secure them, and your bow will look deliberately beautiful rather than accidentally lopsided.
22. Sleek Low Tie Soft Waves
Sometimes the most elegant option is also the simplest. A clean low tie at the nape paired with soft waves through the length is one of those understated styles that always looks intentional. Nothing flashy, nothing complicated, just a put-together look that works for almost any occasion.
Gather the hair neatly at the nape and secure it with a clean, simple tie. Keep the surface smooth from the crown down to the tie, but avoid flattening the hair completely because a little natural body keeps the top from looking pressed and lifeless. Shape the length into loose waves that fall naturally from the secured base.
Tie tension affects the whole look more than people realize. Pull too tight and the crown loses all its volume, making the style look harsh and flat from the top. A slightly relaxed hold at the tie keeps the body intact through the upper sections while still keeping the lower length tidy and controlled.
23. Half Up Velvet Bow Flow
A velvet bow placed at the center of a half up style is the kind of detail that feels intentionally luxurious. The rich texture of the bow contrasts beautifully against the softness of flowing hair, and the result is a style that looks both expensive and approachable at the same time.
Lift the top section and secure it at mid-head level, then place the velvet bow directly at the center point where the hair is tied. Let the rest of your hair fall below in soft waves or straight lengths, whichever suits your natural texture. The lower half should stay relaxed so the bow stays the center of attention.
Bow placement is everything. Too high and it makes the style feel juvenile. Too low and the bow gets hidden in the waves below it. The sweet spot is mid-head, centered precisely, where it can be seen clearly from both the front and the side. When it is placed right, this small detail elevates the entire look.
24. Braided Crown Half Down Style
A crown braid paired with the rest of the hair left down is one of the most versatile styles on this list. It works for casual days when you want something a little more interesting than a headband, and it works just as well for events when you want structure without a full updo.
Start from one side of the hairline and braid along the crown toward the opposite side, maintaining even tension throughout so the pattern stays consistent. Pin it securely once it reaches the other side, and then let the remaining hair fall however feels natural, straight, wavy, or lightly curled all work beautifully with this top detail.
The braid tension is what makes or breaks this style. Pull too tight and the crown flattens out, losing all its natural volume and making the braid look like it is straining against the head. A relaxed braid sits on top of the hair naturally, keeps visible depth in the pattern, and blends with the length below without looking forced.
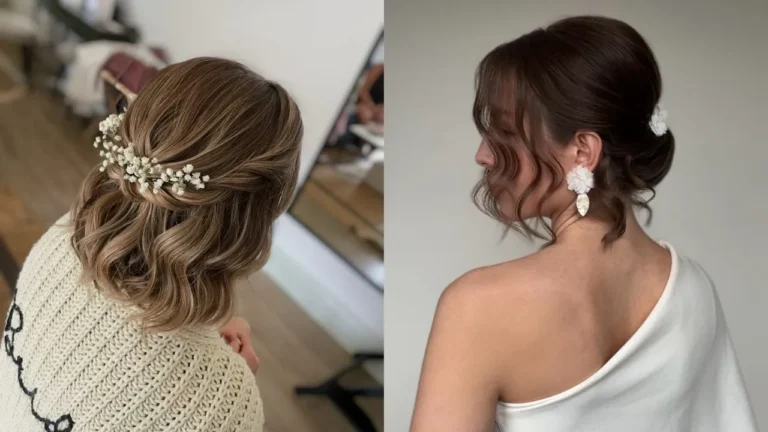
25. Twisted Low Bun Pearl Accents
This is the one to save for the moments that matter. Twists gathered into a low bun at the nape create a compact, elegant base, and pearl accents placed within the structure add a layer of refinement that feels bridal, formal, and beautifully curated all at once.
Twist sections from both sides and bring them toward the nape, wrapping them into the bun gradually and securing step by step rather than all at once. As you build, place individual pearl pins lightly between the twisted sections so they sit within the structure rather than on top of it. This placement makes the pearls look like they are part of the design, not just pinned on afterward.
Pearl spacing is the finishing detail that separates a great version of this style from a basic one. Concentrating all the pearls in one spot makes that area look heavy while the rest of the bun looks unfinished. Spread them evenly across the whole bun surface and the result is a style that looks thoughtfully crafted from every angle.
Occasion Compatibility
Before choosing a hairstyle, it helps to think about where and when you’ll wear it. Some styles hold better during long days, while others work best for short events or evenings out. Matching the hairstyle with the occasion makes everything feel more intentional and easier to manage.
Hairstyle Type | Best Setting | Effort Level |
|---|---|---|
Sleek High Pony | Gym / Active Day | Low |
Braided Crown | Outdoor Events | Medium |
Pearl Low Bun | Formal / Wedding | High |
Glossy Side Waves | Date Night | Medium |
Longevity Secrets
Once you’ve picked a style, the next step is making sure it actually lasts. Long hair can lose shape quickly if not secured properly, so a few small habits can help maintain the structure throughout the day without constant fixing.
- Avoid Over-Touching: The more you adjust your hair, the faster it loses shape and starts to frizz.
- Cool Down Time: Let curls and waves set fully before styling further to lock in the pattern.
- Internal Support: Use hidden pins or elastics inside buns and braids to keep everything in place longer.
Texture Mastery
Hair texture also changes how each style turns out, which is why the same look can feel different from person to person. Working with your hair type instead of forcing it into a style makes the result more natural and easier to maintain.
- Fine Hair: Use dry shampoo or volume powder at the roots to add grip before styling.
- Thick Hair: Divide into smaller sections to control weight and keep the shape balanced.
- Curly Hair: Follow your natural pattern instead of flattening it to maintain better structure.
Tool Essentials
Finally, having the right tools makes the process smoother and more controlled. You don’t need many, but the right ones can make a noticeable difference in how clean and long-lasting your hairstyle turns out.
- Boar Bristle Brush: Helps smooth the surface for a cleaner finish.
- Clear Elastics: Keep the focus on the hairstyle without visible distractions.
- Sectioning Clips: Make styling more precise and easier to manage.
FAQs
1. Which fancy hairstyles work best for long hair daily?
Half-up styles, low buns, and soft braids work well for daily wear since they balance style and practicality.
2. How can I make fancy hairstyles last longer?
Use light hold products, secure sections properly, and avoid over-touching once the style is set.
3. Are these hairstyles suitable for thin hair?
Yes, just add texture spray or light teasing to create volume before styling for better results.
4. Can I create these styles without heat tools?
Many braided, twisted, and bun styles can be done without heat, especially with slightly textured hair.
5. How do I choose the right hairstyle for an occasion?
Go for structured styles like buns for formal events and loose waves or ponytails for casual settings.
Conclusion
The right hairstyle can shift your entire appearance and confidence without changing your length. These fancy hairstyles for long hair give you multiple ways to refresh your style and avoid falling into the same routine.
Try a few, see what works best for your hair, and make them your own. Save your favorites on Pinterest and share them with someone who needs new hair inspiration.