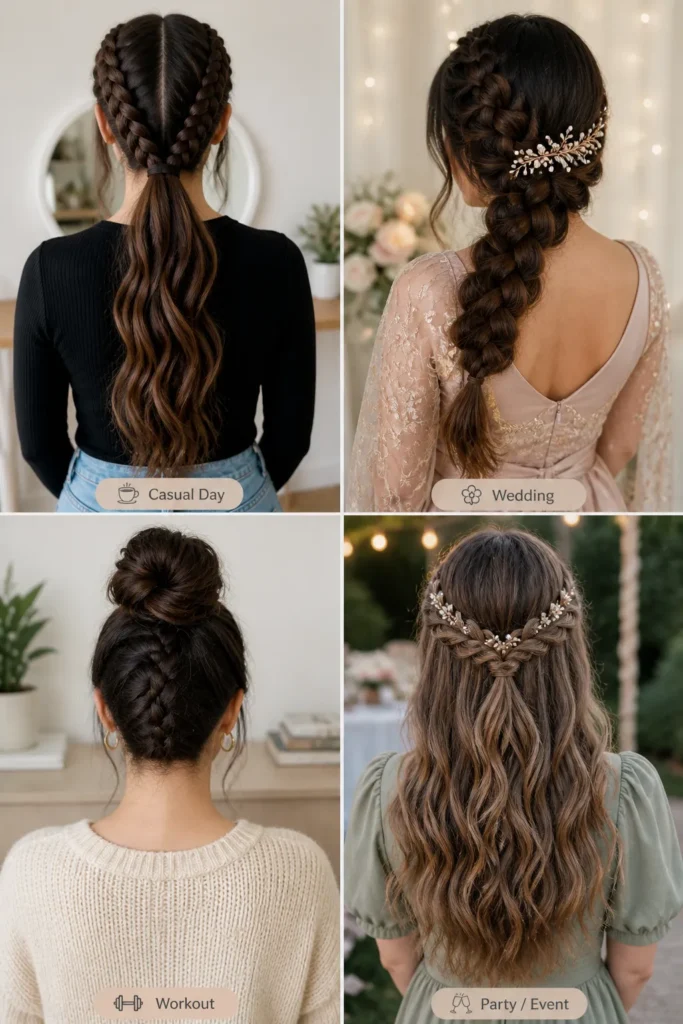
25 Different Types of Braids and How to Choose One
Struggling to find a hairstyle that actually fits your routine and still looks stylish? These 25 different types of braids are designed to make your hair feel more put-together without adding extra effort to your day.
This guide helps you choose styles that solve real hair concerns, whether it’s keeping strands in place, adding detail without heat, or finding something that works for both casual days and special occasions. In my experience, the right braid can completely change how your hair sits and how confident you feel throughout the day.
As you explore each idea , you’ll notice how small changes in technique, placement, or sectioning can create a completely different look. That’s what makes braids so versatile, they adapt to your hair, your time, and your style.
Why Braids Still Stay Popular
Braids have a way of making life easier without taking away from your style. On days when everything feels rushed, a simple braid can bring your hair together quickly while still looking put-together and intentional.
They also give you room to switch things up without doing anything drastic. One day can be sleek and controlled, the next can feel more relaxed and playful, all without changing your haircut or spending extra time.
Another reason people keep coming back to braids is how adaptable they are. No matter your hair type or length, there’s always a version that works, which makes them feel approachable rather than complicated.
What to Consider Before Choosing a Braid
Source: junetomkynssalon
Before choosing a braid, it helps to think about how your hair behaves during the day. Some styles hold their shape for hours, while others start to loosen quickly depending on texture and movement.
Your routine matters just as much as the style itself. If you’re heading out for a long day, you might want something that stays secure, while lighter styles work better when you want something easygoing and flexible.
It’s also worth thinking about how you want your hair to sit. Some braids frame your face softly, while others pull everything back, so choosing based on how you want it to feel makes the process much simpler.
Now that you know what to look for and how different factors affect your choice, it becomes easier to explore each braid type and find the one that fits your routine and preference.
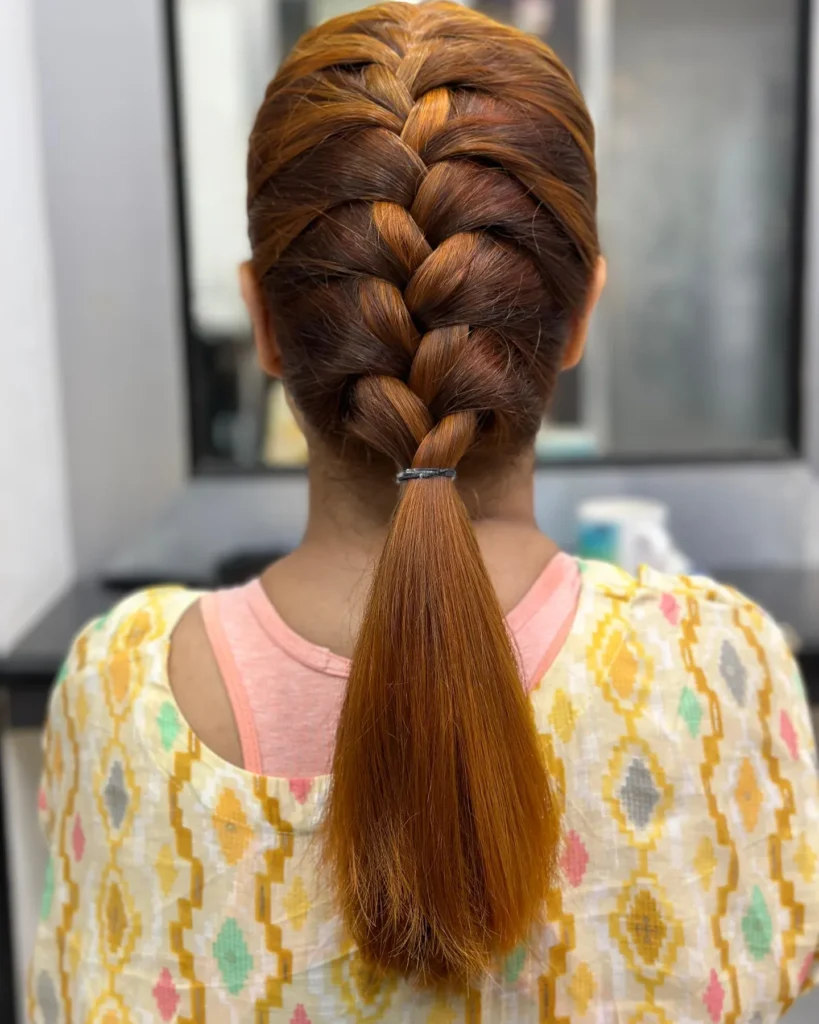
1. French Braid
Source: virmartinsanjuan
Hair pulled back neatly can change how the whole day starts. A French braid brings control without looking flat, keeping strands in place while still showing texture. It works across lengths and handles humidity better than most loose styles.
Sections are added gradually, which means the braid tightens naturally as it goes down. That’s why it holds longer without needing constant fixing. Clean parting at the start makes a big difference, especially near the crown where shape defines everything.
If strands slip early, the base wasn’t secure enough. Keep tension balanced, not tight. Finish slightly loose near the end so it doesn’t feel stiff. That small adjustment changes how comfortable it stays after hours of wear.
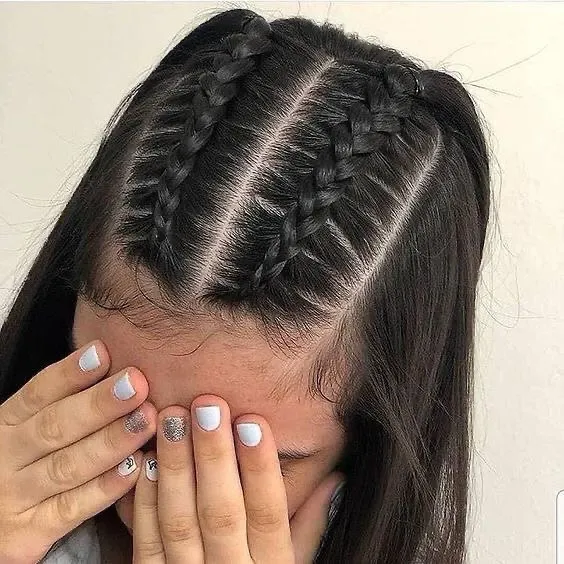
2. Side Dutch Braid
Source: missysueblog
From experience, shifting a braid to one side instantly changes the mood without extra effort. A Dutch braid already sits raised, and placing it off-center brings more dimension. It frames the face differently, especially when the front pieces are left slightly undone.
The underhand weaving technique builds that lifted effect, which stands out more in thicker hair. Volume comes from gently pulling sections apart after finishing, not during. Doing it too early breaks the structure before it forms properly.
Keep the braid aligned with the jawline instead of dragging it too low. That small angle choice changes balance. Avoid over-loosening near the scalp, or it loses shape faster than expected during the day.
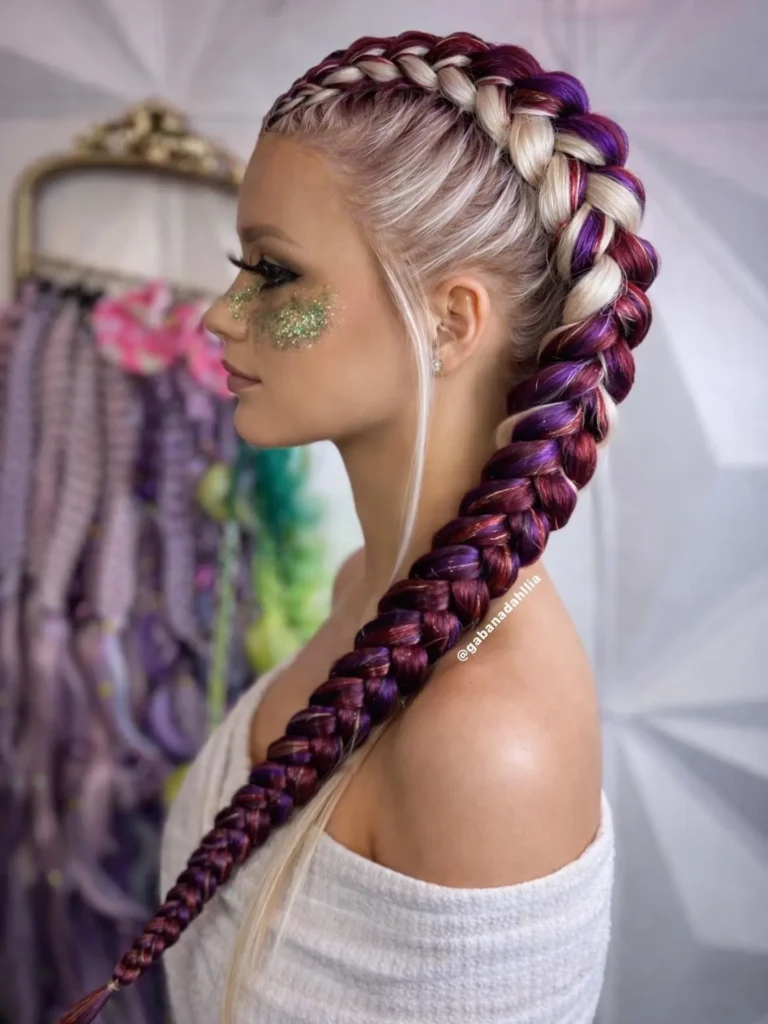
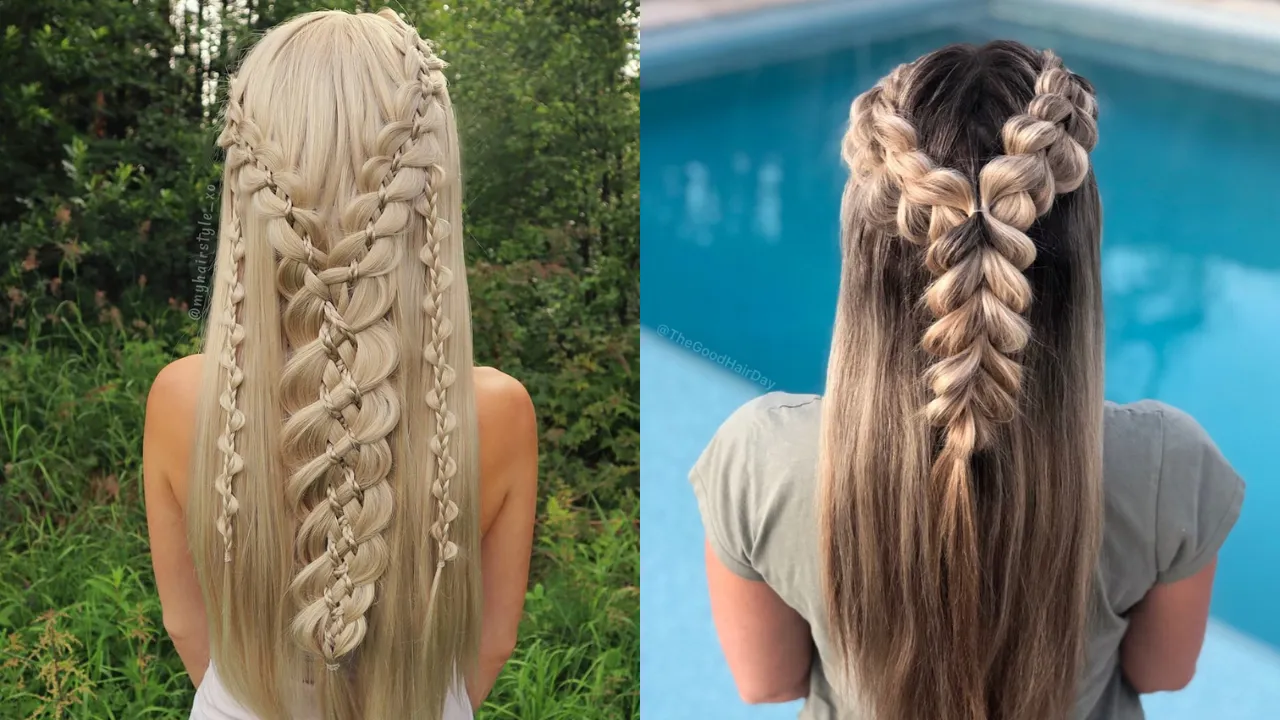
Source: gabanact
Bold color placement can completely change how a braid feels without needing extra accessories or complicated styling. This vivid Dutch braid combines deep purple and magenta tones with oversized weaving, helping the hairstyle stand out beautifully during festivals, concerts, and creative event looks.
The thicker braid pattern keeps the color contrast visible from every angle while the cleaner scalp sections maintain sharper definition near the crown. Glitter makeup and softer outfit textures pair especially well with this kind of statement braid.
Read More : 22 Slick Back Hairstyles for Every Occasion Look
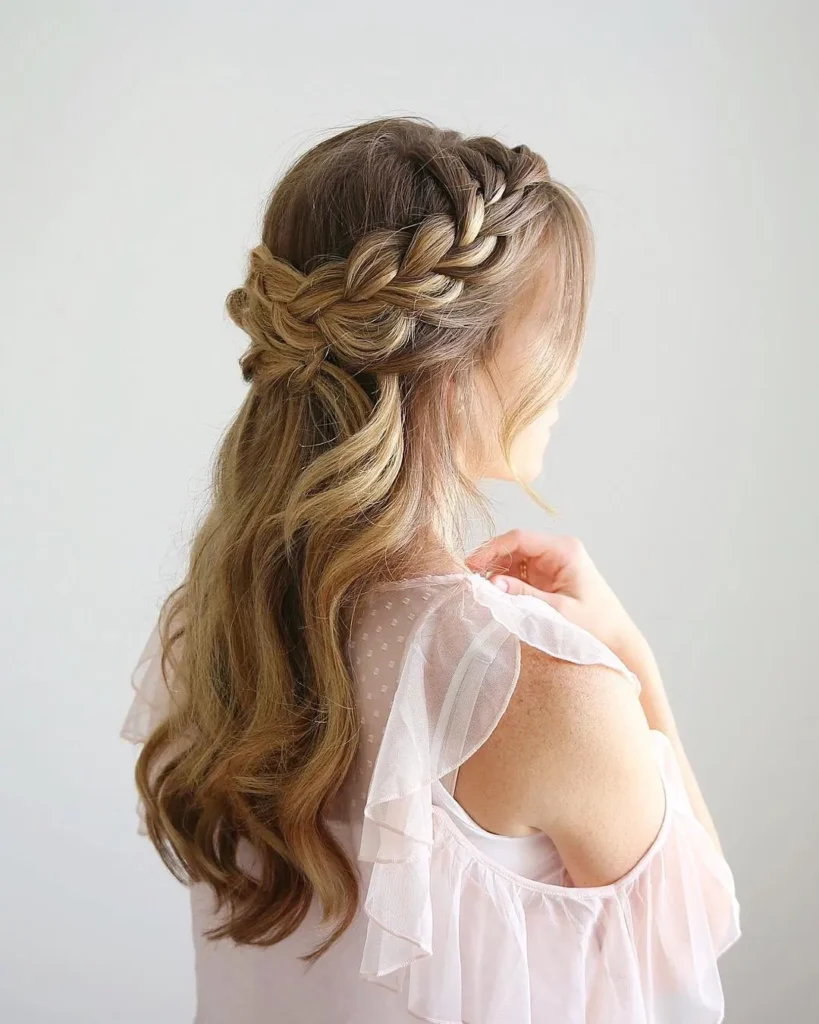
3. Crown Half Braid
Source: missysueblog
A braid that does not take over the entire hairstyle brings a lighter balance, and a crown half braid sits across the back of the head while leaving the remaining hair open, which keeps the style from feeling overly controlled.
Two sections from each side meet at the center, forming a frame that depends more on positioning than complexity, since placing it too high separates it from the rest, while too low causes it to blend into loose hair.
Layered hair needs careful handling during braiding, so shorter pieces should be guided inward instead of forced, allowing the ends to fall freely rather than being pinned tightly, which keeps the finish more balanced.
4. Zipper Braid

Source: poppy_hairstyles
At first glance, this one almost looks too complex to attempt, yet the pattern becomes clear once sections start looping in sequence. The zipper braid stands out because each strand locks into place, forming a clean, defined line.
Instead of traditional weaving, sections are passed through small openings, building that zipper-like effect. Consistency matters more than speed here, since uneven spacing quickly disrupts the alignment through the center.
Work slowly near the top where the pattern begins. That area sets the direction for everything that follows. If the start is uneven, the entire braid shifts off balance as you move downward.
Keep fingers close while threading each section so the pattern stays tight and controlled. Rushing through the middle sections often leads to gaps that are difficult to fix later.
Read More : 23 Types of Bangs That Change Your Whole Look
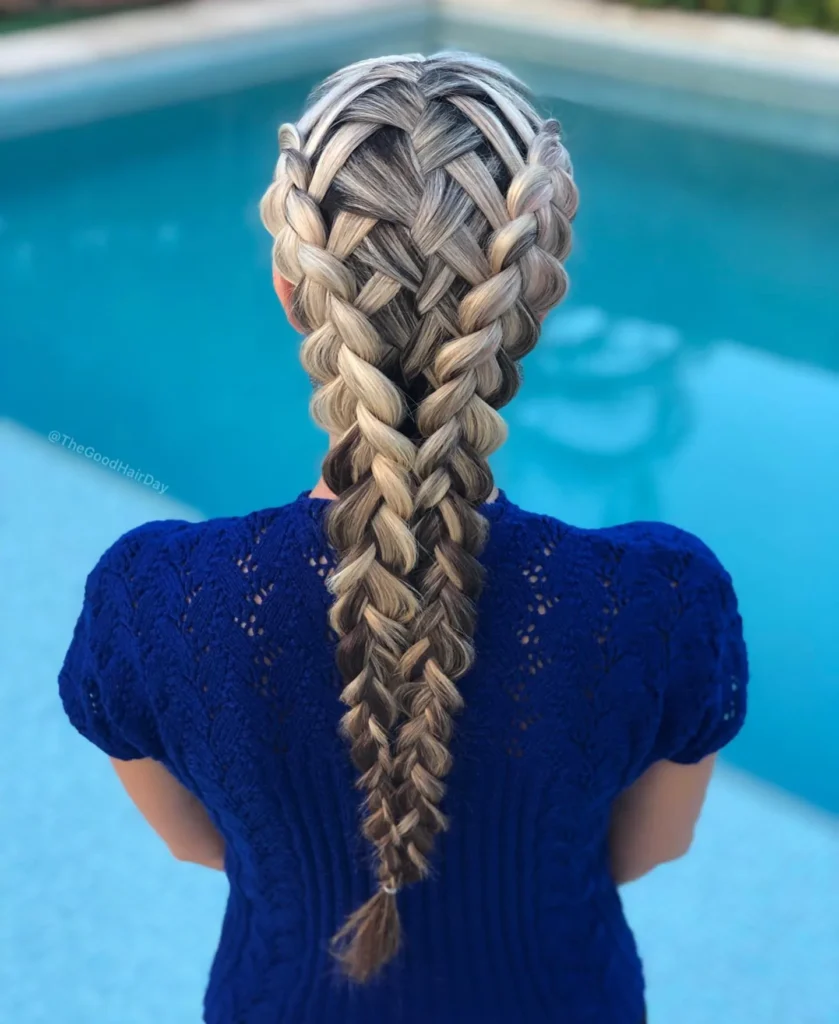
5. Criss Cross Braid
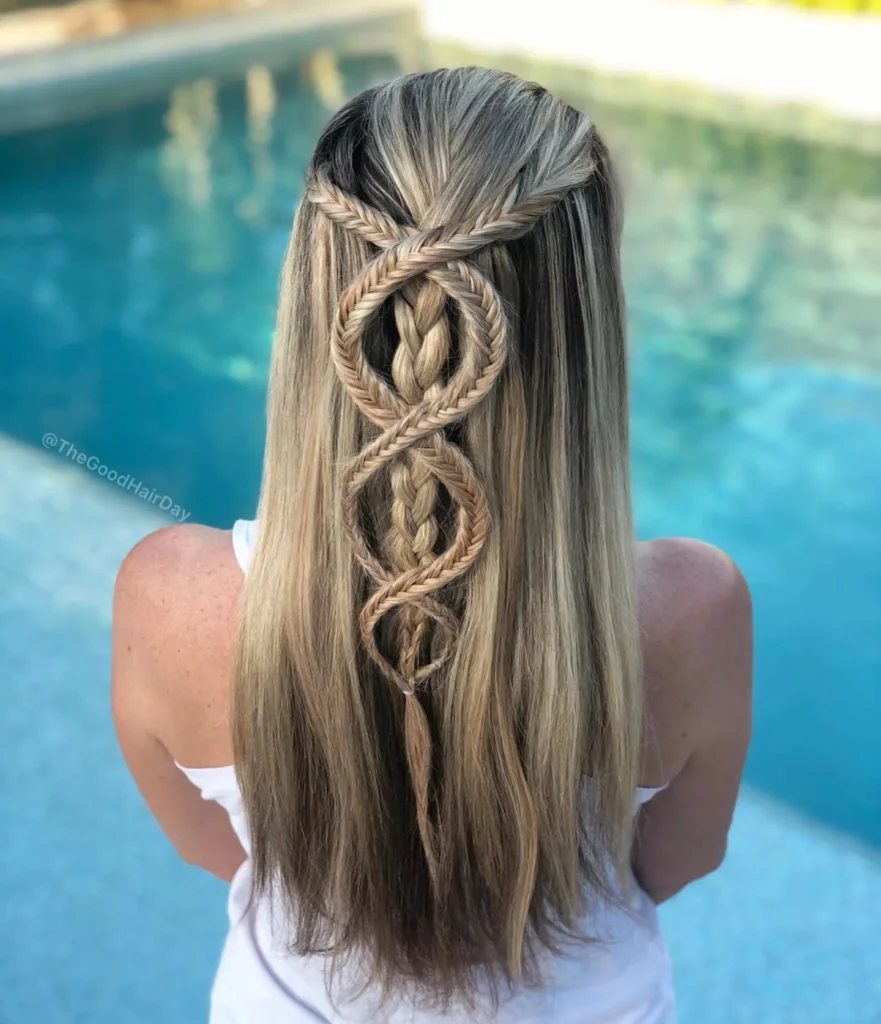
Source: thegoodhairday
Some styles rely more on placement than technique, and this one proves it. Strands cross over each other in sections, forming a layered pattern that feels detailed without needing complex braiding skills at every step.
The key lies in sectioning before starting. Clean parts create that sharp criss cross effect, while uneven divisions make it look messy. Each crossing should sit flat, not twisted, so the design remains visible from every angle.
Avoid pulling strands too tight across the scalp. That flattens the pattern and removes depth. Keep tension steady but relaxed, allowing each crossover to sit naturally without merging into the next section.
6. Braided Low Bun

Source: thegoodhairday
From experience, low buns with braids tend to last longer during busy days compared to loose styles. The braid anchors the structure, while the bun keeps everything contained near the nape, which reduces constant fixing.
Start with a simple braid, then wrap it into a bun rather than twisting first. That order keeps the texture visible instead of hiding it. Placement slightly above the neckline helps maintain balance without dragging the style downward.
Pins should go inward toward the center, not outward. That holds the shape better over time. Leave a few edges relaxed around the face so the style doesn’t feel too rigid after several hours.
Read More : 23 Bun Hairstyles You’ll Want to Try Right Now
7. Braided Top Knot
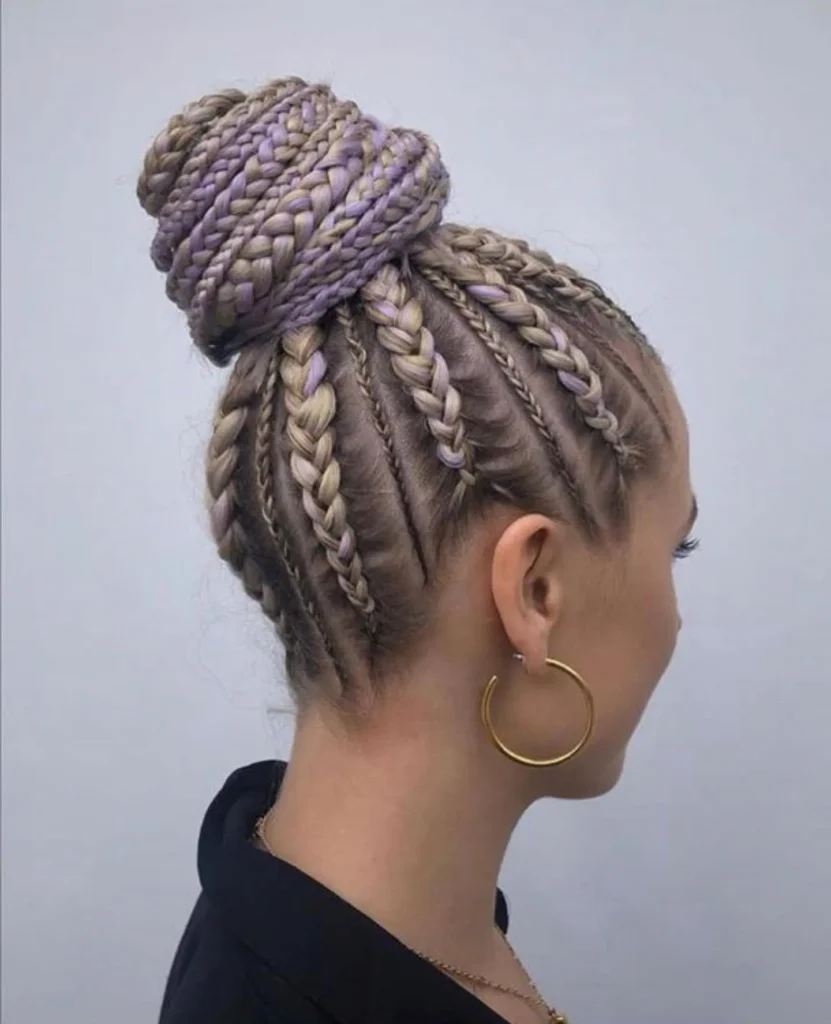
Source: hairtutnet
Some days call for everything lifted away from the neck, and that’s where this style stands out by keeping hair secure while still showing texture across the crown, making it practical without losing visual detail in the upper section.
The braid is formed first and then wrapped into a knot placed high on the head, where height shifts balance noticeably, so keeping the base firm before wrapping prevents movement while slight looseness at the edges avoids a stiff appearance.
8. Waterfall Straight Braid
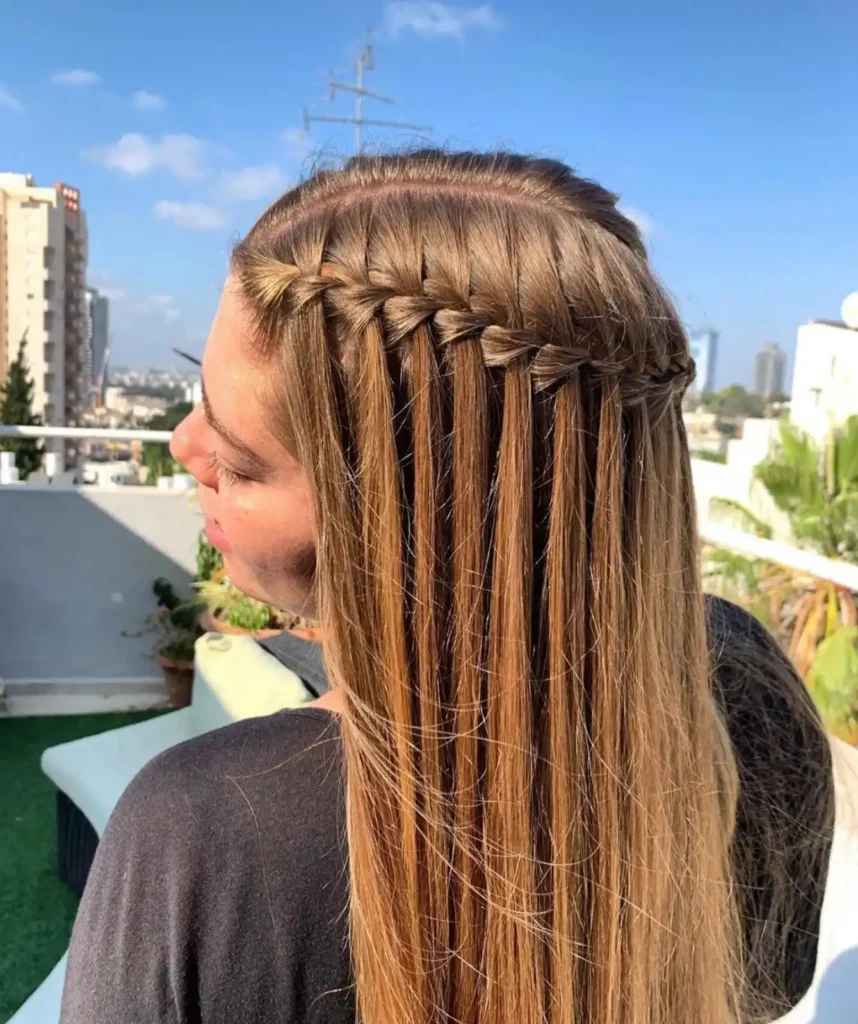
Source: yourbraids
Strands falling through the braid give this style its signature flow. Instead of holding every section, pieces are released as you move along, creating a layered effect that works especially well on straight hair textures.
Control comes from consistent spacing between drops. If sections are uneven, the pattern breaks quickly. Keeping each release similar in size helps maintain that flowing line from one side to the other.
Work in a straight horizontal direction rather than angling downward. That keeps the braid visible across the back. Avoid grabbing thick sections, or the waterfall effect starts to disappear into the rest of the hair.
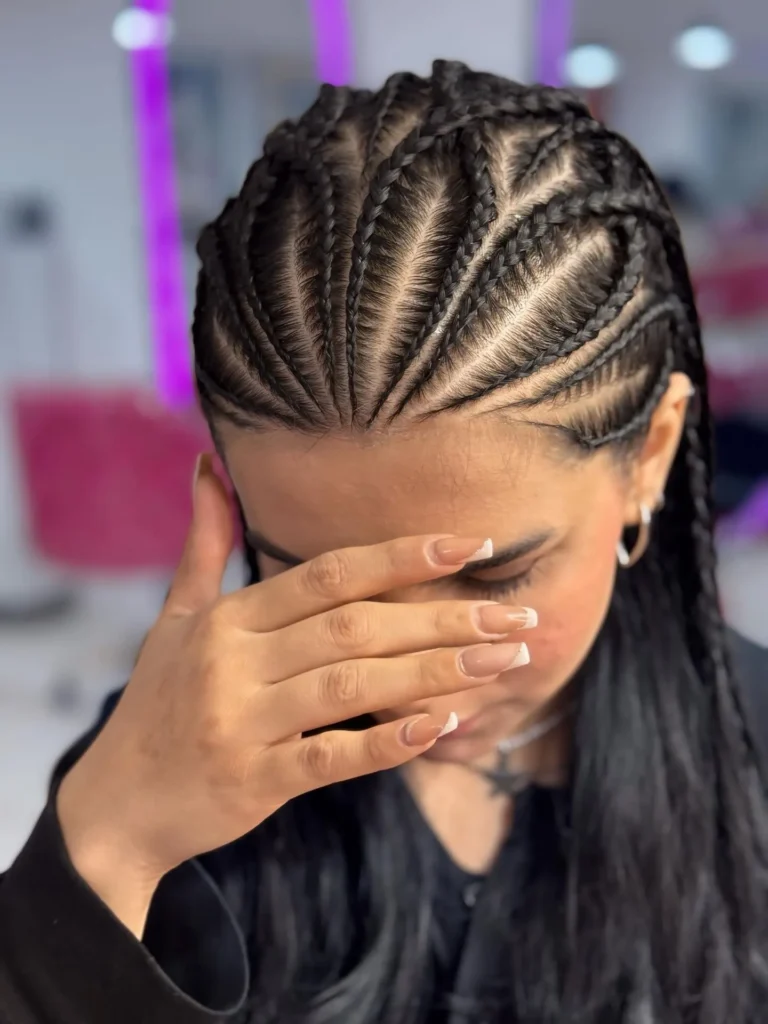
9. Tribal Cornrow Braids
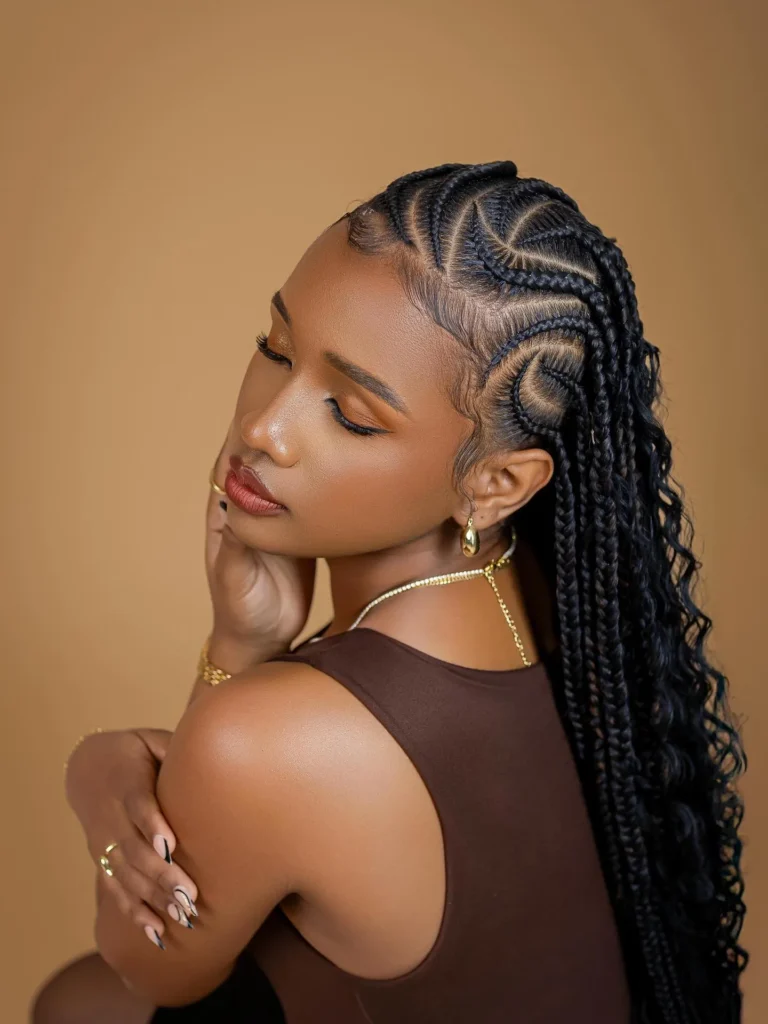
Source: caymakeupartist
Patterns closer to the scalp can completely shift the overall style. Tribal cornrows focus on detailed parting and direction, forming lines and curves that stand out even before the braiding begins.
Precision matters more than speed here. Each section needs to be clean so the design remains visible. Once braiding starts, keeping tension even ensures the rows stay consistent from front to back without gaps.
Edges should not be pulled too tight, especially near the hairline. That can lead to discomfort over time. Choosing a pattern that follows natural growth direction helps the style last longer without needing frequent adjustments.
Read More : 23 Braided Updo Natural Hair Styles That Pop
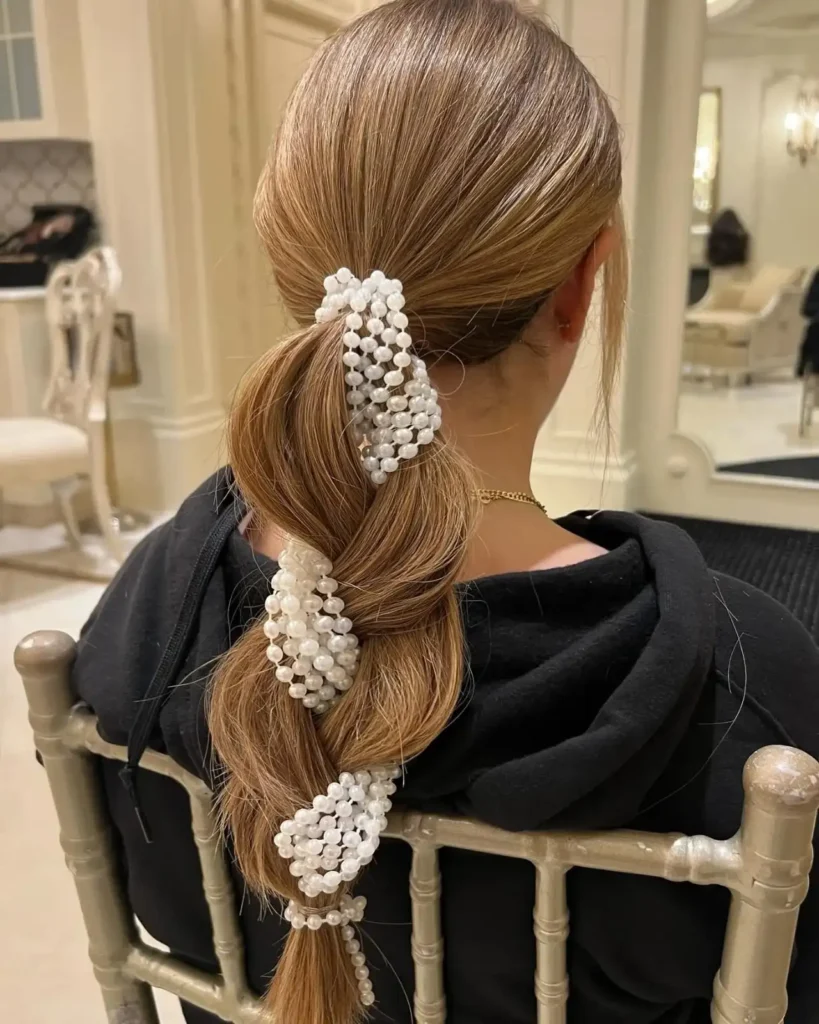
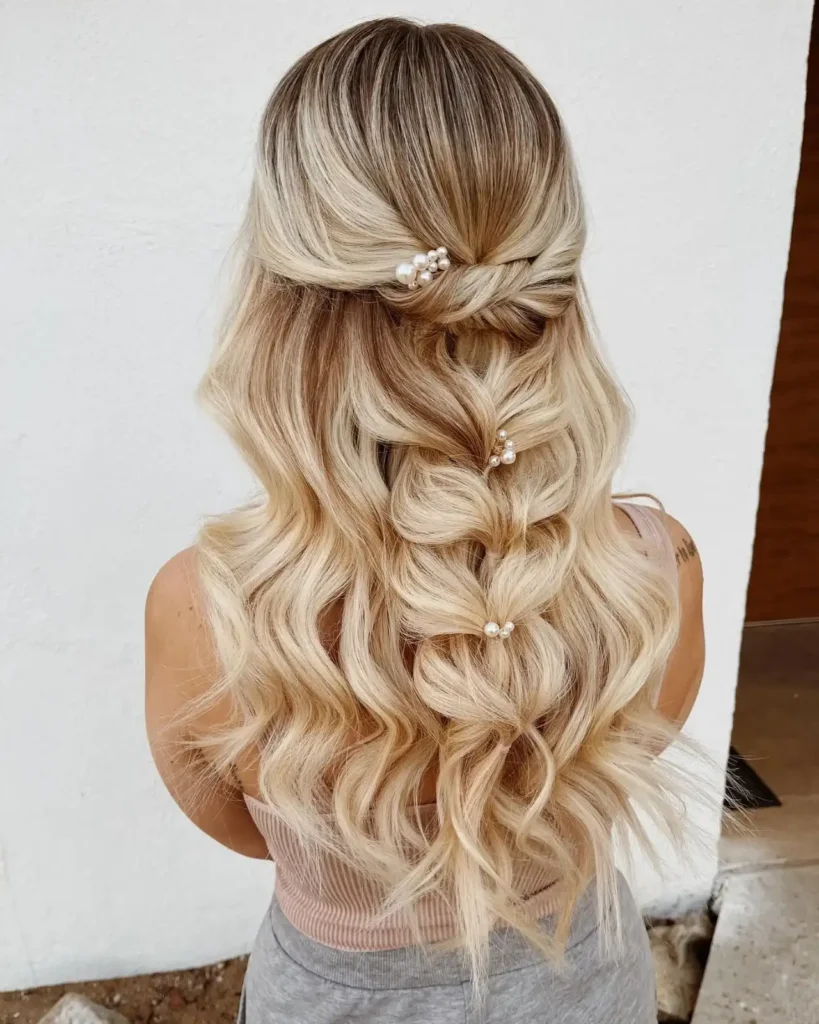
10. Pearl Bubble Braid
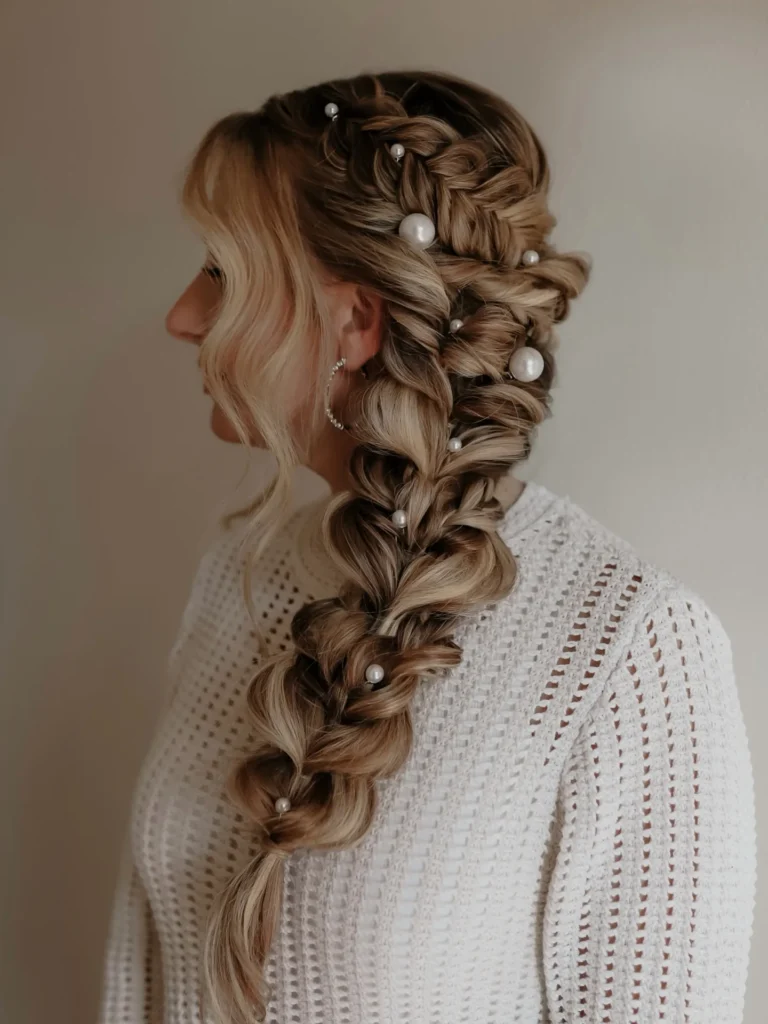
Source: rebecca.murphy.beauty
Small sections tied along the length can completely change how the braid reads from a distance, with evenly spaced ties forming rounded segments that stand out more clearly when accessories are placed carefully between each section.
Spacing must stay consistent from top to bottom, since uneven gaps quickly break the visual flow, while choosing lightweight pieces prevents downward pulling and keeps each section defined without flattening the rounded shape.
11. Butterfly Pull Braid
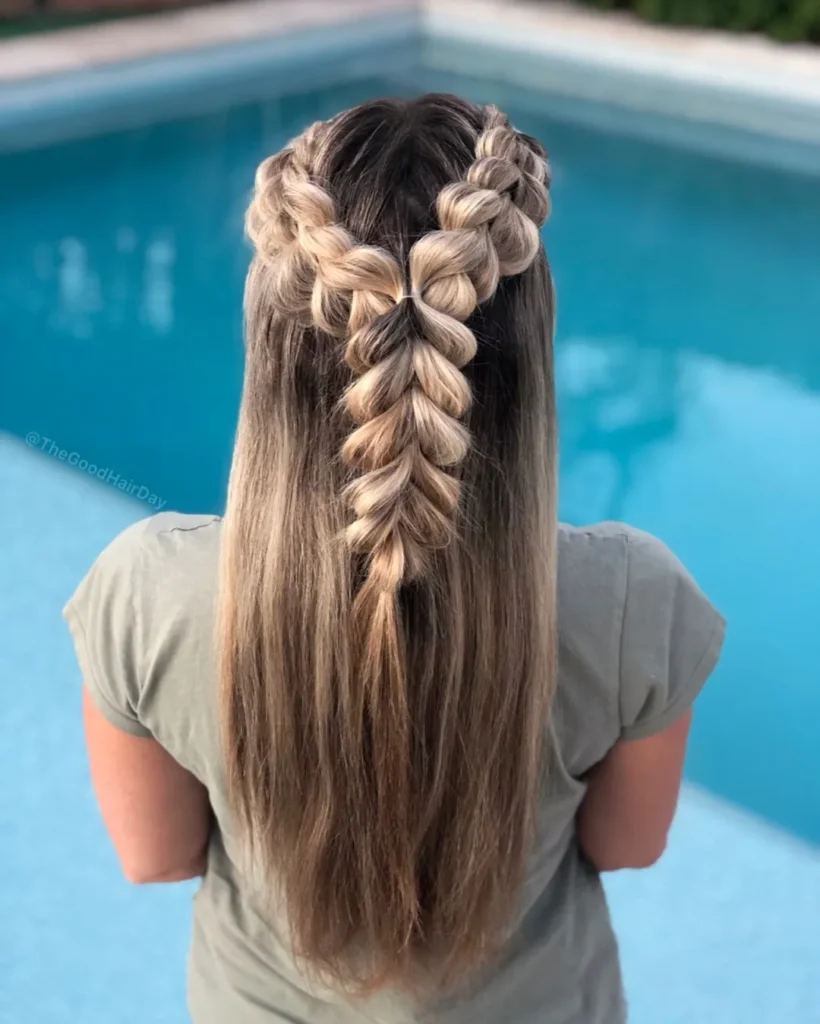
Source: thegoodhairday
Sections opened gently across the braid give it that soft, winged shape. The butterfly pull braid builds from a structured base, then expands outward, creating a fuller appearance without needing extra hair or extensions.
The key is timing when to pull sections apart. Doing it gradually after completing the braid keeps the structure intact. If expanded too early, the pattern weakens and becomes uneven along the length.
Focus on the middle sections more than the ends. That’s where volume shows best. Avoid pulling near the roots, or the base starts to loosen, which affects how long the braid holds its shape.
12. French Curly Braids
Source: losmoeer_hair
Curly ends paired with braided sections bring contrast that feels more dynamic than fully braided styles. The structure stays controlled at the top, while the loose curls at the bottom shift freely with movement.
Sectioning needs attention before starting. Clean parts help the braid transition smoothly into curls without looking disconnected. Using smaller sections keeps the finish lighter and prevents the style from appearing too heavy near the ends.
Moisture matters here more than with straight styles. Dry curls lose shape quickly, affecting the overall finish. Light hydration keeps the ends defined, while avoiding heavy products prevents buildup near the braided sections.
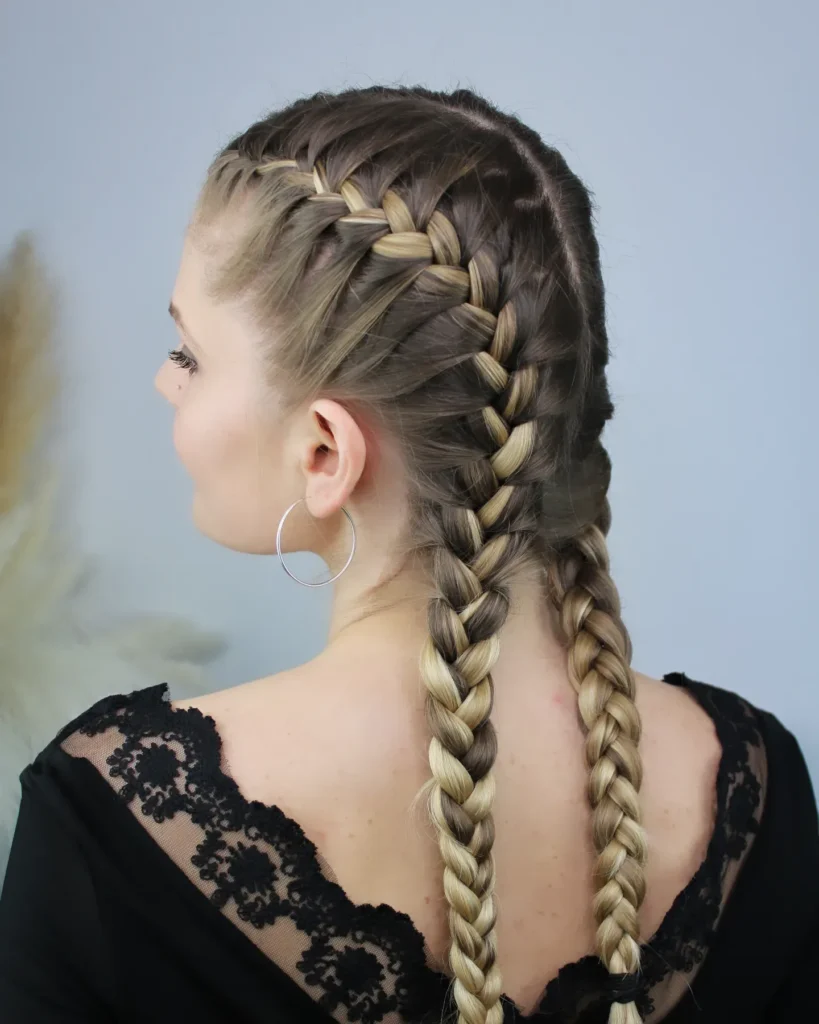
13. Criss Cross Dutch Braid
Source: thegoodhairday
Crossing sections while working under instead of over gives this braid a raised, layered finish. The criss cross detail adds more depth, making the pattern stand out clearly across the scalp without needing extra accessories or complex steps.
Sectioning plays a major role before braiding even begins. Each crossing needs equal spacing so the pattern stays visible. Uneven parts break the design quickly, especially near the front where the eye focuses first.
Keep movements controlled rather than fast. Rushing causes overlaps that blur the structure. Maintain steady tension throughout so each crossed section sits clearly on top instead of blending into the rest.
14. Bubble Ponytail
Source: sarahshipper
Hair gathered into a ponytail can feel basic at first, yet dividing it into sections transforms the appearance by forming rounded segments along the length, creating volume without relying on traditional braiding or detailed weaving techniques.
Elastic placement controls the entire outcome, so keeping spacing even maintains balance, while gently expanding each section after securing helps retain the rounded shape instead of compressing it too tightly.
15. Braided Low Ponytail
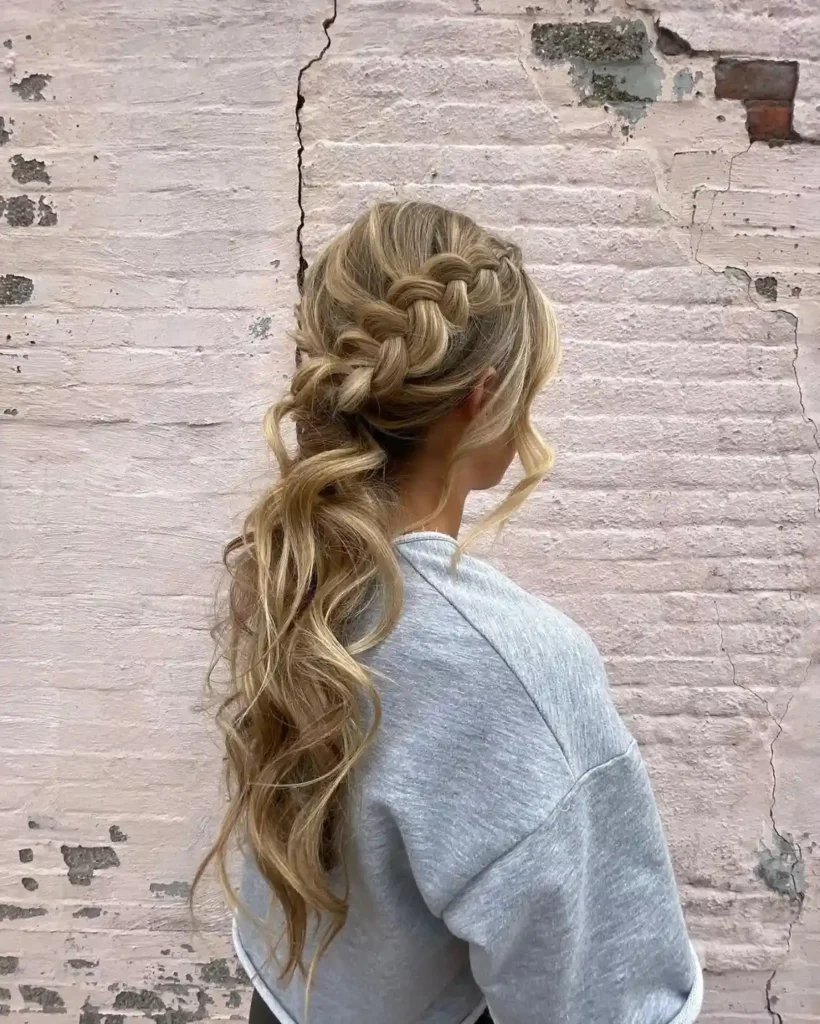
Source: hair.by.theresa
Combining a braid with a low ponytail keeps the structure simple while still adding detail. The braid leads into the ponytail smoothly, making the transition look connected rather than two separate styles.
Placement slightly below the nape keeps the style grounded. If positioned too low, it starts to sag; too high, and it loses that relaxed balance. The braid should guide the direction instead of sitting stiff above the ponytail.
Secure the base firmly before braiding downward. A loose starting point affects the entire structure. Let the ponytail remain slightly free so the style doesn’t feel overly tight or restricted.
16. Parallel Mini Braids
Source: tressbeauty.ae
Thin braids placed side by side can shift the entire vibe without taking over the full hairstyle. Parallel mini braids create clean lines that run in the same direction while leaving the rest of the hair open.
Equal spacing between each braid keeps the pattern sharp. Uneven gaps break the effect quickly. Avoid making them too tight near the roots, so the scalp stays comfortable through longer wear.
17. Classic Boxer Braids
Source: nia_hairstyles_
Two braids running from the front toward the back bring a balanced, symmetrical structure. Boxer braids keep everything controlled while still showing detail, making them practical for active days without constant readjustment.
Each side should mirror the other in section size and direction. If one side differs even slightly, the imbalance becomes noticeable quickly. Starting both sides at the same point helps maintain consistency throughout the braid.
Keep tension even from front to end so the braids don’t loosen halfway through. Avoid pulling too tight near the hairline, as that can cause discomfort over time.
18. Crystal Wrap Braid
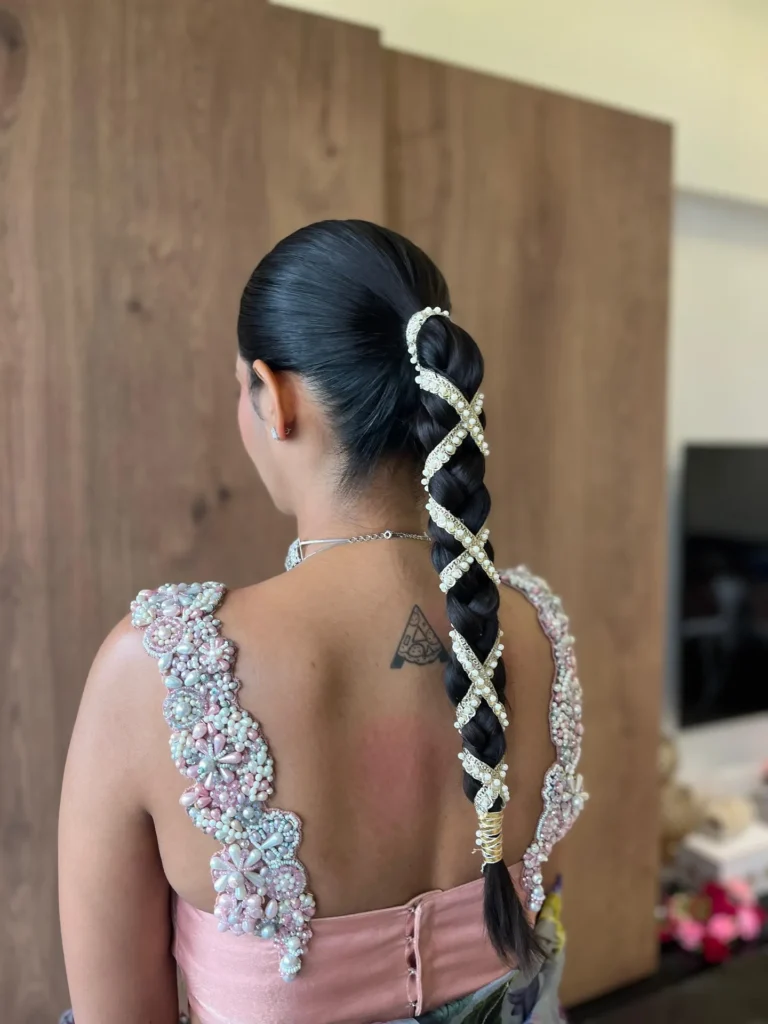
Source: hairby_jinalpatel_
Small accessories wrapped along a braid can shift the entire appearance without changing the base technique. The crystal wrap braid uses delicate pieces placed along sections, giving a refined finish that stands out subtly.
Placement should follow the natural curve of the braid rather than sitting randomly. When positioned with intention, each wrap highlights the structure instead of hiding it. Spacing them evenly keeps the design from looking cluttered.
Choose lightweight pieces that won’t drag sections downward. Heavy additions loosen the braid faster. Secure each wrap properly so it stays in place without needing frequent adjustments during the day.
19. Radial Cornrow Pattern
Source: shadiaa_beauty_salon
Cornrows arranged in circular or radiating directions shift attention toward the center of the head. The radial pattern forms a structured design that stands out clearly, even before noticing the braiding technique itself.
Sectioning determines how clean the pattern appears. Each part should follow a consistent curve so the lines connect smoothly. Any break in direction becomes noticeable, especially near the crown where all sections meet.
Keep tension balanced across every row to maintain symmetry. Avoid pulling tighter in one direction, or the pattern starts to distort. Following the natural curve of the head helps the design stay intact longer.
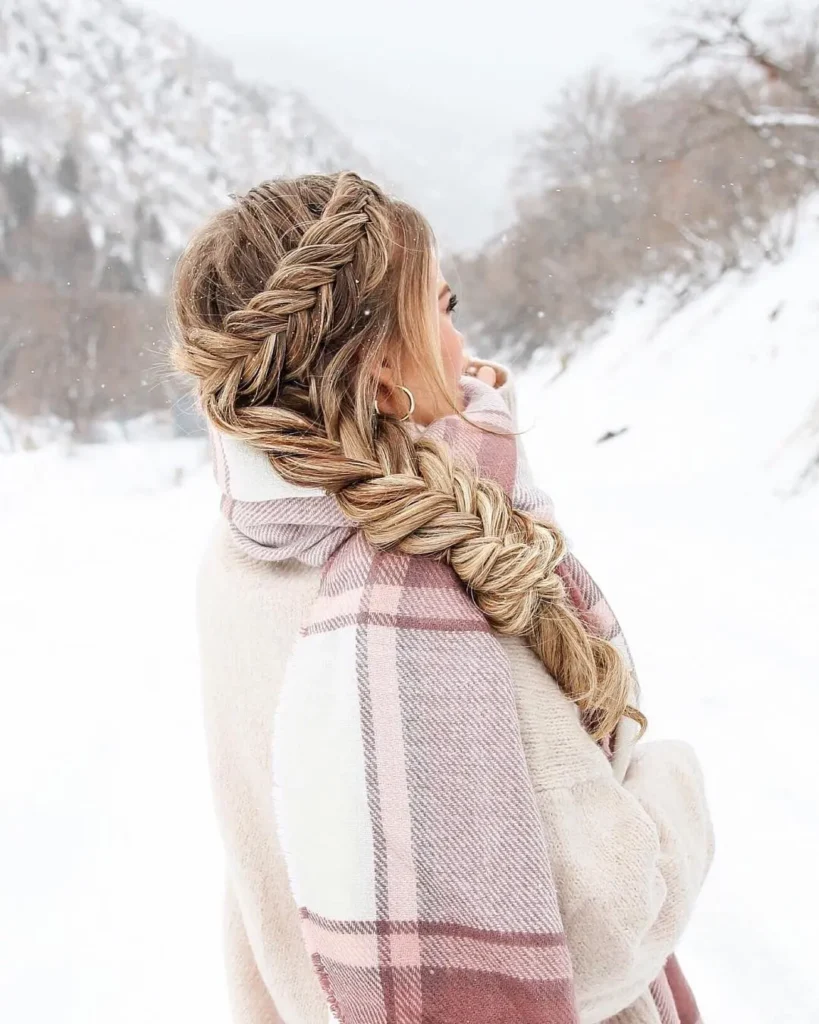
20. Rope Twist Braid
Source: stephaniegardnerstyles
From experience, two-strand twists can hold shape better than traditional braids when done with consistent tension. The rope twist braid forms by wrapping sections around each other, giving a spiral effect that stands out without complex weaving.
Direction matters here more than people expect. Each strand should twist in the same direction before crossing over. If not, the braid starts to unravel quickly, especially near the ends where tension naturally reduces.
Secure the ends properly before releasing your grip. A loose finish causes the entire twist to open up. Keeping the twist tight but not strained helps maintain the spiral form throughout the day.
21. Messy Braid
Source: rakshita_hairdo
Not every braid depends on clean lines to stand out, since this style works by breaking those expectations slightly, allowing sections to fall unevenly while still holding a loose base that keeps everything connected without appearing overly controlled.
Volume builds after finishing by pulling sections apart carefully, yet maintaining a base shape underneath prevents it from turning into loose hair, while leaving small irregularities untouched preserves the character of the braid.
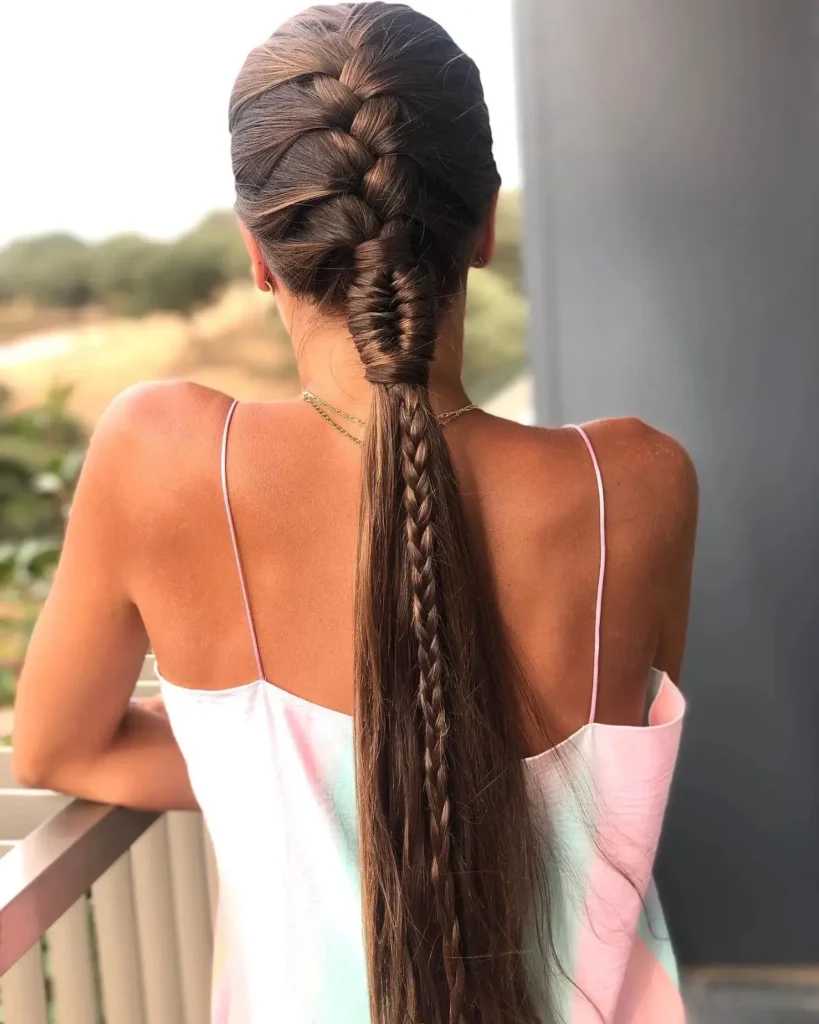
22. Slim Fishtail Braid
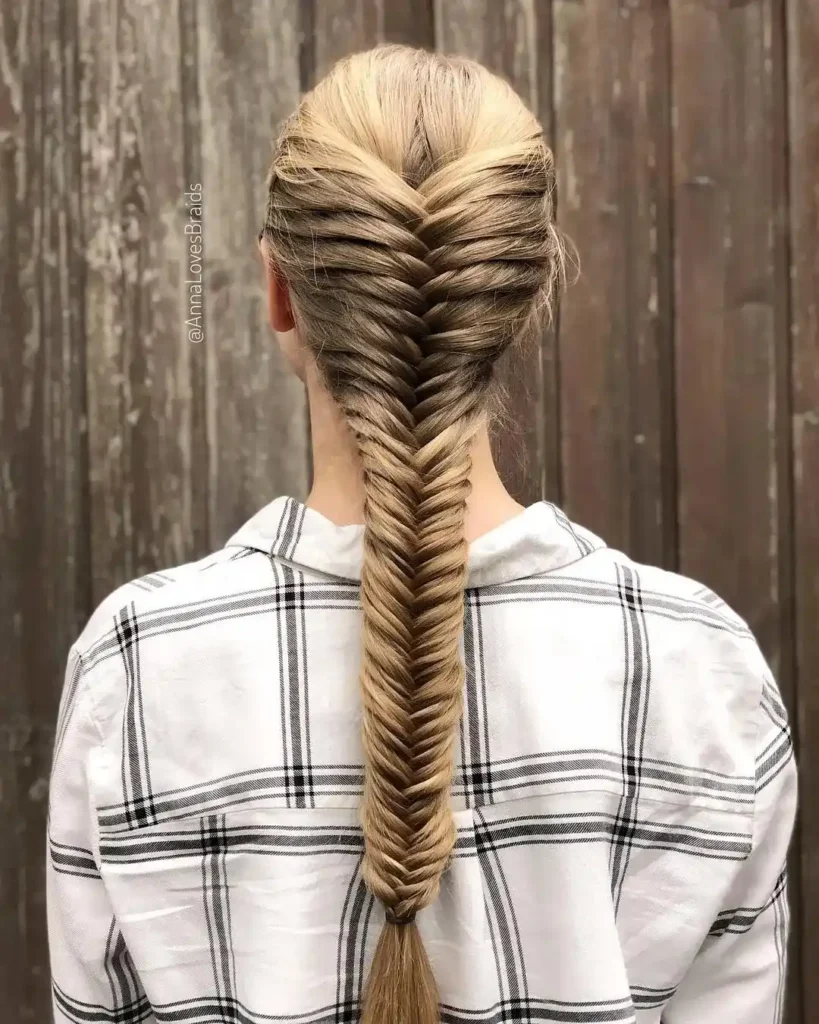
Source: annalovesbraids
Thin sections woven carefully can shift how detailed a braid appears. The slim fishtail uses smaller pieces, forming a tighter pattern that runs neatly along the length without appearing bulky or heavy.
Control comes from patience rather than speed. Each strand should be picked evenly from both sides so the braid stays balanced. Uneven sections quickly disrupt the pattern, especially in the middle where detail matters most.
Keep fingers close to the braid while working to maintain tension. Letting sections hang loose before crossing causes gaps that break the clean structure.
23. Ladder Braid
Source: lily_tranquillityhair
A braid that forms a visible ladder pattern instantly stands apart from standard styles. One side holds the base while the other creates looped sections, giving a layered effect that runs clearly along the hair.
Spacing between loops needs to stay consistent from start to finish. If one section stretches more than the others, the ladder pattern becomes uneven and loses its visual rhythm.
Work steadily rather than quickly when forming each loop. That helps maintain control and keeps the pattern aligned along the length without shifting direction.
Keep the base braid firm so the looped side has support. If the foundation weakens, the ladder effect collapses and the design starts blending into the rest of the hair.
24. Pull Through Braid
Source: suvisland
Not all braids rely on weaving. The pull through version uses sections tied and flipped through each other, forming a chain-like pattern that appears fuller compared to traditional braiding methods.
Section size plays a major role in how defined the braid looks. Larger sections create bold shapes, while smaller ones give a more detailed appearance. Keeping sizes consistent helps maintain a clean visual flow.
Avoid pulling sections too loosely when flipping them through. That causes gaps and breaks the structure. Controlled tension keeps the braid looking full without losing its shape.
25. Halo Braid
Source: kristinagasperasmua
Wrapping a braid around the head changes how the entire hairstyle is perceived. The halo braid circles from one side to the other, forming a continuous line that keeps hair lifted and away from the neck.
Placement should follow the natural curve of the head rather than sitting too far forward or back. When aligned properly, it frames the face without covering important features or shifting out of place.
Secure the braid gradually as you wrap it instead of pinning everything at once. This keeps the shape even and prevents sections from loosening throughout the day.
Choosing the Right Pattern
Before picking a braid, it helps to pause and think about what your hair actually needs throughout the day. Some styles hold better during long hours, while others are more suited for quick styling or relaxed settings.
If your routine includes movement or long wear, structured options tend to stay in place longer without constant fixing. Lighter patterns, on the other hand, work better when comfort and flexibility matter more than control.
Here’s a simple way to match braid types with your hair:
Hair Type | Recommended Style | Effort Level |
|---|---|---|
Fine / Thin | Bubble Braid | Low |
Thick / Coarse | Dutch Braid | Medium |
Curly / Kinky | Tribal Cornrows | High |
Short Length | Side French Braid | Medium |
Maintenance Essentials
Keeping a braid in good shape doesn’t require a complicated routine, but a few small habits can make a noticeable difference over time. The goal is to reduce friction and keep the strands in place without constant reworking.
- Silk Pillowcase: Reduces friction and helps maintain the braid overnight
- Edge Control: Keeps the front area smooth and more defined
- Dry Shampoo: Adds grip when hair feels too clean or slippery
- Clear Elastics: Secure ends without drawing attention
These simple tools help extend the life of your braid without needing a full redo.
Preparation Steps
Getting the hair ready before starting often determines how well the braid turns out. Rushing into it without preparation usually leads to uneven sections and loose strands that are harder to manage later.
Start by detangling from the ends upward to avoid breakage. A light leave-in conditioner can help control strands without making them too slippery, which keeps the weaving process more controlled.
Working with slightly lived-in hair instead of freshly washed strands often provides better grip, making the braid easier to handle and more stable throughout the day.
Quick Fixes for Braids
Even a well-done braid can shift slightly as the day goes on, so knowing how to fix small issues quickly helps maintain the overall appearance without starting over.
If a braid feels too tight, gently lifting sections with the end of a comb can ease the tension without ruining the pattern. For flyaways, a small amount of hairspray applied with a toothbrush keeps things controlled without stiffness.
When the end begins to loosen, re-securing it early prevents the entire braid from unraveling, saving both time and effort.
FAQs
1. Which braid lasts the longest?
Cornrows and tightly woven styles usually last longer since they stay close to the scalp and hold their shape well.
2. How do I choose the right braid for my hair type?
Pick based on thickness, length, and daily routine, lighter hair works better with simple patterns, while thicker hair holds detailed styles well.
3. Can braids damage hair?
Only when pulled too tight or worn too long; keeping tension balanced helps avoid breakage.
4. Are braids suitable for short hair?
Yes, styles like side braids or mini braids work well even with shorter lengths.
5. How can I make my braid look fuller?
Gently pulling sections apart after finishing can add volume without changing the overall shape.
Conclusion
Braids are more than just a practical way to manage hair during a busy day. They reflect personal style and can shift how you carry yourself without requiring a complete transformation.
Trying different patterns over time helps you understand what suits your routine, your hair type, and your comfort level. Some styles will become everyday choices, while others will remain occasional favorites.
Once you find what works, everything starts to feel easier.
Own your style and let your hair do the talking.